TensorFlow2 Python深度学习 - 卷积神经网络示例-使用MNIST识别数字示例
锋哥原创的TensorFlow2 Python深度学习视频教程:
https://www.bilibili.com/video/BV1X5xVz6E4w/
课程介绍

本课程主要讲解基于TensorFlow2的Python深度学习知识,包括深度学习概述,TensorFlow2框架入门知识,以及卷积神经网络(CNN),循环神经网络(RNN),生成对抗网络(GAN),模型保存与加载等。
TensorFlow2 Python深度学习 - 卷积神经网络示例-使用MNIST识别数字示例
MNIST数据集介绍
MNIST(Modified National Institute of Standards and Technology)数据集是一个常用于机器学习和深度学习领域的经典数据集,特别是在图像识别任务中。它由美国国家标准与技术研究院(NIST)提供,广泛用于手写数字识别的研究和算法测试。
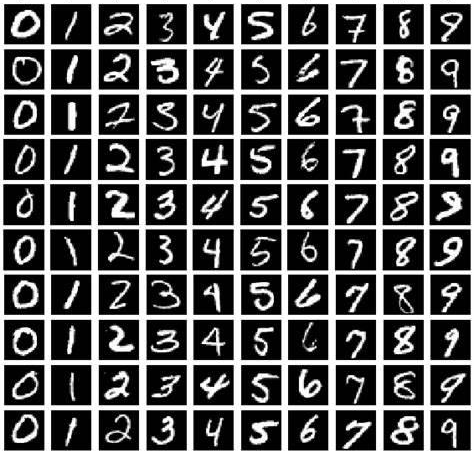
主要特点:
-
数据内容:
-
MNIST数据集包含了28x28像素的灰度图像,表示从0到9的手写数字。每个图像展示了一个单一的手写数字(0到9之一)。
-
数据集分为两个部分:
-
训练集:包含60,000个样本,用于训练模型。
-
测试集:包含10,000个样本,用于测试和评估模型的性能。
-
-
-
标签信息:
-
每个图像都有一个对应的标签,表示图像中手写数字的真实值(即0到9之间的某个数字)。
-
-
数据预处理:
-
图像的大小是28x28像素,灰度级别为0到255,其中0表示白色,255表示黑色。图像通常在输入神经网络之前会被标准化或者归一化。
-
-
应用领域:
-
手写数字识别:这是MINIST数据集的经典应用,用于测试各种机器学习算法的性能。
-
分类问题:可以用于对比不同模型(如支持向量机、神经网络、决策树等)的分类准确性。
-
卷积神经网络示例-使用MNIST识别数字示例
import tensorflow as tf
from keras import Input, layers
from matplotlib import pyplot as plt
# 1,加载MNIST数据集
(x_train, y_train), (x_test, y_test) = tf.keras.datasets.mnist.load_data()
print(x_train.shape, y_train.shape)
print(x_test.shape, y_test.shape)
print(x_train[0], x_train[0].shape)
print(y_train, y_train.shape)
# 2,数据预处理
x_train = x_train / 255.0 # 归一化
x_test = x_test / 255.0 # 归一化
print(x_train[0], x_train[0].shape)
# 将数据重塑为 (样本数, 高, 宽, 通道数) 的形状
print(x_train, x_train.shape)
x_train = x_train.reshape(x_train.shape[0], 28, 28, 1)
x_test = x_test.reshape(x_test.shape[0], 28, 28, 1)
print(x_train, x_train.shape)
# 3,构建CNN模型
model = tf.keras.models.Sequential([
Input(shape=(28, 28, 1)),
layers.Conv2D(32, (3, 3), activation='relu'), # 第一卷积层,卷积核大小3x3,滤波器数为32,ReLU激活函数
layers.MaxPooling2D((2, 2)), # 第一池化层,2x2最大池化
layers.Conv2D(64, (3, 3), activation='relu'), # 第二卷积层,卷积核大小3x3,滤波器数为64,ReLU激活函数
layers.MaxPooling2D((2, 2)), # 第二池化层,2x2最大池化
layers.Flatten(), # 展平层 将二维特征图展平为一维
layers.Dense(64, activation='relu'), # 全连接层,64个神经元,ReLU激活函数
layers.Dense(10, activation='softmax') # 输出层,10个神经元(对应数字0-9),softmax激活函数
])
# 4,模型编译
model.compile(optimizer='adam',
loss='sparse_categorical_crossentropy',
metrics=['accuracy']
)
# 5,模型训练
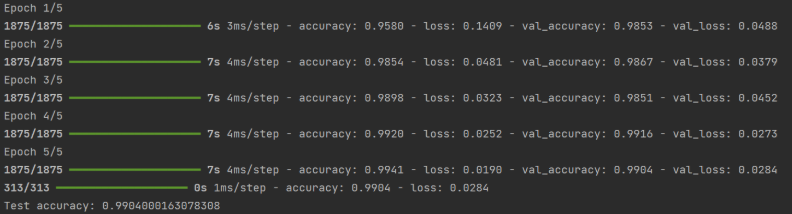
history = model.fit(x_train, y_train, epochs=5, validation_data=(x_test, y_test), verbose=1)
# 6,模型评估
test_loss, test_acc = model.evaluate(x_test, y_test)
print(f"Test accuracy: {test_acc}")运行结果:
可视化训练过程:
# 设置matplotlib使用黑体显示中文
plt.rcParams['font.family'] = 'Microsoft YaHei'
plt.plot(history.history['accuracy'], label='训练准确率')
plt.plot(history.history['val_accuracy'], label='验证准确率')
plt.xlabel('轮次')
plt.ylabel('准确率')
plt.legend()
plt.show()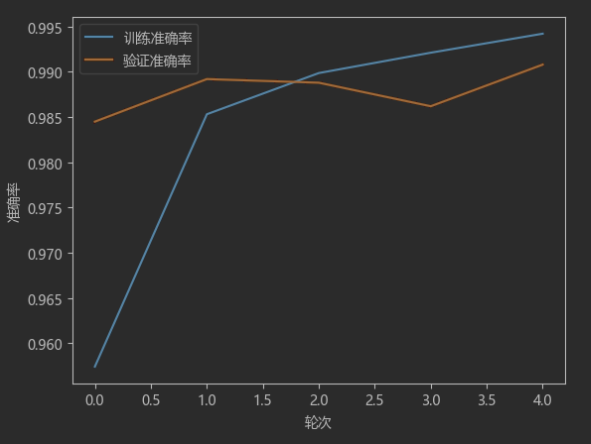
预测结果:
# 预测测试集中的一张图片
predictions = model.predict(x_test)
# 显示第一个预测结果
print(f"Predicted label: {predictions[0].argmax()}")
print(f"True label: {y_test[0]}")
# 显示第一张图片
plt.imshow(x_test[0].reshape(28, 28), cmap='gray')
plt.show()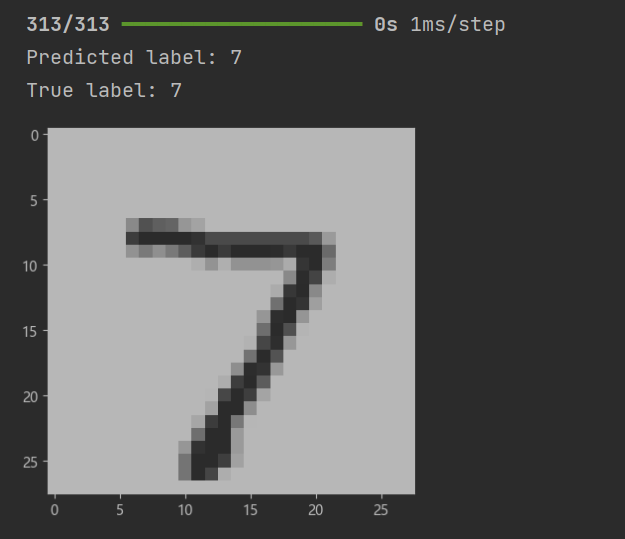

码道开发者社区,聚焦华为云码道 CodeArts 代码智能体,沉淀 Agent、Skill、鸿蒙开发实战内容,供开发者查阅资料、交流技术、分享工程实践
更多推荐


 4
4 0
0- 0


 已为社区贡献42条内容

所有评论(0)