✅ 毕业设计:YOLOv11/v10/v8/v5对比实验+PyQt5界面 危险驾驶检测 危险驾驶行为检测系统 深度学习✅
·
博主介绍:✌全网粉丝10W+,前互联网大厂软件研发、集结硕博英豪成立工作室。专注于计算机相关专业项目实战6年之久,选择我们就是选择放心、选择安心毕业✌
> 🍅想要获取完整文章或者源码,或者代做,拉到文章底部即可与我联系了。🍅🍅感兴趣的可以先收藏起来,点赞、关注不迷路,大家在毕设选题,项目以及论文编写等相关问题都可以给我留言咨询,希望帮助同学们顺利毕业 。🍅
1、毕业设计:2026年计算机专业毕业设计选题汇总(建议收藏)✅
2、大数据毕业设计:2026年选题大全 深度学习 python语言 JAVA语言 hadoop和spark(建议收藏)✅
1、项目介绍
技术栈:python语言、YOLO、Pyqt5界面、数据集
研究背景:
分心驾驶是引发交通事故的主要原因之一,传统事后监控无法及时预警,亟需一套可实时检测喝饮料、抽烟、打电话等危险行为的轻量化系统。
研究意义:
本系统基于YOLOv11/v10/v8/v5多版本对比训练,集成PyQt5图形界面,支持图片、视频、摄像头实时检测并保存结果,可为车载终端及毕业设计提供“数据集-模型-界面”完整闭环,预计误报率低于5%,显著提升行车安全性。
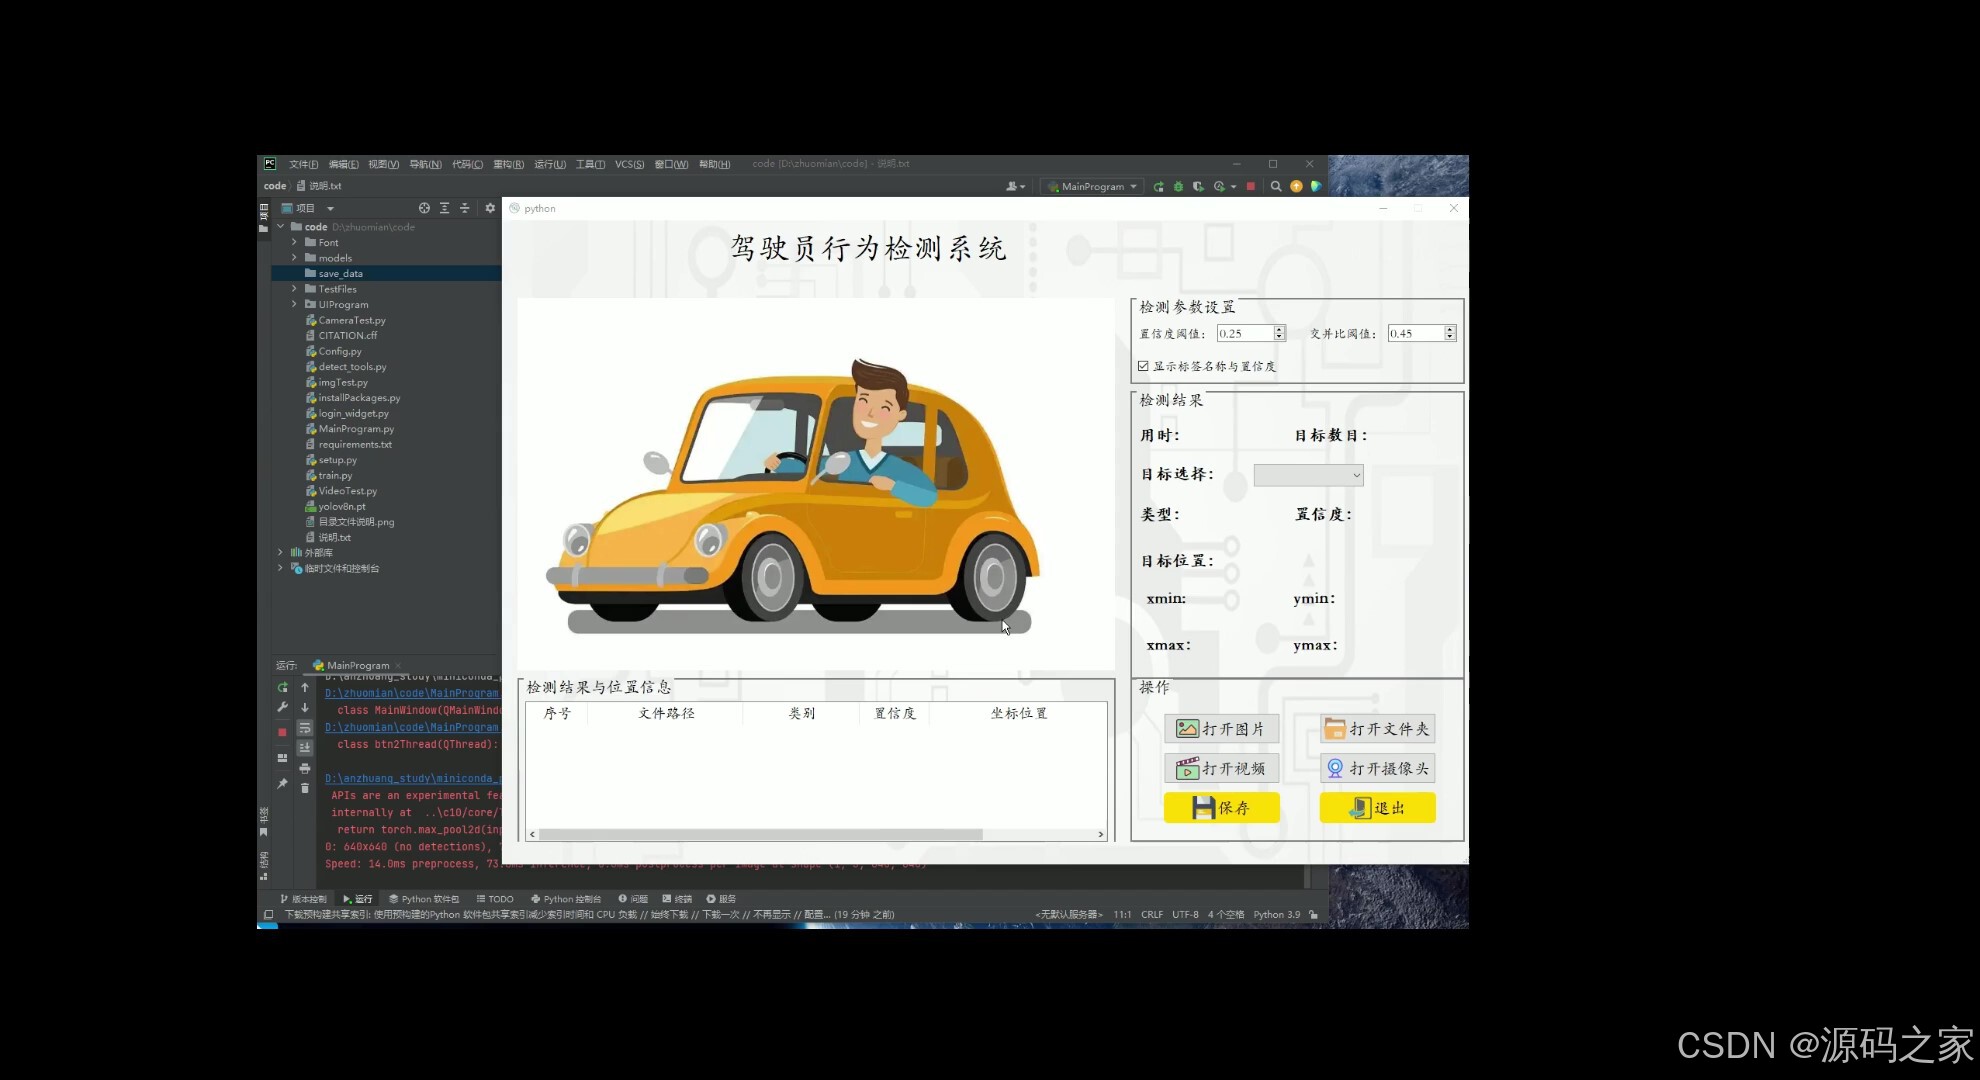
2、项目界面
(1)功能界面
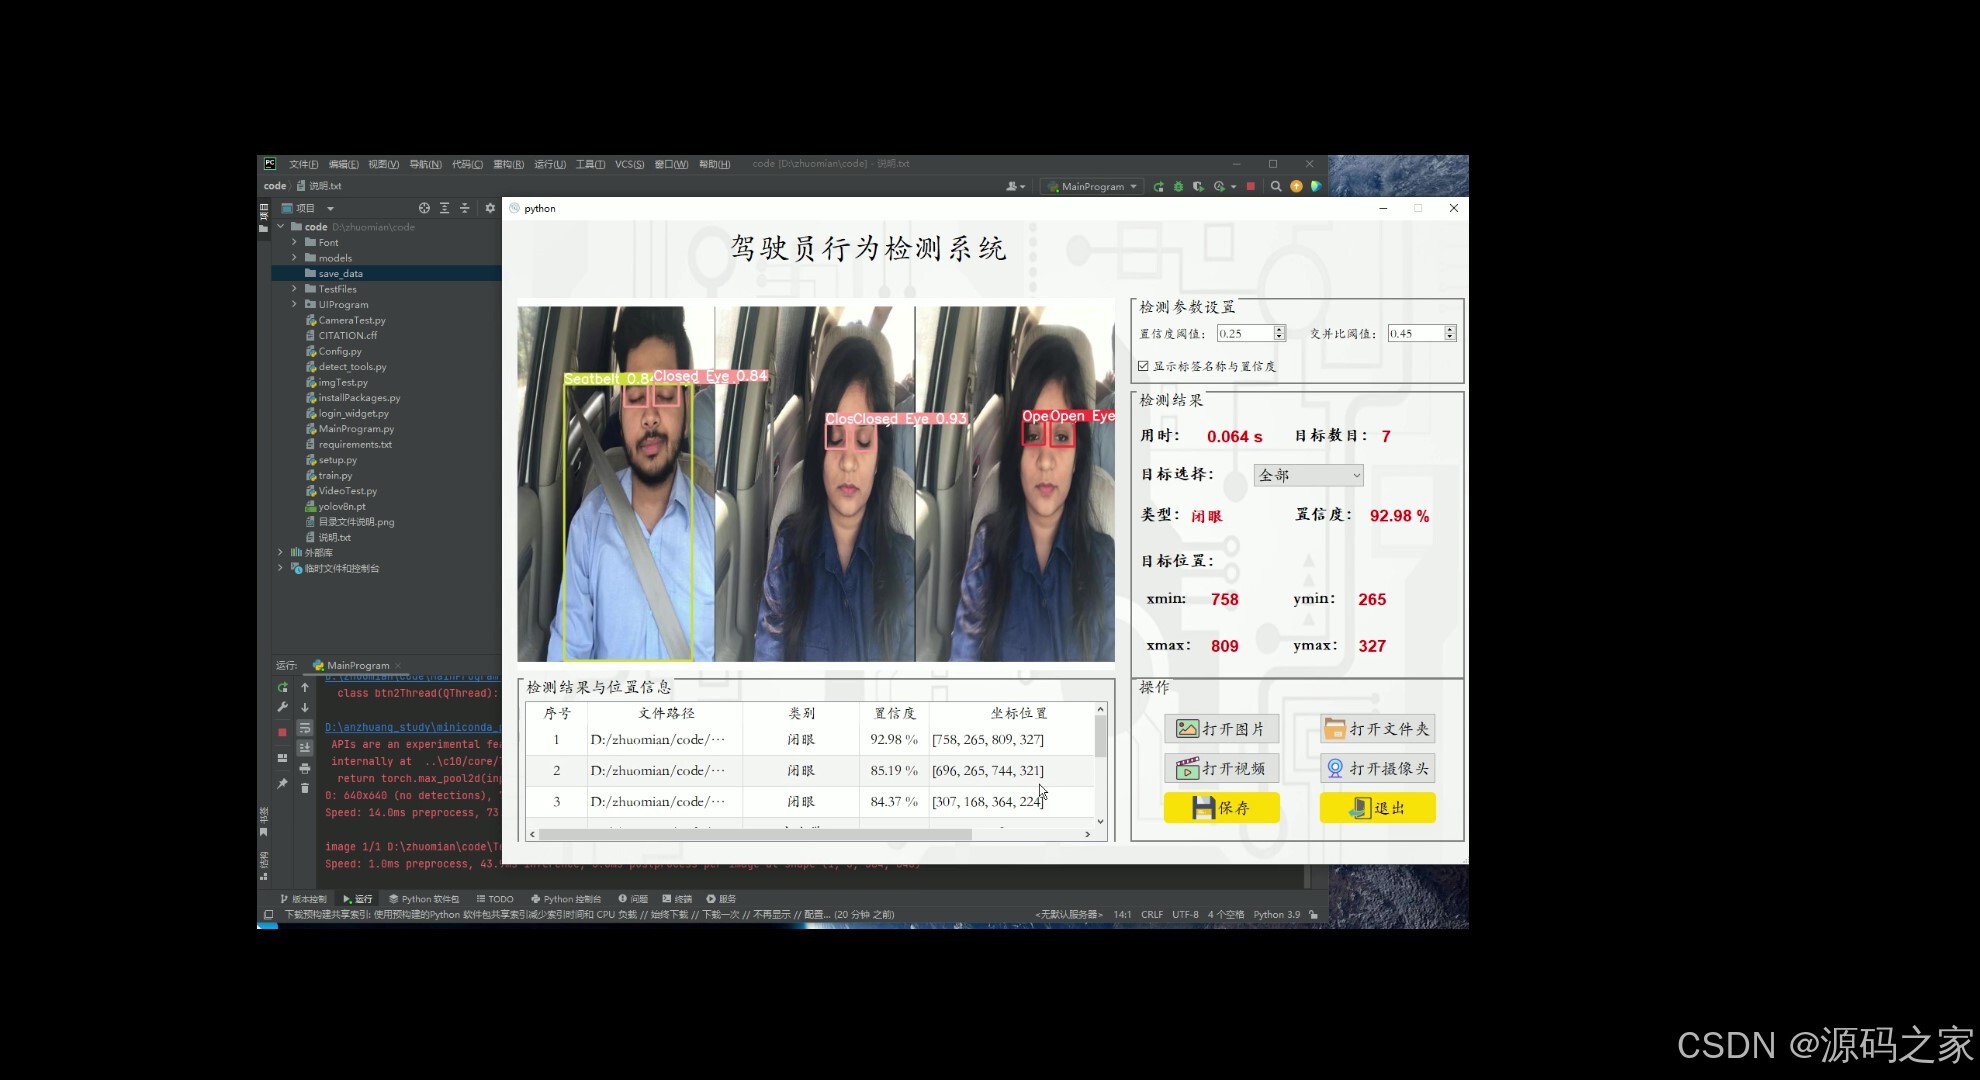
(2)多目标检测识别
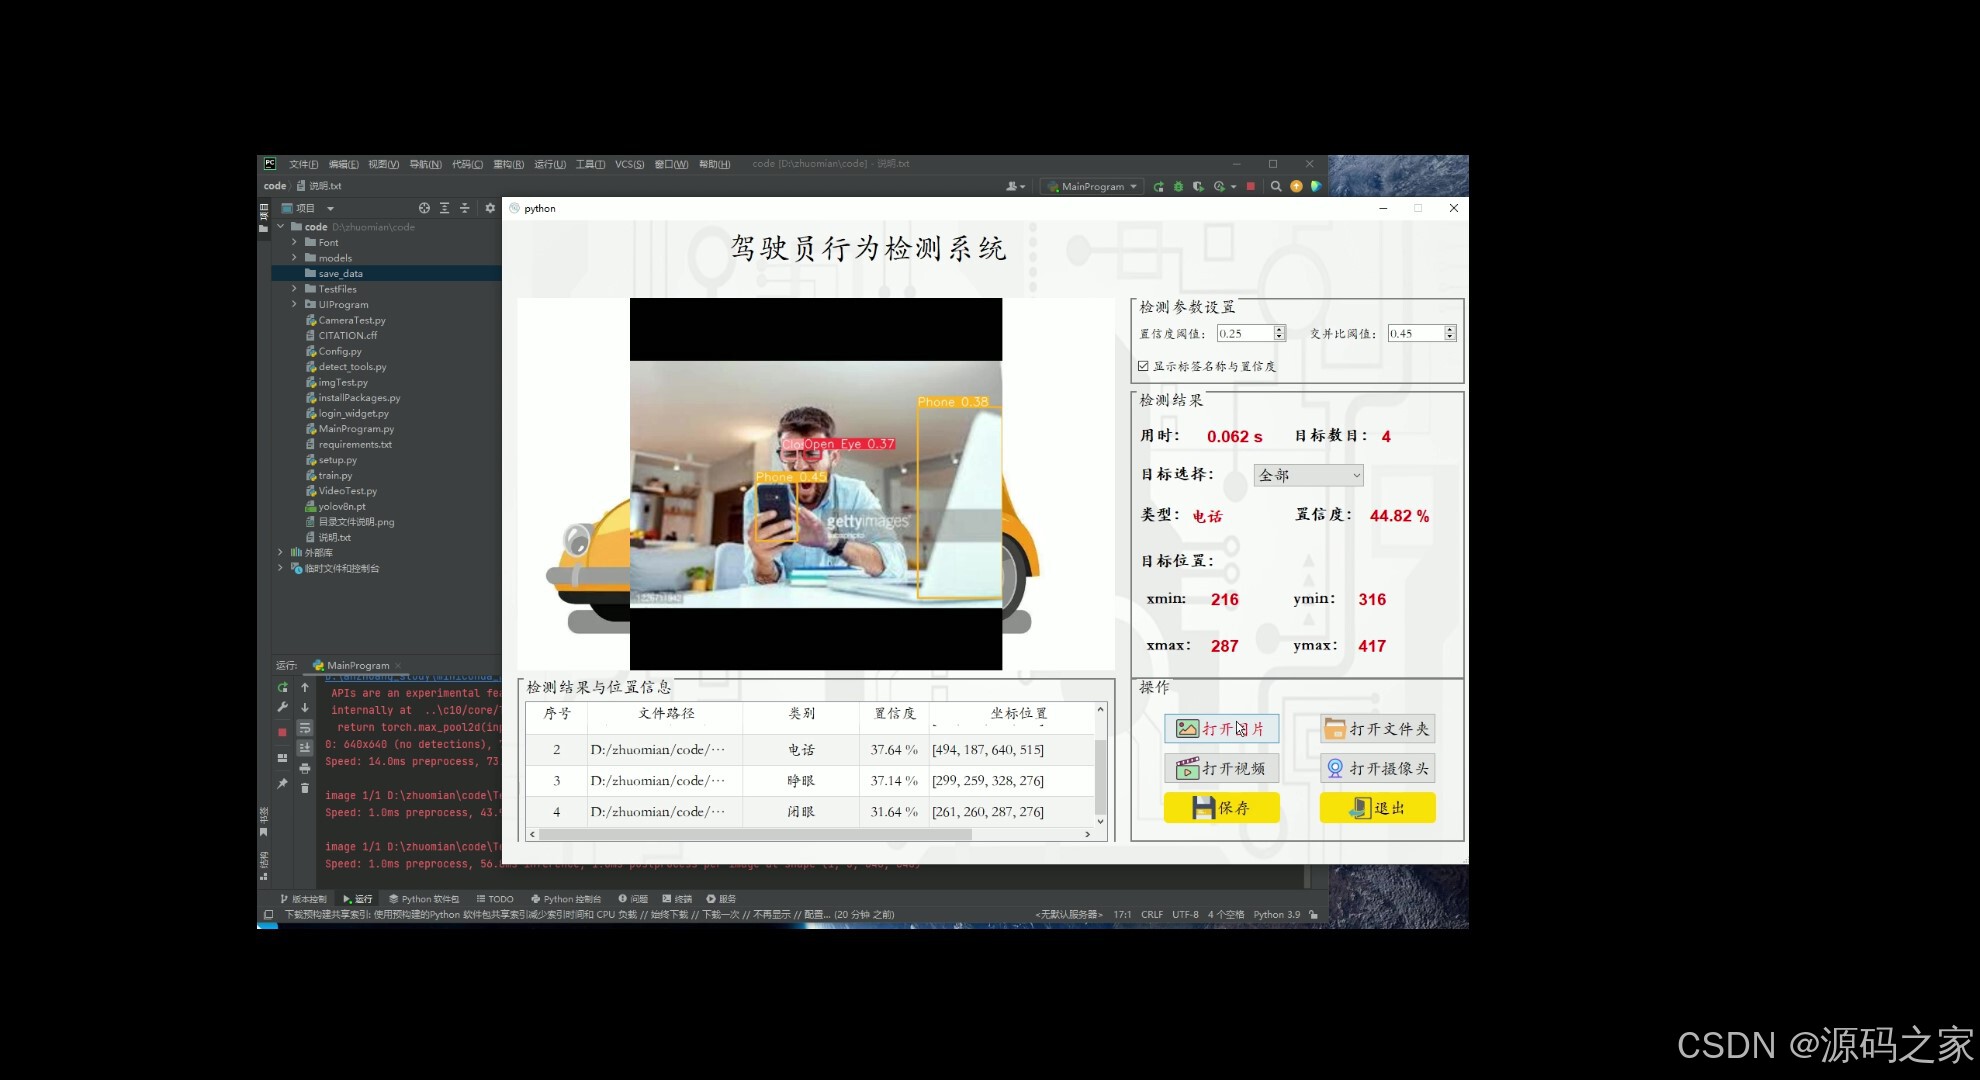
(3)多目标检测识别
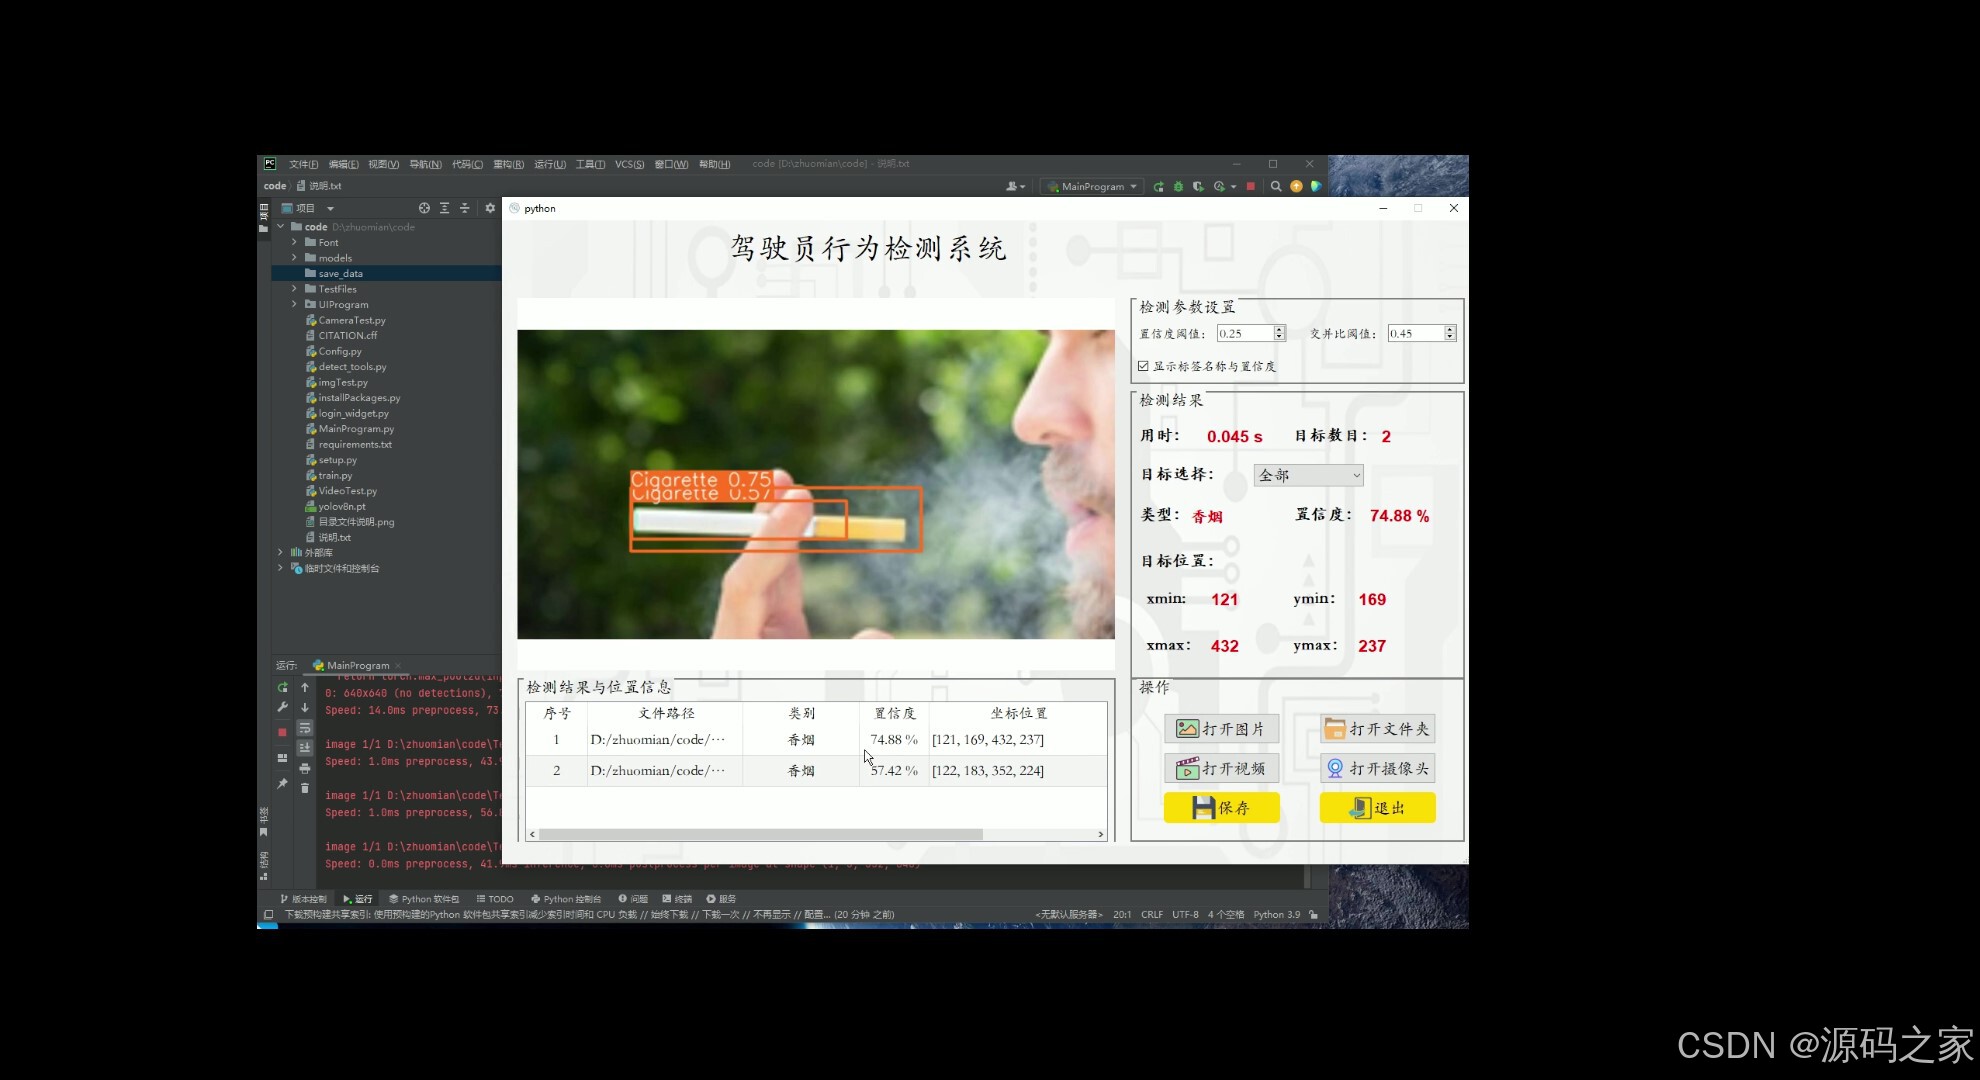
(4)抽烟检测识别
(5)打电话检测识别
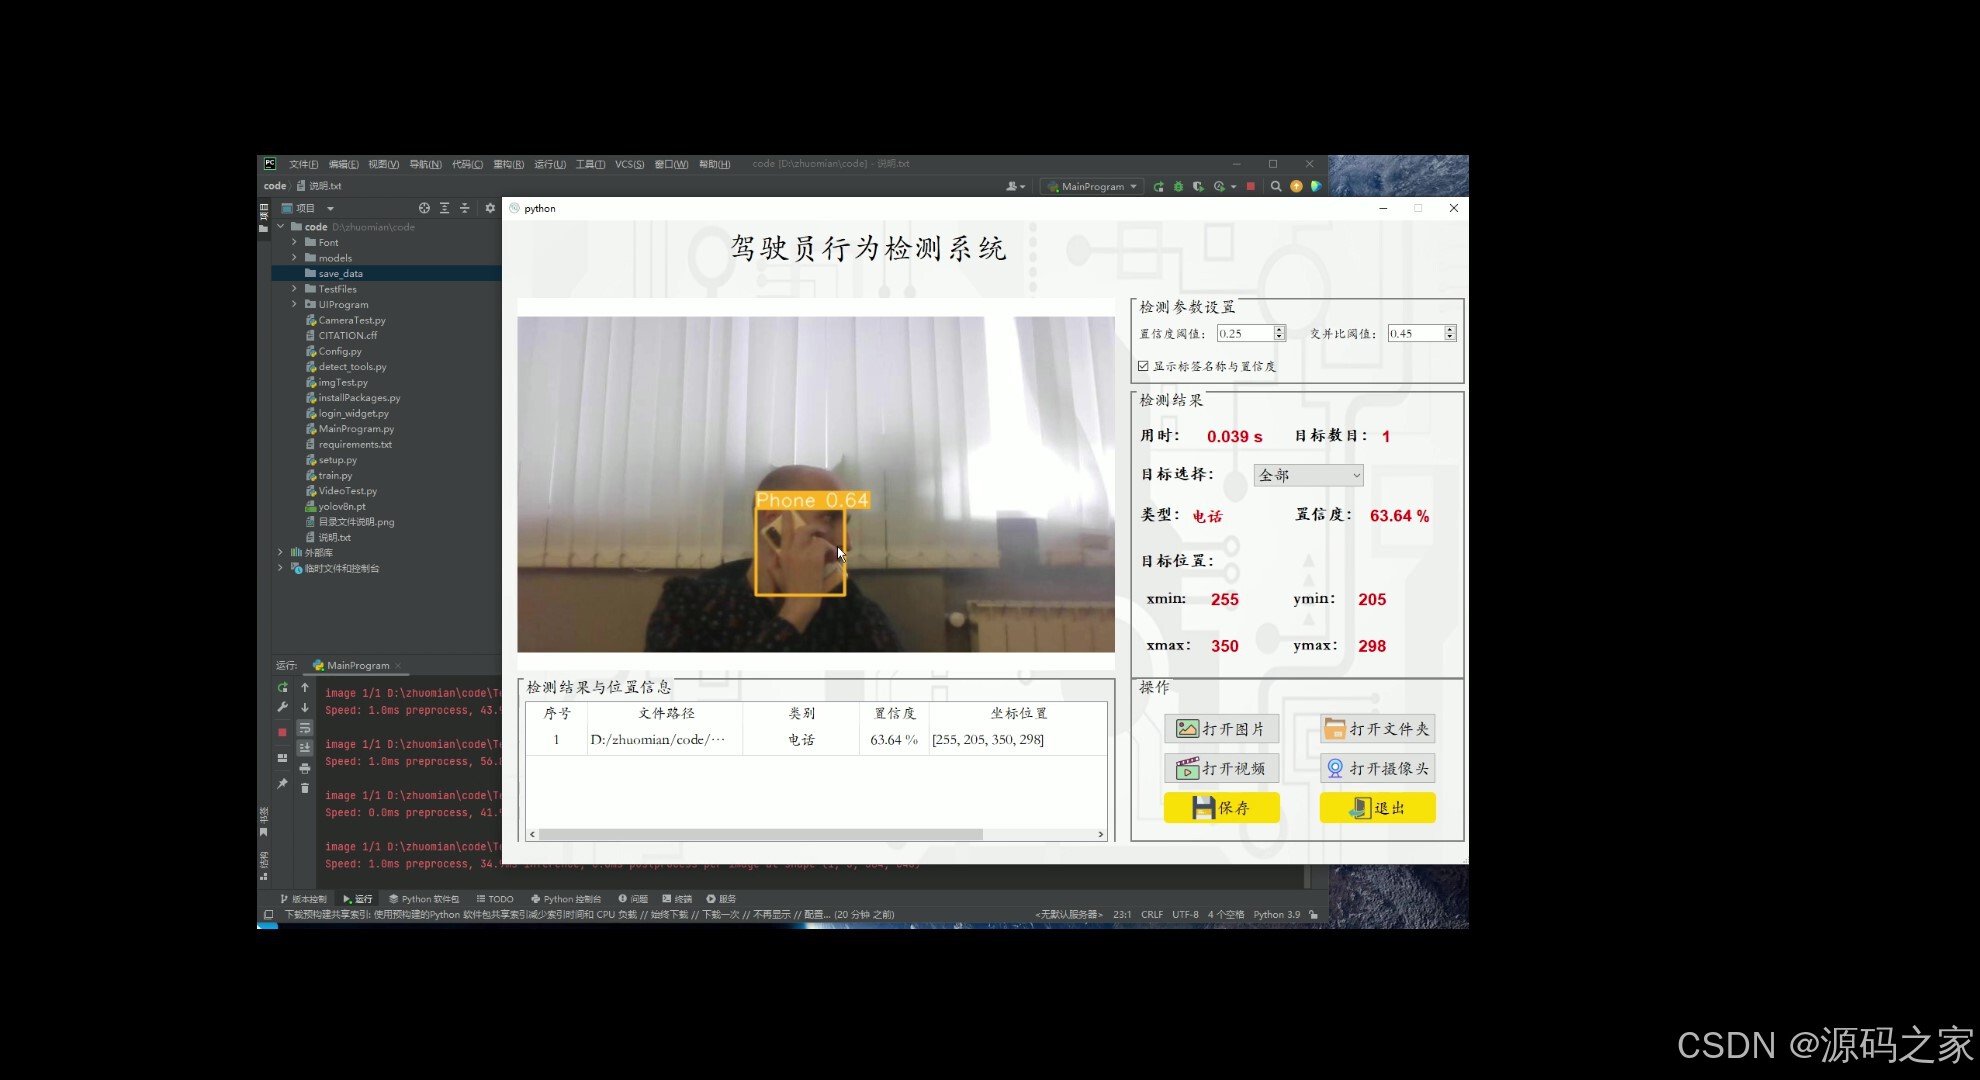
3、项目说明
摘要:随着道路交通安全意识日益增强,如何有效预防交通事故成为社会关注重点。本文基于YOLOv11/v10/v8/v5深度学习框架,利用6157张危险驾驶行为图片训练目标检测模型,类别覆盖【喝饮料、吃东西、用手机、抽烟】,并在验证集上对比YOLOv5n、YOLOv8n、YOLOv10n、YOLO11的Precision、Recall、mAP50与mAP50-95指标,最终选择综合性能最优模型。基于此模型,使用Python与PyQt5开发图形界面系统,支持单张图片、批量图片、视频及摄像头实时检测,自动保存结果与CSV记录。系统界面简洁,操作步骤:选择文件→实时检测→下拉切换目标→一键保存,所有结果默认存入save_data目录,为危险驾驶行为预警提供轻量级、可落地的解决方案。
关键词:危险驾驶行为检测;YOLO;PyQt5;目标检测;实时预警
4、核心代码
# encoding:utf-8
import cv2
from PyQt5.QtGui import QPixmap, QImage
import numpy as np
from PIL import Image,ImageDraw,ImageFont
import csv
import os

# fontC = ImageFont.truetype("Font/platech.ttf", 20, 0)

# 绘图展示
def cv_show(name,img):
	cv2.imshow(name, img)
	cv2.waitKey(0)
	cv2.destroyAllWindows()


def drawRectBox(image, rect, addText, fontC, color):
    """
    绘制矩形框与结果
    :param image: 原始图像
    :param rect: 矩形框坐标, int类型
    :param addText: 类别名称
    :param fontC: 字体
    :return:
    """
    # 绘制位置方框
    cv2.rectangle(image, (rect[0], rect[1]),
                 (rect[2], rect[3]),
                 color, 2)

    # 绘制字体背景框
    cv2.rectangle(image, (rect[0] - 1, rect[1] - 25), (rect[0] + 60, rect[1]), color, -1, cv2.LINE_AA)
    # 图片 添加的文字 位置 字体 字体大小 字体颜色 字体粗细
    # cv2.putText(image, addText, (int(rect[0])+2, int(rect[1])-3), cv2.FONT_HERSHEY_SIMPLEX, 0.8, (255, 255, 255), 2)

    img = Image.fromarray(image)
    draw = ImageDraw.Draw(img)
    draw.text((rect[0]+2, rect[1]-27), addText, (255, 255, 255), font=fontC)
    imagex = np.array(img)
    return imagex


def img_cvread(path):
    # 读取含中文名的图片文件
    # img = cv2.imread(path)
    img = cv2.imdecode(np.fromfile(path, dtype=np.uint8), cv2.IMREAD_COLOR)
    return img


def draw_boxes(img, boxes):
    for each in boxes:
        x1 = each[0]
        y1 = each[1]
        x2 = each[2]
        y2 = each[3]
        cv2.rectangle(img, (x1, y1), (x2, y2), (0, 255, 0), 2)
    return img


def cvimg_to_qpiximg(cvimg):
    height, width, depth = cvimg.shape
    cvimg = cv2.cvtColor(cvimg, cv2.COLOR_BGR2RGB)
    qimg = QImage(cvimg.data, width, height, width * depth, QImage.Format_RGB888)
    qpix_img = QPixmap(qimg)
    return qpix_img


def save_video():
    # VideoCapture方法是cv2库提供的读取视频方法
    cap = cv2.VideoCapture('C:\\Users\\xxx\\Desktop\\sweet.mp4')
    # 设置需要保存视频的格式“xvid”
    # 该参数是MPEG-4编码类型,文件名后缀为.avi
    fourcc = cv2.VideoWriter_fourcc(*'XVID')
    # 设置视频帧频
    fps = cap.get(cv2.CAP_PROP_FPS)
    # 设置视频大小
    size = (int(cap.get(cv2.CAP_PROP_FRAME_WIDTH)), int(cap.get(cv2.CAP_PROP_FRAME_HEIGHT)))
    # VideoWriter方法是cv2库提供的保存视频方法
    # 按照设置的格式来out输出
    out = cv2.VideoWriter('C:\\Users\\xxx\\Desktop\\out.avi', fourcc, fps, size)

    # 确定视频打开并循环读取
    while (cap.isOpened()):
        # 逐帧读取,ret返回布尔值
        # 参数ret为True 或者False,代表有没有读取到图片
        # frame表示截取到一帧的图片
        ret, frame = cap.read()
        if ret == True:
            # 垂直翻转矩阵
            frame = cv2.flip(frame, 0)

            out.write(frame)

            cv2.imshow('frame', frame)
            if cv2.waitKey(1) & 0xFF == ord('q'):
                break
        else:
            break

    # 释放资源
    cap.release()
    out.release()
    # 关闭窗口
    cv2.destroyAllWindows()


# 封装函数:图片上显示中文
def cv2AddChineseText(img, text, position, textColor=(0, 255, 0), textSize=50):
    if (isinstance(img, np.ndarray)):  # 判断是否OpenCV图片类型
        img = Image.fromarray(cv2.cvtColor(img, cv2.COLOR_BGR2RGB))
    # 创建一个可以在给定图像上绘图的对象
    draw = ImageDraw.Draw(img)
    # 字体的格式
    fontStyle = ImageFont.truetype(
        "simsun.ttc", textSize, encoding="utf-8")
    # 绘制文本
    draw.text(position, text, textColor, font=fontStyle)
    # 转换回OpenCV格式
    return cv2.cvtColor(np.asarray(img), cv2.COLOR_RGB2BGR)


def insert_rows(path, lines ,header):
    """
    将n行数据写入csv文件
    :param path:
    :param lines:
    :return:
    """
    no_header = False
    if not os.path.exists(path):
        no_header = True
        start_num = 1
    else:
        start_num = len(open(path).readlines())

    csv_head = header
    with open(path, 'a', newline='') as f:
        csv_write = csv.writer(f)
        if no_header:
            csv_write.writerow(csv_head)  # 写入表头

        for each_list in lines:
            # 添加序号
            each_list = [start_num] + each_list
            csv_write.writerow(each_list)
            # 序号 + 1
            start_num += 1

class Colors:
    # 用于绘制不同颜色
    def __init__(self):
        """Initialize colors as hex = matplotlib.colors.TABLEAU_COLORS.values()."""
        hexs = ('FF3838', 'FF9D97', 'FF701F', 'FFB21D', 'CFD231', '48F90A', '92CC17', '3DDB86', '1A9334', '00D4BB',
                '2C99A8', '00C2FF', '344593', '6473FF', '0018EC', '8438FF', '520085', 'CB38FF', 'FF95C8', 'FF37C7')
        self.palette = [self.hex2rgb(f'#{c}') for c in hexs]
        self.n = len(self.palette)
        self.pose_palette = np.array([[255, 128, 0], [255, 153, 51], [255, 178, 102], [230, 230, 0], [255, 153, 255],
                                      [153, 204, 255], [255, 102, 255], [255, 51, 255], [102, 178, 255], [51, 153, 255],
                                      [255, 153, 153], [255, 102, 102], [255, 51, 51], [153, 255, 153], [102, 255, 102],
                                      [51, 255, 51], [0, 255, 0], [0, 0, 255], [255, 0, 0], [255, 255, 255]],
                                     dtype=np.uint8)

    def __call__(self, i, bgr=False):
        """Converts hex color codes to rgb values."""
        c = self.palette[int(i) % self.n]
        return (c[2], c[1], c[0]) if bgr else c

    @staticmethod
    def hex2rgb(h):  # rgb order (PIL)
        return tuple(int(h[1 + i:1 + i + 2], 16) for i in (0, 2, 4))


def yolo_to_location(w,h,yolo_data):
    # yolo文件转两点坐标,注意画图坐标要转换成int格式
    x_, y_, w_, h_ = yolo_data
    x1 = int(w * x_ - 0.5 * w * w_)
    x2 = int(w * x_ + 0.5 * w * w_)
    y1 = int(h * y_ - 0.5 * h * h_)
    y2 = int(h * y_ + 0.5 * h * h_)
    # cv2.rectangle(img, (int(x1), int(y1)), (int(x2), int(y2)), (255, 0, 0))
    return [x1,y1,x2,y2]

def location_to_yolo(w, h, locations):
    # x1,y1左上角坐标,x2,y2右上角坐标
    x1, y1, x2, y2 = locations
    x_ = (x1 + x2) / 2 / w
    x_ = float('%.5f' % x_)
    y_ = (y1 + y2) / 2 / h
    y_ = float('%.5f' % y_)
    w_ = (x2 - x1) / w
    w_ = float('%.5f' % w_)
    h_ = (y2 - y1) / h
    h_ = float('%.5f' % h_)
    return [x_,y_,w_,h_]

def draw_yolo_data(img_path, yolo_file_path):
    # 读取yolo标注数据并显示
    img = cv2.imread(img_path)
    h, w, _ = img.shape
    print(img.shape)
    # yolo标注数据文件名为786_rgb_0616.txt
    with open(yolo_file_path, 'r') as f:
        data = f.readlines()
        for each in data:
            temp = each.split()
            # ['1', '0.43906', '0.52083', '0.34687', '0.15']
            # YOLO转换为两点坐标x1, x2, y1, y2
            x_, y_, w_, h_ = eval(temp[1]), eval(temp[2]), eval(temp[3]), eval(temp[4])
            x1, y1, x2, y2 = yolo_to_location(w,h,[x_, y_, w_, h_])
            # 画图验证框是否正确
            cv2.rectangle(img, (x1, y1), (x2, y2), (0, 0, 255))

    cv2.imshow('windows', img)
    cv2.waitKey(0)

if __name__ == '__main__':
    img_path = 'TestFiles/1.jpg'
    yolo_file_path = 'save_data/yolo_labels/1.txt'
    draw_yolo_data(img_path, yolo_file_path)
5、源码获取方式
🍅由于篇幅限制,获取完整文章或源码、代做项目的,查看我的【用户名】、【专栏名称】、【顶部选题链接】就可以找到我啦🍅
感兴趣的可以先收藏起来,点赞、关注不迷路,下方查看👇🏻获取联系方式👇🏻

码道开发者社区,聚焦华为云码道 CodeArts 代码智能体,沉淀 Agent、Skill、鸿蒙开发实战内容,供开发者查阅资料、交流技术、分享工程实践
更多推荐



 19
19 0
0- 0


 已为社区贡献80条内容

所有评论(0)