Spring 核心技术栈:IoC 容器 / AOP 切面 / 事务管理核心逻辑拆解
一、技术体系结构
1.总体技术架构
(1)单一架构
项目主要应用技术框架为Spring,SpringMVC,Mybatis。

(2)分布式架构-微服务
一个项目(对应IDEA中的一个project)拆分成多个模块,每个模块是一个IDEA中的一个module,每个工程都是运行在自己的Tomcat上,模块之间可以相互调用。
项目主要应用架构为:SpringBoot(SSM),SpringCloud,中间件等。
2.框架概念和理解
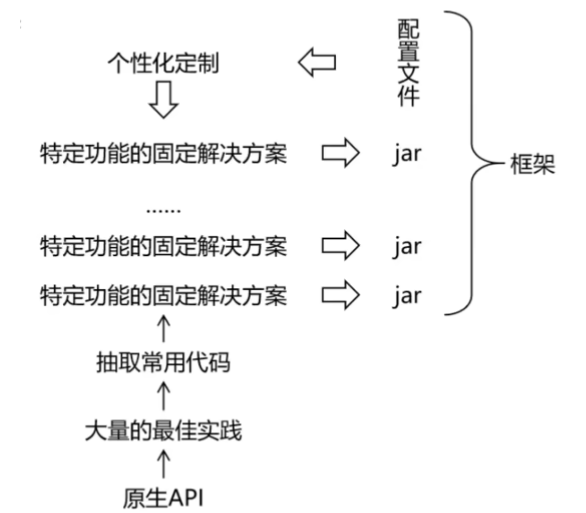
框架 = jar包+配置文件
二、SpringFramework介绍
1.Spring和SpringFrameWork概念
- Spring:广义上是一个围绕 Java 开发的 “生态体系”,包含 Spring Framework(核心框架)、Spring Boot(快速开发工具)、Spring Cloud(微服务架构)、Spring Data(数据访问)等一系列组件,核心目标是简化 Java 企业级应用开发。
- Spring Framework:是 Spring 生态的 “基石”,通常也被直接简称为 “Spring”,是一套轻量级的 Java 开发框架,提供了核心的 IOC(控制反转)和 AOP(面向切面编程)等基础能力,为后续生态组件提供底层支撑。
2.SpringFrameWork主要功能模块
Spring Framework 采用 “模块化” 设计,各模块可独立使用,核心模块如下:
- 核心容器(Core Container)
框架的基础核心,包含spring-core(核心工具类)、spring-beans(Bean 定义与管理)、spring-context(应用上下文,整合 Bean 生命周期)、spring-expression(SpEL 表达式,动态访问对象属性),核心实现 IOC 容器功能,管理对象的创建与依赖注入。 - AOP 模块(Aspect-Oriented Programming)
包含spring-aop(AOP 核心实现)、spring-aspects(集成 AspectJ 切面框架),支持面向切面编程,可将日志、事务、权限等 “横切关注点” 与业务逻辑解耦,提升代码复用性。 - 数据访问 / 集成(Data Access/Integration)
简化数据操作,包含spring-jdbc(JDBC 模板,减少重复代码)、spring-orm(集成 Hibernate、MyBatis 等 ORM 框架)、spring-tx(声明式事务管理,无需手动控制事务)、spring-jms(消息服务集成)。 - Web 模块
支持 Web 开发,包含spring-web(基础 Web 工具)、spring-webmvc(MVC 框架,实现前后端分离与请求分发)、spring-websocket(WebSocket 通信支持),是 Java Web 开发的常用组件。 - 测试模块(Test)
提供与 JUnit、TestNG 等测试框架的集成,支持依赖注入式测试,可快速创建测试环境,简化单元测试与集成测试。
3.SpringFrameWork主要优势
丰富的生态系统,模块化的设计,简化Java开发
三、SpringIoC容器和核心概念
1.组件和组件管理
(1)什么是组件?
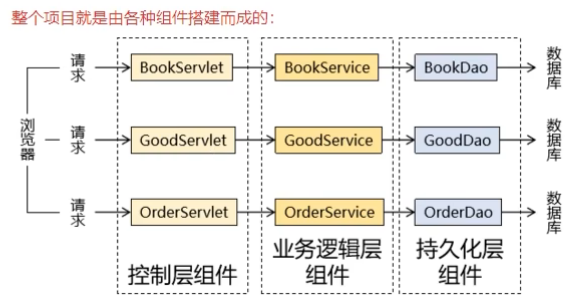
(2)Spring充当组件管理角色IOC
2.SpringIoC容器和容器实现
(1)普通和复杂容器
普通容器:例如:生活中的水杯;普通容器只能用来存储,没有更多的功能,例如数组,集合
复杂容器:例如:生活中的政府-政府管理我们的一生,准生证-户口-学区-毕业-劳动合同-结婚-注销);程序中Servlet容器能够管理Servlet(init、service、destory)、Filter、Listener组件的一生
(2)SpringIOC容器介绍
SpringIOC也是一个复杂的容器,不仅创建组件对象,存储组件对象,还要负责调用组件的方法让它们工作,最终在特定情况下销毁组件。

(3)SpringIOC容器具体接口和实现类
BeanFactory规定了IOC容器的基本动作
ApplicationContext做了一些扩展动作aop|web

ClassPathXmlApplicationContext | 通过读取类路径下的 XML 格式的配置文件创建 IOC 容器对象 |
FileSystemXmlApplicationContext | 通过文件系统路径读取 XML 格式的配置文件创建 IOC 容器对象 |
AnnotationConfigApplicationContext | 通过读取 Java 配置类创建 IOC 容器对象 |
WebApplicationContext | 专为 web 应用准备,基于 Web 环境创建 IOC 容器对象,并将对象引入存入 ServletContext 域中 |
(4)SpringIOC容器管理配置方式
- XML配置方式
- 注解方式
- Java配置类方式
3.SpringIoC / DI概念总结
(1)IoC控制反转
进行实例化管理
IoC主要是针对对象的创建和调用控制而言的,也就是说,当应用程序需要使用一个对象时,不再是应用程序直接创建该对象,而是由IoC容器来创建和管理,即控制由应用程序转移到IoC容器中,也就是“反转”了控制权。这种方式基本上是通过依赖查找的方式来实现的,即IoC容器维护着构成应用程序的对象,并负责创建这些对象。
(2)DI依赖注入
DI 是指在组件之间传递依赖关系的过程中,将依赖关系在容器内部进行处理,这样就不必在应用程序代码中硬编码对象之间的依赖关系,实现了对象之间的解耦合。在 Spring 中,Dl是通过 XML 配置文件或注解的方式实现的。它提供了三种形式的依赖注入:构造函数注入、Setter方法注入和接口注入。
四、SpringIoC实践和应用
1.基于XML配置方式组件管理
(1)组件(Bean)信息声明配置(IoC)
目标:如何通过定义XML配置文件,声明组件类信息,交给Spring的IoC容器进行组件管理!
//无参构造
package com.test.ioc_01;

public class HappyComponent {
    public void doSomething()
    {
        System.out.println("HappyComponent");
    }
}


//静态工厂构造
package com.test.ioc_01;

public class ClientService {
    private static ClientService clientService = new ClientService();
    private ClientService() {
    }
    public static ClientService getInstance() {
        return clientService;
    }
}


//非静态工厂构造
package com.test.ioc_01;

public class DefaultServiceLocator {
    private static ClientServiceImpl clientService = new ClientServiceImpl();
    public ClientServiceImpl getClientService()
    {
        return clientService;
    }
}
//非静态工厂构造对象的ClientServiceImpl类
package com.test.ioc_01;

public class ClientServiceImpl {
    private static ClientServiceImpl clientService = new ClientServiceImpl();
    public ClientServiceImpl getClientService()
    {
        return clientService;
    }
}
<?xml version="1.0" encoding="UTF-8"?>
<beans xmlns="http://www.springframework.org/schema/beans"
       xmlns:xsi="http://www.w3.org/2001/XMLSchema-instance"
       xsi:schemaLocation="http://www.springframework.org/schema/beans http://www.springframework.org/schema/beans/spring-beans.xsd">

    <!-- 无参数
        <bean标签一个组件信息,一个组件对象;
        id:组件的标识唯一,方便后续读取;class:组件的类
     -->
    <bean id="happyComponent" class="com.test.ioc_01.HappyComponent"/>
    <!-- 静态工厂
         <bean标签一个组件信息,一个组件对象;
         id:组件的标识唯一,方便后续读取;
         class:组件的类;factory-method:静态工厂方法
     -->
    <bean id="clientService" class="com.test.ioc_01.ClientService" factory-method="getInstance"/>

    <!--非静态工厂-->
    <!--配置工厂类组件信息-->
    <bean id="DefaultServiceLocator" class="com.test.ioc_01.DefaultServiceLocator"/>
    <!--通过指定非静态工厂对象和方法,来配置生成的ioc信息-->
    <bean id="clientService2" factory-bean="DefaultServiceLocator" factory-method="getClientService"/>
</beans>
(2)组件(Bean)依赖注入配置(DI)
- 目标:通过配置文件,实现IoC容器中Bean之间的引入
- 思路:

package com.test.ioc_02;

public class UserDao {
}

//具体
package com.test.ioc_02;

public class UserService {
    private UserDao userDao;
    public UserService(UserDao userDao)
    {
        this.userDao = userDao;
    }
    private int age;
    private String name;
    public UserService(int age, String name, UserDao userDao)
    {
        this.userDao = userDao;
        this.age = age;
        this.name = name;
    }
}
<?xml version="1.0" encoding="UTF-8"?>
<beans xmlns="http://www.springframework.org/schema/beans"
       xmlns:xsi="http://www.w3.org/2001/XMLSchema-instance"
       xsi:schemaLocation="http://www.springframework.org/schema/beans http://www.springframework.org/schema/beans/spring-beans.xsd">


    <!-- 单个构造参数注入:将他们都放在ioc容器中 -->
    <bean id="userDao" class="com.test.ioc_02.UserDao"/>
    <!-- 构造参数注入
         <constructor-arg 构造参数传值
         value = 直接属性值
         ref = 引用ioc容器中的对象
     -->
    <bean id="userService" class="com.test.ioc_02.UserService">
        <constructor-arg ref="userDao"/>
    </bean>

    <!-- 多个构造参数注入-->
    <!-- 构造参数索引 value放具体的值-->
    <bean id="userService1" class="com.test.ioc_02.UserService">
        <constructor-arg value="18"/>
        <constructor-arg value="张三"/>
        <constructor-arg ref="userDao"/>
    </bean>

    <bean id="userService2" class="com.test.ioc_02.UserService">
        <constructor-arg index="0" value="18"/>
        <constructor-arg index="1" value="张三"/>
        <constructor-arg index="2" ref="userDao"/>
    </bean>

    <bean id="userService3" class="com.test.ioc_02.UserService">
        <constructor-arg name="age" value="18"/>
        <constructor-arg name="name" value="张三"/>
        <constructor-arg name="userDao" ref="userDao"/>
    </bean>
</beans>
- 基于Setter方法注入依赖
package com.test.ioc_02;

public class MovieFinder {
}

//具体
package com.test.ioc_02;

public class SimpleMovieFinder {
    private MovieFinder movieFinder;
    private String movieName;
    public void setMovieFinder(MovieFinder movieFinder)
    {
        this.movieFinder = movieFinder;
    }
    public void setMovieName(String movieName)
    {
        this.movieName = movieName;
    }
}
<?xml version="1.0" encoding="UTF-8"?>
<beans xmlns="http://www.springframework.org/schema/beans"
       xmlns:xsi="http://www.w3.org/2001/XMLSchema-instance"
       xsi:schemaLocation="http://www.springframework.org/schema/beans http://www.springframework.org/schema/beans/spring-beans.xsd">


    <!-- 单个构造参数注入:将他们都放在ioc容器中 -->
    <bean id="userDao" class="com.test.ioc_02.UserDao"/>
    <!-- 构造参数注入
         <constructor-arg 构造参数传值
         value = 直接属性值
         ref = 引用ioc容器中的对象
     -->
    <bean id="userService" class="com.test.ioc_02.UserService">
        <constructor-arg ref="userDao"/>
    </bean>

    <!-- 多个构造参数注入-->
    <!-- 构造参数索引 value放具体的值-->
    <bean id="userService1" class="com.test.ioc_02.UserService">
        <constructor-arg value="18"/>
        <constructor-arg value="张三"/>
        <constructor-arg ref="userDao"/>
    </bean>

    <bean id="userService2" class="com.test.ioc_02.UserService">
        <constructor-arg index="0" value="18"/>
        <constructor-arg index="1" value="张三"/>
        <constructor-arg index="2" ref="userDao"/>
    </bean>

    <bean id="userService3" class="com.test.ioc_02.UserService">
        <constructor-arg name="age" value="18"/>
        <constructor-arg name="name" value="张三"/>
        <constructor-arg name="userDao" ref="userDao"/>
    </bean>

    <!-- 触发setter方法进行注入 -->
    <bean id="movieFinder" class="com.test.ioc_02.MovieFinder"/>
    <bean id="simpleMovieFinder" class="com.test.ioc_02.SimpleMovieFinder">
        <!-- value是直接属性值,ref是其他bean的id,即引用movieFinder对象 -->
        <property name="movieFinder" ref="movieFinder"/>
        <property name="movieName" value="名字"/>
    </bean>
</beans>
(3)IoC容器创建和使用
//bean
package com.test.ioc_03;

public class HappyComponent {
    public void doSomething()
    {
        System.out.println("HappyComponent");
    }
}


package com.test.ioctest;

import com.test.ioc_01.DefaultServiceLocator;
import com.test.ioc_03.HappyComponent;
import org.springframework.context.ApplicationContext;
import org.springframework.context.support.ClassPathXmlApplicationContext;


public class SpringIoCTest {
    //如何创建IoC容器并读取配置文件
    public void createIoC(){
        //方式1:直接创建容器并且读取配置文件
        ApplicationContext applicationContext = new ClassPathXmlApplicationContext("spring-03.xml");

        //方式2:先创建ioc容器对象,再指定配置文件,再刷新
        ClassPathXmlApplicationContext classPathXmlApplicationContext = new ClassPathXmlApplicationContext();
        classPathXmlApplicationContext.setConfigLocation("spring-03.xml");
        classPathXmlApplicationContext.refresh();
    }
    //如何在ioc容器中获取bean
    public void getBean(){
        //创建ioc容器对象
        ApplicationContext applicationContext = new ClassPathXmlApplicationContext("spring-03.xml");
        //读取ioc容器的组件
        //根据bean的id获取,同时指定bean的类型Class
        HappyComponent happyComponent = applicationContext.getBean("happyComponent", HappyComponent.class);

    }
}
<?xml version="1.0" encoding="UTF-8"?>
<beans xmlns="http://www.springframework.org/schema/beans"
       xmlns:xsi="http://www.w3.org/2001/XMLSchema-instance"
       xsi:schemaLocation="http://www.springframework.org/schema/beans http://www.springframework.org/schema/beans/spring-beans.xsd">

    <bean id="happyComponent" class="com.test.ioc_03.HappyComponent"/>
</beans>
(4)高级特性:组件(Bean)作用域和周期方法配置
package com.test.ioc_04;

public class JavaBean {
    public void init(){
        System.out.println("init");
    }
    public void destroy(){
        System.out.println("destroy");
    }
}


package com.test.ioctest;

import com.test.ioc_01.DefaultServiceLocator;
import com.test.ioc_03.HappyComponent;
import org.junit.jupiter.api.Test;
import org.springframework.context.ApplicationContext;
import org.springframework.context.support.ClassPathXmlApplicationContext;


public class SpringIoCTest {

    /*测试ioc配置的初始化和组件的销毁*/
    @Test
    public void testInitAndDestroy(){
        ClassPathXmlApplicationContext classPathXmlApplicationContext = new ClassPathXmlApplicationContext("spring-04.xml");
    }
}
<?xml version="1.0" encoding="UTF-8"?>
<beans xmlns="http://www.springframework.org/schema/beans"
       xmlns:xsi="http://www.w3.org/2001/XMLSchema-instance"
       xsi:schemaLocation="http://www.springframework.org/schema/beans http://www.springframework.org/schema/beans/spring-beans.xsd">

    <!--
    init-method= “初始化方法名”
    destroy-method= “销毁方法名”
    spring ioc容器会自动调用init-method和destroy-method方法
     -->
    <bean id="javaBean" class="com.test.ioc_04.JavaBean" init-method="init" destroy-method="destroy"/>
</beans>
(5)高级特性:FactoryBean特性和使用
FactoryBean是一个特殊的 Bean 接口,它的核心作用是封装复杂对象的创建过程,简化 Bean 的配置与管理。当某个 Bean 的实例化逻辑复杂(如需要大量初始化参数、依赖第三方资源、或涉及动态生成逻辑)时,使用FactoryBean可以将创建逻辑与配置分离,提升代码的灵活性和可维护性。
- 工厂模式封装
FactoryBean本身是一个 "工厂 Bean",它的主要职责是创建并返回其他 Bean 的实例(称为 "目标 Bean")。Spring 容器会自动识别FactoryBean类型的 Bean,并通过它的工厂方法获取目标 Bean。
- 特殊的获取方式
当通过getBean(beanName)获取 Bean 时,Spring 默认返回FactoryBean所创建的目标 Bean;若要获取FactoryBean自身的实例,需在 beanName 前加&前缀,即getBean("&beanName")。
- 支持单例 / 多例控制
通过isSingleton()方法控制目标 Bean 是否为单例(默认单例)。
- 简化复杂对象配置
对于创建过程复杂的对象(如数据源、线程池、ORM 框架的 SessionFactory 等),FactoryBean可以将创建逻辑封装在内部,外部只需配置FactoryBean即可,无需关心目标 Bean 的具体创建细节。
2.基于注解方式管理Bean
(1)Bean注解标记和扫描IoC
| 注解 | 说明 |
|---|---|
| @Component | 用于描述 Spring 中的 Bean,是泛化的组件概念,可作用于应用的任何层次(如 Service 层、Dao 层等),标注在类上即可将其定义为 Spring Bean。 |
| @Repository | 用于将数据访问层(Dao 层)的类标识为 Spring Bean,功能与 @Component 相同。 |
| @Service | 通常作用于业务层(Service 层),用于将业务层的类标识为 Spring Bean,功能与 @Component 相同。 |
| @Controller | 通常作用于控制层(如 SpringMVC 的 Controller),用于将控制层的类标识为 Spring Bean,功能与 @Component 相同。 |
//插入注解
package com.test.ioc_01;

import org.springframework.stereotype.Component;

@Component
public class CommonComponent {
}

package com.test.ioc_01;

import org.springframework.stereotype.Repository;

@Repository
public class XxxDao {
}


package com.test.ioc_01;

import org.springframework.stereotype.Service;

@Service
public class XxxService {
}

package com.test.ioc_01;

import org.springframework.stereotype.Controller;

@Controller
public class XxxController {
}
<!--指定扫描文件-->
<?xml version="1.0" encoding="UTF-8"?>
<beans xmlns="http://www.springframework.org/schema/beans"
       xmlns:xsi="http://www.w3.org/2001/XMLSchema-instance"
       xmlns:context="http://www.springframework.org/schema/context"
       xsi:schemaLocation="http://www.springframework.org/schema/beans
                          http://www.springframework.org/schema/beans/spring-beans.xsd
                          http://www.springframework.org/schema/context
                          http://www.springframework.org/schema/context/spring-context.xsd">

    <!-- 1.普通配置包扫描
    base-package:指定ioc容器去哪些包下找注解类
    -->
    <context:component-scan base-package="com.test.ioc_01"/>
</beans>
//验证

package com.test.iocTest;

import com.test.ioc_01.XxxDao;
import org.junit.jupiter.api.Test;
import org.springframework.context.support.ClassPathXmlApplicationContext;

public class Spring {
    @Test
    public void test() {
        //1.创建ioc容器
        ClassPathXmlApplicationContext context
                = new ClassPathXmlApplicationContext("spring-01.xml");

        //2.获取bean
        XxxDao bean = context.getBean(XxxDao.class);
        System.out.println(bean);
        //添加ioc注解,默认的组件名称就是类名首字母小写
        Object xxxService = context.getBean("xxxService");
        System.out.println(xxxService);

    }
}

//结果:com.test.ioc_01.XxxDao@518caac3
//com.test.ioc_01.XxxService@68034211
(2)Bean作用域和周期方法注解
- 周期方法概念
我们可以在组件类中定义方法,然后当 IoC 容器实例化和销毁组件对象的时候进行调用!这两个方法我们称为生命周期方法!类似于 Servlet 的 init/destroy 方法,我们可以在周期方法完成初始化和释放资源等工作。
- 周期方法声明
public class BeanOne {

    //周期方法要求: 方法命名随意,但是要求方法必须是 public void 无形参列表
    @PostConstruct  //注解指定初始化方法
    public void init() {
        // 初始化逻辑
    }
}

public class BeanTwo {

    @PreDestroy //注解指定销毁方法
    public void cleanup() {
        // 释放资源逻辑
    }
}
- Bean 作用域概念
<bean 标签声明 Bean,只是将 Bean 的信息配置给 SpringIoC 容器!在 IoC 容器中,这些 <bean 标签对应的信息转成 Spring 内部 BeanDefinition 对象,BeanDefinition 对象内,包含定义的信息(id,class, 属性等等)!这意味着,BeanDefinition 与类概念一样,SpringIoC 容器可以根据 BeanDefinition 对象反射创建多个 Bean 对象实例。具体创建多少个 Bean 的实例对象,由 Bean 的作用域 Scope 属性指定!
- 作用域可选值
| 取值 | 含义 | 创建对象的时机 | 默认值 |
|---|---|---|---|
| singleton | 在 IOC 容器中,这个 bean 的对象始终为单实例 | IOC 容器初始化时 | 是 |
| prototype | 这个 bean 在 IOC 容器中有多个实例 | 获取 bean 时 | 否 |
如果是在 WebApplicationContext 环境下还会有另外两个作用域(但不常用):
| 取值 | 含义 | 创建对象的时机 | 默认值 |
|---|---|---|---|
| request | 请求范围内有效的实例 | 每次请求 | 否 |
| session | 会话范围内有效的实例 | 每次会话 | 否 |
- 作用域配置
@Scope(scopeName = ConfigurableBeanFactory.SCOPE_SINGLETON) // 单例,默认值
@Scope(scopeName = ConfigurableBeanFactory.SCOPE_PROTOTYPE) // 多例 二选一
public class BeanOne {

    // 周期方法要求: 方法命名随意,但是要求方法必须是 public void 无形参列表
    @PostConstruct  // 注解指定初始化方法
    public void init() {
        // 初始化逻辑
    }
}
(3)Bean属性赋值:引用类型自动装配(DI)
@Autowired 注解
在成员变量上直接标记 @Autowired 注解即可,不需要提供 setXxx0方法。项目中的正式用法就是这样。
package com.test.ioc_02;

import org.springframework.beans.factory.annotation.Autowired;
import org.springframework.stereotype.Controller;

@Controller
public class UserController {
    // 注入业务层,自动装配
    @Autowired
    private UserService userService;

    public void setUserService(UserService userService) {
        this.userService = userService;
    }
    public void show() {
        //调用业务层的show方法
    }
}

package com.test.ioc_02;

public interface UserService {
    public String show();
}

package com.test.ioc_02;

import org.springframework.stereotype.Controller;

@Controller
public class UserServiceImpl implements UserService{
    @Override
    public String show() {
        return "UserServiceImpl show()";
    }
}
<?xml version="1.0" encoding="UTF-8"?>
<beans xmlns="http://www.springframework.org/schema/beans"
       xmlns:xsi="http://www.w3.org/2001/XMLSchema-instance"
       xmlns:context="http://www.springframework.org/schema/context"
       xsi:schemaLocation="http://www.springframework.org/schema/beans
                          http://www.springframework.org/schema/beans/spring-beans.xsd
                          http://www.springframework.org/schema/context
                          http://www.springframework.org/schema/context/spring-context.xsd">


    <context:component-scan base-package="com.test.ioc_02"/>
</beans>
(4)Bean属性赋值:基本类型属性赋值(DI)
@value用于给 Bean 的基本类型属性(如 String、int、boolean 等,包括对应的包装类)赋值。它支持直接指定值、读取外部配置文件中的值,或通过 SpEL(Spring 表达式语言)动态计算值,简化了属性赋值的配置。
import org.springframework.stereotype.Component;
import org.springframework.beans.factory.annotation.Value;

@Component
public class User {
    // 给String类型赋值
    @Value("张三")
    private String name;

    // 给int类型赋值
    @Value("20")
    private int age;

    // 给boolean类型赋值
    @Value("true")
    private boolean isStudent;

    // getter/setter省略
}
通过 ${key} 语法引用外部配置文件(如 application.properties 或 application.yml)中的键值对,适用于需要动态配置的值(如数据库连接信息、端口号等)。
① 配置文件 src/main/resources/config.properties 内容:
user.name=李四
user.age=25
或者在在xml中引入配置文件:classpath:jdbc.properties。
<?xml version="1.0" encoding="UTF-8"?>
<beans xmlns="http://www.springframework.org/schema/beans"
       xmlns:xsi="http://www.w3.org/2001/XMLSchema-instance"
       xmlns:context="http://www.springframework.org/schema/context"
       xsi:schemaLocation="http://www.springframework.org/schema/beans
                          http://www.springframework.org/schema/beans/spring-beans.xsd
                          http://www.springframework.org/schema/context
                          http://www.springframework.org/schema/context/spring-context.xsd">


    <context:property-placeholder location="classpath:jdbc.properties"/>
</beans>
② 代码中使用:
import org.springframework.stereotype.Component;
import org.springframework.beans.factory.annotation.Value;
import org.springframework.context.annotation.PropertySource;

@Component
@PropertySource("classpath:config.properties") // 加载配置文件
public class User {
    // 引用配置文件中的user.name
    @Value("${user.name}")
    private String name;

    // 引用配置文件中的user.age
    @Value("${user.age}")
    private int age;

    // getter/setter省略
}
3.基于配置类方式管理Bean
Java配置类,替代xml配置文件;
添加@Configuration
1、包扫描注解配置
2、引用外部的配置文件
3、声明第三方依赖的bean组件。添加@Bean:让配置类的方法创建的组件存储到ioc容器。
package com.test.config;

//包扫描注解配置
@ComponentScan({"com.test.ioc_01","com.test.ioc_02"})
//引入外部配置文件
@PropertySource('classpath:application.properties')
@Configuration
public class JavaConfiguration {
}


import com.test.ioc_01.XxxDao;
import org.junit.jupiter.api.Test;
import org.springframework.context.support.ClassPathXmlApplicationContext;

public class Spring {
    @Test
    public void test() {
        //1.创建ioc容器
        ApplicationContext applicationContext = new ClassPathXmlApplicationContext("JavaConfiguration.class");
        AnnotationConfigApplicationContext applicationContext = new AnnotationConfigApplicationContext();
        applicationContext.register(JavaConfiguration.class);
        applicationContext.refresh();
    }
}
五、Spring AOP面向切面编程
1.场景设定和问题复现
在传统业务开发中,经常会遇到横切关注点(如日志记录、事务管理、权限校验)与核心业务逻辑耦合的问题。例如:
场景:多个服务类(如用户服务、订单服务)都需要在方法执行前记录请求日志,执行后记录响应日志。
问题复现:如果直接在每个服务方法中编写日志代码,会导致:
- 代码重复,维护成本高
- 核心业务逻辑被稀释
- 需求变更时(如修改日志格式)需修改所有相关类
2.解决技术代理模式
代理模式是 AOP 的底层实现基础,通过为目标对象创建代理对象,将横切逻辑封装在代理中,实现与核心业务的解耦。
// 订单服务接口
public interface OrderService {
    void createOrder();
}

// 目标类(核心业务)
public class OrderServiceImpl implements OrderService {
    @Override
    public void createOrder() {
        System.out.println("执行创建订单业务..."); // 仅保留核心逻辑
    }
}

// 代理类(封装横切逻辑)
public class OrderServiceProxy implements OrderService {
    private OrderService target; // 目标对象

    public OrderServiceProxy(OrderService target) {
        this.target = target;
    }

    @Override
    public void createOrder() {
        // 横切逻辑(日志)
        System.out.println("=== 开始执行创建订单 ===");

        // 调用目标方法
        target.createOrder();

        // 横切逻辑(日志)
        System.out.println("=== 结束执行创建订单 ===");
    }
}
(2)动态代理
运行期动态生成代理对象,无需手动编写代理类,分为:
- JDK 动态代理:基于接口实现,要求目标类实现接口
- CGLIB 动态代理:基于继承实现,可代理无接口的类
// JDK动态代理示例
public class LogProxy implements InvocationHandler {
    private Object target; // 目标对象

    public LogProxy(Object target) {
        this.target = target;
    }

    // 生成代理对象
    public Object getProxy() {
        return Proxy.newProxyInstance(
            target.getClass().getClassLoader(),
            target.getClass().getInterfaces(),
            this
        );
    }

    // 代理逻辑
    @Override
    public Object invoke(Object proxy, Method method, Object[] args) throws Throwable {
        System.out.println("=== 开始执行 " + method.getName() + " ===");
        Object result = method.invoke(target, args); // 调用目标方法
        System.out.println("=== 结束执行 " + method.getName() + " ===");
        return result;
    }
}

// 使用示例
public class Main {
    public static void main(String[] args) {
        OrderService target = new OrderServiceImpl();
        OrderService proxy = (OrderService) new LogProxy(target).getProxy();
        proxy.createOrder(); // 执行代理方法
    }
}
3.面向切面编程思维
AOP(Aspect-Oriented Programming)是对 OOP 的补充,将横切关注点(如日志、事务)从业务逻辑中剥离,形成独立的 “切面”,通过动态代理技术在运行期将切面织入目标对象。
核心概念:
- 切面(Aspect):封装横切逻辑的类(如日志切面、事务切面)
- 通知(Advice):切面中的方法(如前置通知、后置通知)
- 连接点(JoinPoint):可能被切面织入的点(如方法执行前后)
- 切入点(Pointcut):指定哪些连接点需要被织入(通过表达式定义)
- 目标对象(Target):被代理的原始对象
- 织入(Weaving):将切面代码插入到目标对象的过程
4.Spring AOP框架介绍和关系梳理
Spring AOP 是 Spring 框架的核心模块,基于动态代理实现,简化了 AOP 开发。
核心组件关系:
- @Aspect:标记类为切面
- 通知注解:@Before(前置)、@After(后置)、@Around(环绕)等
- 切入点表达式:定义拦截规则(如
execution(* com.service.*.*(..))) - 代理工厂:Spring 自动选择 JDK 或 CGLIB 生成代理对象(默认优先 JDK)
与 Spring IoC 的关系:
- IoC 容器管理目标对象和切面对象
- AOP 通过 IoC 获取目标对象,动态生成代理对象并注入到容器中
5.Spring AOP基于注解方式实现和细节
步骤 1:引入依赖(Maven)
<dependencies>
    <!-- Spring核心 -->
    <dependency>
        <groupId>org.springframework</groupId>
        <artifactId>spring-context</artifactId>
        <version>5.3.20</version>
    </dependency>
    <!-- AOP支持 -->
    <dependency>
        <groupId>org.aspectj</groupId>
        <artifactId>aspectjweaver</artifactId>
        <version>1.9.9.1</version>
    </dependency>
</dependencies>
步骤 2:定义目标接口和实现类
// 目标接口
public interface UserService {
    void addUser(String name);
    String getUserById(int id);
}

// 目标实现类
@Service // 交给Spring管理
public class UserServiceImpl implements UserService {
    @Override
    public void addUser(String name) {
        System.out.println("添加用户:" + name);
    }

    @Override
    public String getUserById(int id) {
        System.out.println("查询用户ID:" + id);
        return "用户" + id;
    }
}
步骤 3:定义切面类
@Aspect // 标记为切面
@Component // 交给Spring管理
public class LogAspect {
    // 切入点:拦截UserService的所有方法
    @Pointcut("execution(* com.service.UserService.*(..))")
    public void userServicePointcut() {}

    // 前置通知:方法执行前
    @Before("userServicePointcut()")
    public void beforeAdvice(JoinPoint joinPoint) {
        String methodName = joinPoint.getSignature().getName();
        Object[] args = joinPoint.getArgs();
        System.out.println("前置通知:" + methodName + ",参数:" + Arrays.toString(args));
    }

    // 后置通知:方法执行后(无论是否异常)
    @After("userServicePointcut()")
    public void afterAdvice(JoinPoint joinPoint) {
        String methodName = joinPoint.getSignature().getName();
        System.out.println("后置通知:" + methodName + "执行结束");
    }

    // 返回通知:方法正常返回后
    @AfterReturning(value = "userServicePointcut()", returning = "result")
    public void afterReturningAdvice(JoinPoint joinPoint, Object result) {
        String methodName = joinPoint.getSignature().getName();
        System.out.println("返回通知:" + methodName + ",返回值:" + result);
    }
}
步骤 4:配置类开启 AOP
@Configuration
@ComponentScan("com.service") // 扫描组件
@EnableAspectJAutoProxy // 开启AOP注解支持
public class AppConfig {
}
步骤 5:测试
public class Main {
    public static void main(String[] args) {
        ApplicationContext context = new AnnotationConfigApplicationContext(AppConfig.class);
        UserService userService = context.getBean(UserService.class);
        userService.addUser("张三");
        userService.getUserById(100);
    }
}
输出结果:
前置通知:addUser,参数:[张三]
添加用户:张三
后置通知:addUser执行结束
返回通知:addUser,返回值:null
前置通知:getUserById,参数:[100]
查询用户ID:100
后置通知:getUserById执行结束
返回通知:getUserById,返回值:用户100
6.Spring AOP基于XML方式实现准备工作
步骤 1:创建目标类和切面类(无需注解)
// 目标类(无注解)
public class OrderService {
    public void deleteOrder(int id) {
        System.out.println("删除订单ID:" + id);
    }
}

// 切面类(无注解)
public class TransactionAspect {
    // 前置通知
    public void beginTransaction(JoinPoint joinPoint) {
        System.out.println("开启事务:" + joinPoint.getSignature().getName());
    }

    // 后置通知
    public void commitTransaction(JoinPoint joinPoint) {
        System.out.println("提交事务:" + joinPoint.getSignature().getName());
    }
}
步骤 2:编写 XML 配置文件(applicationContext.xml)
<?xml version="1.0" encoding="UTF-8"?>
<beans xmlns="http://www.springframework.org/schema/beans"
       xmlns:aop="http://www.springframework.org/schema/aop"
       xmlns:xsi="http://www.w3.org/2001/XMLSchema-instance"
       xsi:schemaLocation="
           http://www.springframework.org/schema/beans
           http://www.springframework.org/schema/beans/spring-beans.xsd
           http://www.springframework.org/schema/aop
           http://www.springframework.org/schema/aop/spring-aop.xsd">

    <!-- 注册目标对象 -->
    <bean id="orderService" class="com.service.OrderService"/>

    <!-- 注册切面对象 -->
    <bean id="transactionAspect" class="com.aspect.TransactionAspect"/>

    <!-- AOP配置 -->
    <aop:config>
        <!-- 定义切入点 -->
        <aop:pointcut id="orderPointcut"
                      expression="execution(* com.service.OrderService.*(..))"/>

        <!-- 定义切面 -->
        <aop:aspect ref="transactionAspect">
            <!-- 前置通知 -->
            <aop:before pointcut-ref="orderPointcut" method="beginTransaction"/>
            <!-- 后置通知 -->
            <aop:after pointcut-ref="orderPointcut" method="commitTransaction"/>
        </aop:aspect>
    </aop:config>
</beans>
步骤 3:测试
public class Main {
    public static void main(String[] args) {
        ApplicationContext context = new ClassPathXmlApplicationContext("applicationContext.xml");
        OrderService orderService = context.getBean(OrderService.class);
        orderService.deleteOrder(5);
    }
}
六、Spring 声明式事务
1. 事务核心概念
事务是一组不可分割的操作集合,遵循ACID 原则:
- 原子性(Atomicity):操作要么全成功,要么全回滚;
- 一致性(Consistency):事务执行前后数据状态保持合法;
- 隔离性(Isolation):多个事务并发执行时互不干扰;
- 持久性(Durability):事务提交后数据永久保存。
Spring 事务分为两类:
- 编程式事务:通过代码手动控制事务(如
TransactionTemplate),灵活性高但侵入业务逻辑; - 声明式事务:基于 AOP 实现,通过注解或 XML 配置声明事务规则,无侵入性,是开发首选。
2. 声明式事务核心机制
Spring 声明式事务本质是AOP 切面:
- 切面:
TransactionInterceptor(事务拦截器); - 通知:根据事务属性(隔离级别、传播行为等)执行事务的开启、提交、回滚;
- 切入点:通过
@Transactional注解或 XML 配置指定需要事务管理的方法。
核心依赖:事务管理器(PlatformTransactionManager),需根据数据源类型适配(如 JDBC 用DataSourceTransactionManager,MyBatis/MyBatis-Plus 同属此类)。
3. 事务核心属性(@Transactional 注解参数)
| 属性名 | 作用 | 可选值示例 |
|---|---|---|
propagation | 事务传播行为(解决嵌套事务问题) | REQUIRED(默认)、REQUIRES_NEW、NESTED |
isolation | 事务隔离级别(解决并发问题) | DEFAULT(默认)、READ_COMMITTED、SERIALIZABLE |
timeout | 事务超时时间(避免长期占用资源) | 数值(秒),默认 - 1(无超时) |
readOnly | 是否只读事务(查询操作设为 true,优化性能) | true/false,默认 false |
rollbackFor | 指定触发回滚的异常类型(默认仅回滚 RuntimeException 及其子类) | {SQLException.class, IOException.class} |
noRollbackFor | 指定不触发回滚的异常类型 | {BusinessException.class} |
关键属性详解
(1)事务传播行为
解决方法嵌套调用时事务的继承规则,最常用 2 种:
- REQUIRED(默认):如果当前有事务则加入,无则新建;
- REQUIRES_NEW:无论当前是否有事务,都新建独立事务(原事务挂起)。
示例:
java
@Service
public class OrderService {
    @Autowired
    private PayService payService;

    @Transactional(propagation = Propagation.REQUIRED)
    public void createOrder() {
        System.out.println("创建订单");
        payService.deductBalance(); // 加入当前事务
    }
}

@Service
public class PayService {
    @Transactional(propagation = Propagation.REQUIRES_NEW)
    public void deductBalance() {
        System.out.println("扣减余额"); // 新建独立事务
    }
}
(2)事务隔离级别
解决并发事务的数据一致性问题,常见级别:
- READ_UNCOMMITTED:允许读取未提交数据(可能出现脏读、不可重复读、幻读);
- READ_COMMITTED:只能读取已提交数据(避免脏读,可能出现不可重复读、幻读),MySQL 默认;
- REPEATABLE_READ:多次读取结果一致(避免脏读、不可重复读,可能出现幻读);
- SERIALIZABLE:串行执行事务(无并发问题,性能最低)。
4. 基于注解的声明式事务实现
步骤 1:引入核心依赖(Maven)
<dependencies>
    <!-- Spring核心 -->
    <dependency>
        <groupId>org.springframework</groupId>
        <artifactId>spring-context</artifactId>
        <version>5.3.20</version>
    </dependency>
    <!-- JDBC支持 -->
    <dependency>
        <groupId>org.springframework</groupId>
        <artifactId>spring-jdbc</artifactId>
        <version>5.3.20</version>
    </dependency>
    <!-- 事务支持 -->
    <dependency>
        <groupId>org.springframework</groupId>
        <artifactId>spring-tx</artifactId>
        <version>5.3.20</version>
    </dependency>
    <!-- H2内存数据库(简化测试) -->
    <dependency>
        <groupId>com.h2database</groupId>
        <artifactId>h2</artifactId>
        <version>2.2.224</version>
        <scope>runtime</scope>
    </dependency>
</dependencies>
步骤 2:配置事务管理器和数据源
@Configuration
@ComponentScan("com.service")
@EnableTransactionManagement // 开启声明式事务支持
public class TxConfig {
    // 1. 配置数据源
    @Bean
    public DataSource dataSource() {
        DriverManagerDataSource ds = new DriverManagerDataSource();
        ds.setDriverClassName("org.h2.Driver");
        ds.setUrl("jdbc:h2:mem:test;DB_CLOSE_DELAY=-1"); // 内存数据库
        ds.setUsername("sa");
        ds.setPassword("");
        return ds;
    }

    // 2. 配置JdbcTemplate(简化数据库操作)
    @Bean
    public JdbcTemplate jdbcTemplate(DataSource dataSource) {
        return new JdbcTemplate(dataSource);
    }

    // 3. 配置事务管理器(核心)
    @Bean
    public PlatformTransactionManager transactionManager(DataSource dataSource) {
        return new DataSourceTransactionManager(dataSource);
    }
}
步骤 3:编写业务类并声明事务
// 实体类
public class Order {
    private Integer id;
    private String name;
    // getter/setter
}

// 订单服务(含事务)
@Service
public class OrderService {
    @Autowired
    private JdbcTemplate jdbcTemplate;

    // 声明事务:默认传播行为REQUIRED,隔离级别DEFAULT
    @Transactional(rollbackFor = Exception.class) // 所有异常均回滚
    public void createOrder(Order order) {
        // 1. 插入订单
        jdbcTemplate.update("INSERT INTO orders(id, name) VALUES(?, ?)",
                           order.getId(), order.getName());
        // 2. 模拟异常(触发回滚)
        if (order.getId() == 1) {
            throw new RuntimeException("订单ID不能为1");
        }
    }

    // 只读事务(查询操作优化)
    @Transactional(readOnly = true)
    public Order getOrderById(Integer id) {
        return jdbcTemplate.queryForObject(
            "SELECT id, name FROM orders WHERE id = ?",
            (rs, rowNum) -> {
                Order o = new Order();
                o.setId(rs.getInt("id"));
                o.setName(rs.getString("name"));
                return o;
            }, id);
    }
}
步骤 4:初始化表结构(测试用)
// 启动时创建表
@Component
public class TableInitializer implements CommandLineRunner {
    @Autowired
    private JdbcTemplate jdbcTemplate;

    @Override
    public void run(String... args) throws Exception {
        jdbcTemplate.execute("CREATE TABLE IF NOT EXISTS orders(id INT PRIMARY KEY, name VARCHAR(20))");
    }
}
步骤 5:测试事务效果
public class Main {
    public static void main(String[] args) {
        ApplicationContext context = new AnnotationConfigApplicationContext(TxConfig.class);
        OrderService orderService = context.getBean(OrderService.class);

        // 测试1:ID=1,触发异常,事务回滚(数据库无数据)
        try {
            Order order1 = new Order();
            order1.setId(1);
            order1.setName("测试订单1");
            orderService.createOrder(order1);
        } catch (Exception e) {
            System.out.println("异常:" + e.getMessage());
        }

        // 测试2:ID=2,无异常,事务提交(数据库有数据)
        Order order2 = new Order();
        order2.setId(2);
        order2.setName("测试订单2");
        orderService.createOrder(order2);

        // 验证结果
        Order result = orderService.getOrderById(2);
        System.out.println("查询结果:" + result.getName()); // 输出"测试订单2"
    }
}
5. 基于 XML 的声明式事务实现
适用于不支持注解的旧项目,核心是配置事务切面:
<?xml version="1.0" encoding="UTF-8"?>
<beans xmlns="http://www.springframework.org/schema/beans"
       xmlns:aop="http://www.springframework.org/schema/aop"
       xmlns:tx="http://www.springframework.org/schema/tx"
       xmlns:xsi="http://www.w3.org/2001/XMLSchema-instance"
       xsi:schemaLocation="
           http://www.springframework.org/schema/beans
           http://www.springframework.org/schema/beans/spring-beans.xsd
           http://www.springframework.org/schema/aop
           http://www.springframework.org/schema/aop/spring-aop.xsd
           http://www.springframework.org/schema/tx
           http://www.springframework.org/schema/tx/spring-tx.xsd">

    <!-- 1. 数据源、JdbcTemplate、事务管理器(同注解方式) -->
    <bean id="dataSource" class="org.springframework.jdbc.datasource.DriverManagerDataSource">
        <property name="driverClassName" value="org.h2.Driver"/>
        <property name="url" value="jdbc:h2:mem:test;DB_CLOSE_DELAY=-1"/>
        <property name="username" value="sa"/>
        <property name="password" value=""/>
    </bean>
    <bean id="jdbcTemplate" class="org.springframework.jdbc.core.JdbcTemplate">
        <property name="dataSource" ref="dataSource"/>
    </bean>
    <bean id="transactionManager" class="org.springframework.jdbc.datasource.DataSourceTransactionManager">
        <property name="dataSource" ref="dataSource"/>
    </bean>

    <!-- 2. 配置事务属性 -->
    <tx:advice id="txAdvice" transaction-manager="transactionManager">
        <tx:attributes>
            <!-- 所有create开头的方法:REQUIRED传播行为,所有异常回滚 -->
            <tx:method name="create*" propagation="REQUIRED" rollback-for="Exception"/>
            <!-- 所有get开头的方法:只读事务 -->
            <tx:method name="get*" read-only="true"/>
        </tx:attributes>
    </tx:advice>

    <!-- 3. 配置AOP切面:将事务属性织入目标方法 -->
    <aop:config>
        <aop:pointcut id="txPointcut" expression="execution(* com.service.*.*(..))"/>
        <aop:advisor advice-ref="txAdvice" pointcut-ref="txPointcut"/>
    </aop:config>

    <!-- 4. 注册业务Bean -->
    <bean id="orderService" class="com.service.OrderService">
        <property name="jdbcTemplate" ref="jdbcTemplate"/>
    </bean>
</beans>
6. 事务失效的常见场景及解决方案
-
非 public 方法:
@Transactional仅对 public 方法生效(AOP 默认拦截 public);解决:改为 public 方法,或自定义 AOP 切面拦截非 public 方法。 -
自调用问题:目标类内部方法调用自身事务方法,代理不生效;解决:① 注入自身 Bean 调用;② 通过
AopContext.currentProxy()获取代理对象。// 错误示例(自调用,事务失效) public void createOrder() { this.deductStock(); // 内部调用,无代理 } @Transactional public void deductStock() {} // 正确示例 @Autowired private OrderService self; // 注入自身 public void createOrder() { self.deductStock(); // 代理调用 } -
异常被捕获:业务方法内捕获异常未抛出,Spring 无法感知;解决:抛出异常,或手动回滚(
TransactionAspectSupport.currentTransactionStatus().setRollbackOnly())。 -
数据源未配置事务管理器:Spring 无法获取事务管理器,事务不生效;解决:确保配置
PlatformTransactionManager并关联数据源。 -
错误的异常类型:默认仅回滚 RuntimeException, checked 异常(如 SQLException)不回滚;解决:通过
rollbackFor = Exception.class指定回滚异常。
七、Spring核心掌握总结
Spring 框架的核心是IoC(控制反转) 和AOP(面向切面编程),二者相辅相成,支撑起声明式事务、安全控制等高级功能。
1. 核心思想:解耦
Spring 的本质是解耦框架,通过以下方式实现:
- IoC 解耦对象依赖:将对象创建、依赖注入交给容器,替代手动
new和硬编码依赖; - AOP 解耦横切逻辑:将日志、事务等横切逻辑与核心业务分离,避免代码侵入;
- 声明式编程:通过注解 / XML 声明规则(如
@Autowired、@Transactional),开发者聚焦业务逻辑。
2. IoC 容器核心掌握
(1)容器本质与实现
- 本质:管理 Bean 生命周期的工厂,核心接口
ApplicationContext; - 实现类:
- 注解配置:
AnnotationConfigApplicationContext; - XML 配置:
ClassPathXmlApplicationContext; - Web 环境:
WebApplicationContext。
- 注解配置:
(2)Bean 核心知识点
| 维度 | 关键内容 |
|---|---|
| 注册方式 | ① 注解:@Component(及衍生@Service、@Controller);② XML:<bean>;③ 配置类:@Bean |
| 作用域 | ① singleton(默认,单例);② prototype(多例);③ Web 专用:request、session |
| 生命周期 | 初始化:@PostConstruct / 实现InitializingBean;销毁:@PreDestroy / 实现DisposableBean |
| 依赖注入 | ① 构造器注入(推荐,解决循环依赖);② Setter 注入;③ 字段注入(@Autowired,简洁但难测试) |
(3)循环依赖解决
Spring 通过三级缓存解决单例 Bean 循环依赖:
- 一级缓存:存放成熟 Bean(已初始化完成);
- 二级缓存:存放早期 Bean(已创建实例,未注入依赖);
- 三级缓存:存放 Bean 工厂(用于生成早期 Bean,避免重复创建)。
3. AOP 核心掌握
(1)核心概念关联
- 切面(Aspect):封装横切逻辑的类(
@Aspect); - 通知(Advice):切面中的具体逻辑(
@Before、@After、@Around); - 切入点(Pointcut):指定拦截哪些方法(如
execution(* com.service.*.*(..))); - 织入(Weaving):Spring 在运行期通过动态代理将切面织入目标对象。
(2)代理选择逻辑
- 目标类实现接口:默认用JDK 动态代理;
- 目标类无接口:用CGLIB 动态代理(通过继承实现);
- 强制 CGLIB:注解配置加
@EnableAspectJAutoProxy(proxyTargetClass = true)。
4. 声明式事务核心掌握
- 本质:AOP 的典型应用,事务拦截器作为切面织入目标方法;
- 核心依赖:
PlatformTransactionManager(需与数据源适配); - 关键避坑:避免自调用、确保异常抛出、正确配置事务属性。
5. 实战核心流程
以 “用户下单” 业务为例,完整 Spring 开发流程:
- 配置容器:用
@Configuration+@ComponentScan开启组件扫描; - 注册 Bean:
@Service注册业务类,@Bean配置数据源、事务管理器; - 依赖注入:
@Autowired注入 Service、JdbcTemplate 等依赖; - AOP 增强:
@Aspect实现日志切面; - 事务控制:
@Transactional声明订单创建方法的事务规则; - 测试运行:通过
ApplicationContext获取 Bean,执行业务方法。

码道开发者社区,聚焦华为云码道 CodeArts 代码智能体,沉淀 Agent、Skill、鸿蒙开发实战内容,供开发者查阅资料、交流技术、分享工程实践
更多推荐


 22
 0
- 0


 已为社区贡献1条内容

所有评论(0)