容器编排大王Kubernetes——资源管理与pod管理(2)
一 Kubernetes中的资源
1.1 资源管理介绍
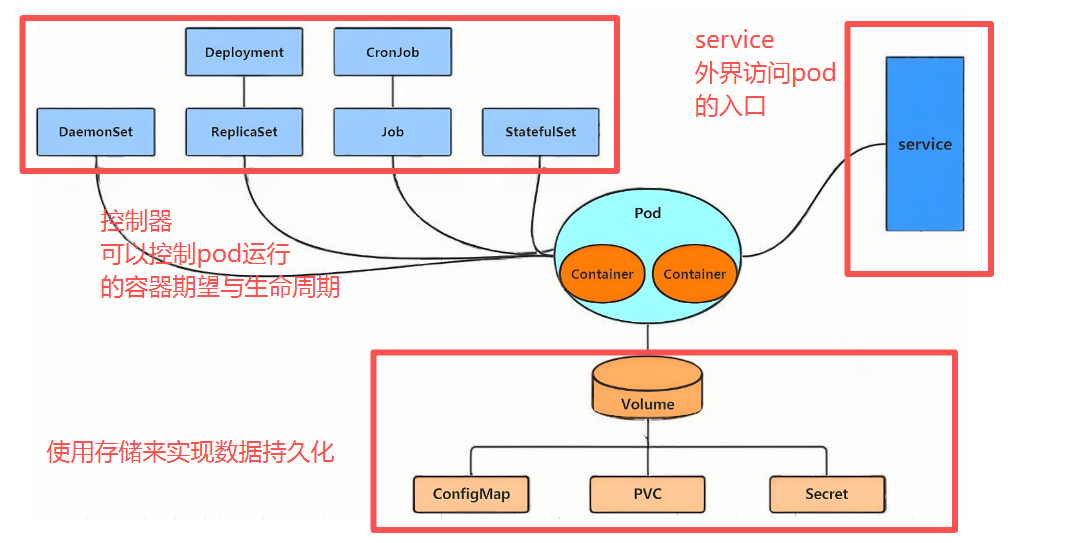
- 在kubernetes中,所有的内容都抽象为资源,用户需要通过操作资源来管理kubernetes。
- kubernetes的本质上就是一个集群系统,用户可以在集群中部署各种服务
- 所谓的部署服务,其实就是在kubernetes集群中运行一个个的容器,并将指定的程序跑在容器中。
- kubernetes的最小管理单元是pod而不是容器,只能将容器放在
Pod中, - kubernetes一般也不会直接管理Pod,而是通过
Pod控制器来管理Pod的。 - Pod中服务的访问是由kubernetes提供的
Service资源来实现。 - Pod中程序的数据需要持久化是由kubernetes提供的各种存储系统来实现
1.2 资源管理方式
-
命令式对象管理:直接使用命令去操作kubernetes资源
kubectl run nginx-pod --image=nginx:latest --port=80 -
命令式对象配置:通过命令配置和配置文件去操作kubernetes资源
kubectl create/patch -f nginx-pod.yaml -
声明式对象配置:通过apply命令和配置文件去操作kubernetes资源
kubectl apply -f nginx-pod.yaml
命令式对象配置与声明式对象配置的区别:
不同点:
命令式对象配置的创建需要使用create,更新使用patch,资源存在时创建会报错已存在
而声明式对象配置创建与更新都是apply,资源存在时appy则为更新
相同点:
都是控制yaml文件来管理资源
| 类型 | 适用环境 | 优点 | 缺点 |
|---|---|---|---|
| 命令式对象管理 | 测试 | 简单 | 只能操作活动对象,无法审计、跟踪,一次性 |
| 命令式对象配置 | 开发 | 可以审计、跟踪 | 项目大时,配置文件多,操作麻烦 |
| 声明式对象配置 | 开发 | 支持目录操作 | 意外情况下难以调试 |
1.3 资源类型与常见命令
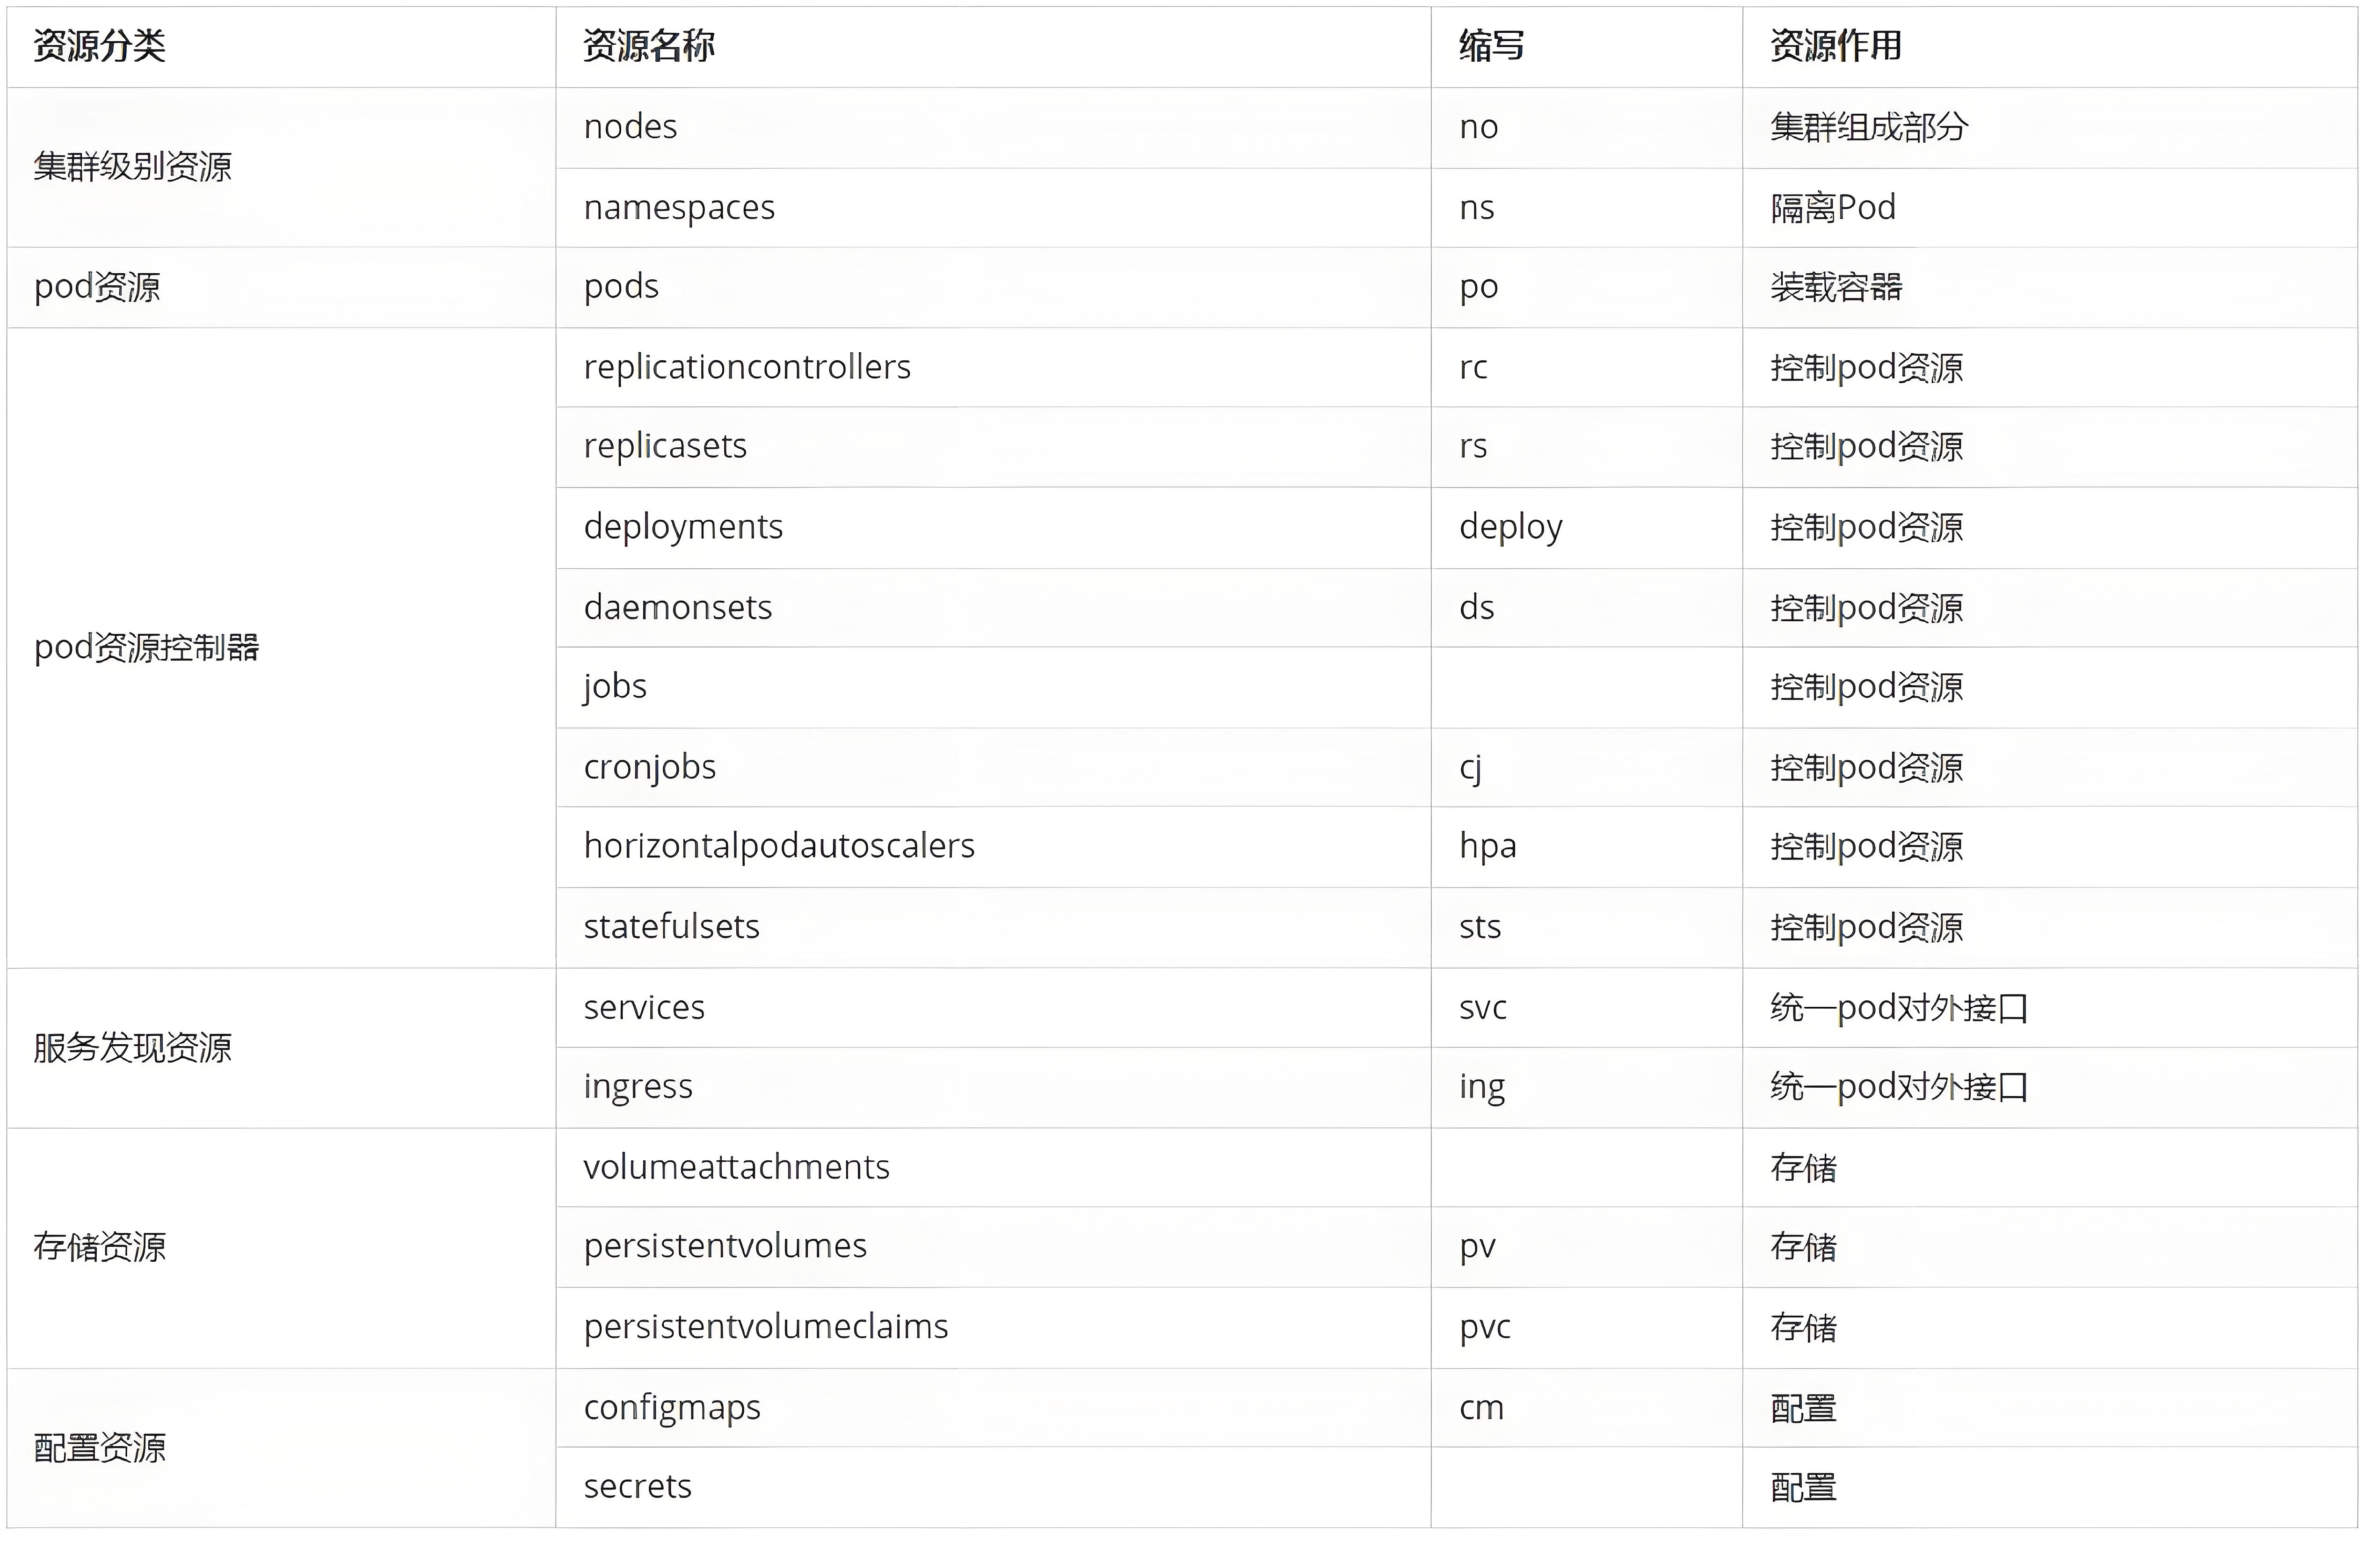
kubernetes中所有的内容都抽象为资源
kubectl api-resources
常用资源类型
kubect 常见命令操作
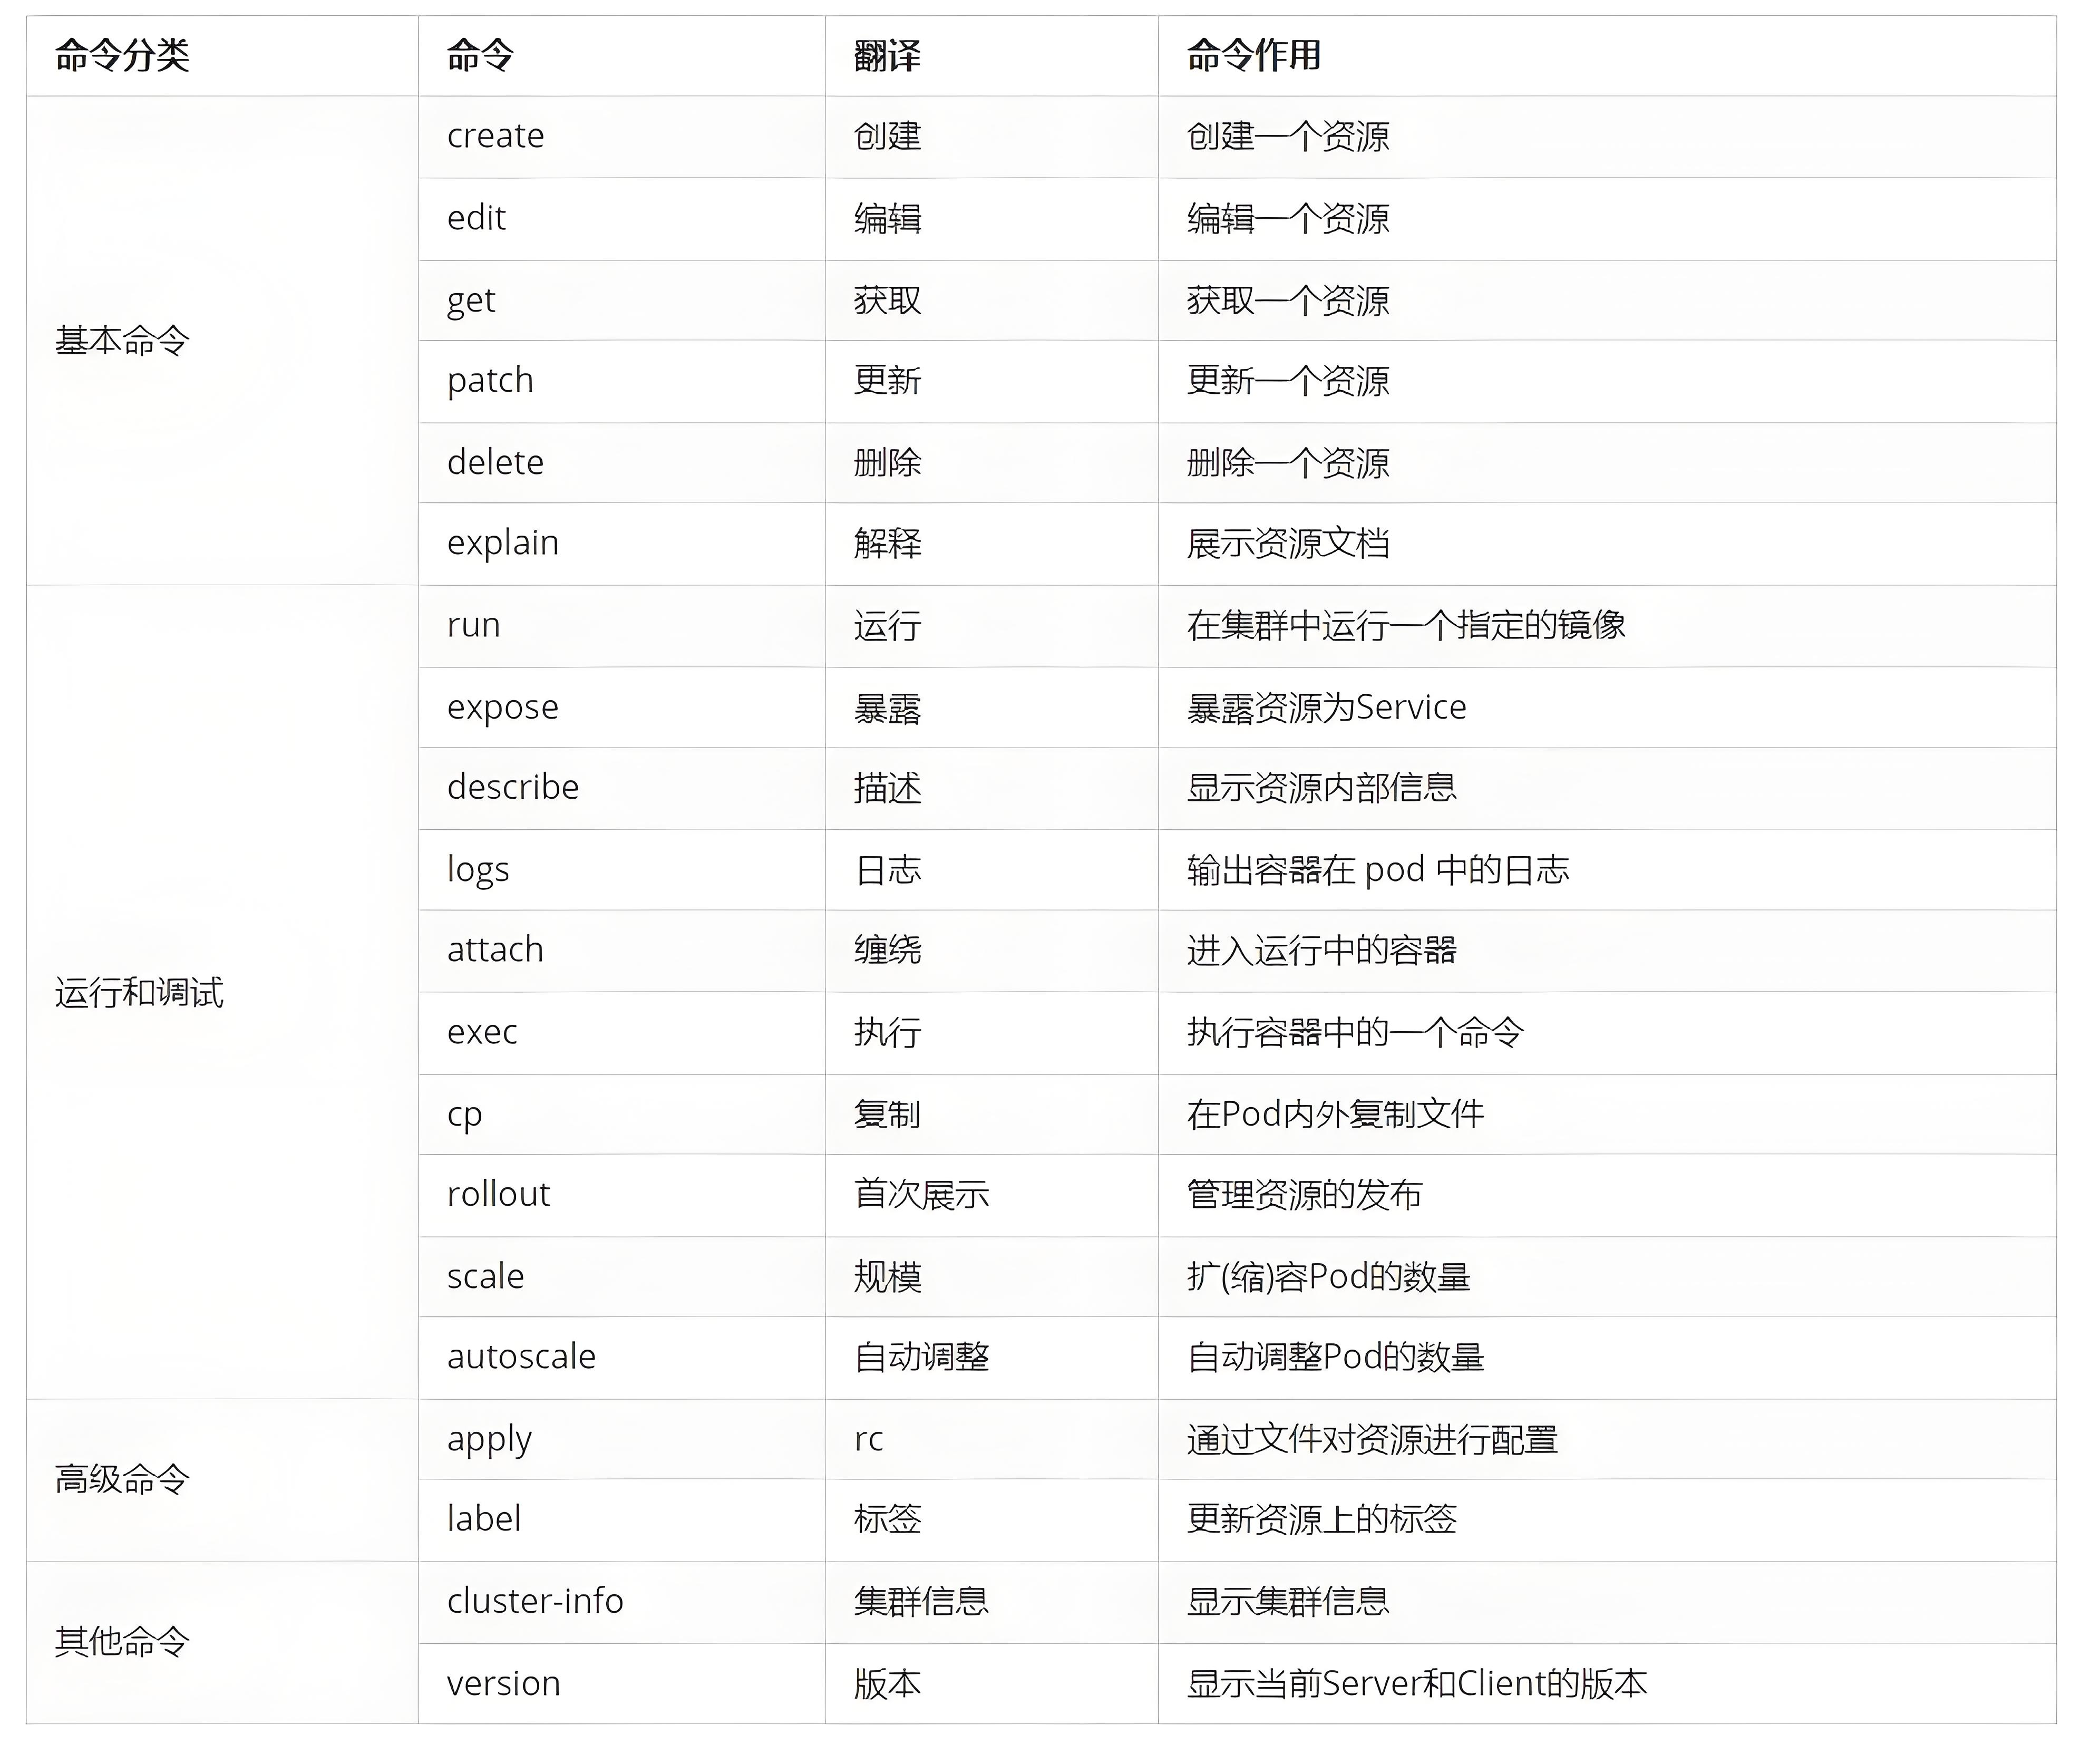
命令式对象管理模板
kubectl是kubernetes集群的命令行工具,通过它能够对集群本身进行管理,并能够在集群上进行容器化应用的安装部署
kubectl命令的语法如下:
kubectl [command] [type] [name] [flags]
comand:指定要对资源执行的操作,例如create、get、delete
type:指定资源类型,比如deployment、pod、service
name:指定资源的名称,名称大小写敏感
flags:指定额外的可选参数
# 查看所有pod
kubectl get pod

# 查看某个pod
kubectl get pod pod_name

# 查看某个pod,以yaml格式展示结果
kubectl get pod pod_name -o yaml
1.4 基本命令示例
kubectl的详细说明地址:https://kubernetes.io/docs/reference/generated/kubectl/kubectl-commands
#显示集群版本
[root@k8s-master ~]# kubectl version
Client Version: v1.30.0
Kustomize Version: v5.0.4-0.20230601165947-6ce0bf390ce3
Server Version: v1.30.0
#显示集群信息
[root@k8s-master ~]# kubectl  cluster-info
Kubernetes control plane is running at https://172.25.254.100:6443
CoreDNS is running at https://172.25.254.100:6443/api/v1/namespaces/kube-system/services/kube-dns:dns/proxy
#创建一个webcluster控制器,控制器中pod数量为2
[root@k8s-master ~]# kubectl create deployment webcluseter --image nginx --replicas 2
#查看控制器
[root@k8s-master ~]# kubectl get  deployments.apps
NAME   READY   UP-TO-DATE   AVAILABLE   AGE
web    3/3     3            3           69m
#查看资源帮助
[root@k8s-master ~]# kubectl explain deployment
GROUP:      apps
KIND:       Deployment
VERSION:    v1

DESCRIPTION:
    Deployment enables declarative updates for Pods and ReplicaSets.

FIELDS:
  apiVersion    <string>
    APIVersion defines the versioned schema of this representation of an object.
    Servers should convert recognized schemas to the latest internal value, and
    may reject unrecognized values. More info:
    https://git.k8s.io/community/contributors/devel/sig-architecture/api-conventions.md#resources

  kind  <string>
    Kind is a string value representing the REST resource this object
    represents. Servers may infer this from the endpoint the client submits
    requests to. Cannot be updated. In CamelCase. More info:
    https://git.k8s.io/community/contributors/devel/sig-architecture/api-conventions.md#types-kinds

  metadata      <ObjectMeta>
    Standard object's metadata. More info:
    https://git.k8s.io/community/contributors/devel/sig-architecture/api-conventions.md#metadata

  spec  <DeploymentSpec>
    Specification of the desired behavior of the Deployment.

  status        <DeploymentStatus>
    Most recently observed status of the Deployment.

#查看控制器参数帮助
[root@k8s-master ~]# kubectl explain deployment.spec
GROUP:      apps
KIND:       Deployment
VERSION:    v1

FIELD: spec <DeploymentSpec>


DESCRIPTION:
    Specification of the desired behavior of the Deployment.
    DeploymentSpec is the specification of the desired behavior of the
    Deployment.

FIELDS:
  minReadySeconds       <integer>
    Minimum number of seconds for which a newly created pod should be ready
    without any of its container crashing, for it to be considered available.
    Defaults to 0 (pod will be considered available as soon as it is ready)

  paused        <boolean>
    Indicates that the deployment is paused.

  progressDeadlineSeconds       <integer>
    The maximum time in seconds for a deployment to make progress before it is
    considered to be failed. The deployment controller will continue to process
    failed deployments and a condition with a ProgressDeadlineExceeded reason
    will be surfaced in the deployment status. Note that progress will not be
    estimated during the time a deployment is paused. Defaults to 600s.

  replicas      <integer>
    Number of desired pods. This is a pointer to distinguish between explicit
    zero and not specified. Defaults to 1.

  revisionHistoryLimit  <integer>
    The number of old ReplicaSets to retain to allow rollback. This is a pointer
    to distinguish between explicit zero and not specified. Defaults to 10.

  selector      <LabelSelector> -required-
    Label selector for pods. Existing ReplicaSets whose pods are selected by
    this will be the ones affected by this deployment. It must match the pod
    template's labels.

  strategy      <DeploymentStrategy>
    The deployment strategy to use to replace existing pods with new ones.

  template      <PodTemplateSpec> -required-
    Template describes the pods that will be created. The only allowed
    template.spec.restartPolicy value is "Always".
#编辑控制器配置
[root@k8s-master ~]# kubectl edit deployments.apps web
@@@@省略内容@@@@@@
spec:
  progressDeadlineSeconds: 600
  replicas: 2

[root@k8s-master ~]# kubectl get deployments.apps
NAME   READY   UP-TO-DATE   AVAILABLE   AGE
web    2/2     2            2           73m
#利用补丁更改控制器配置
[root@k8s-master ~]# kubectl patch  deployments.apps web -p '{"spec":{"replicas":4}}'
deployment.apps/web patched
[root@k8s-master ~]# kubectl get deployments.apps
NAME   READY   UP-TO-DATE   AVAILABLE   AGE
web    4/4     4            4           74m
#删除资源
[root@k8s-master ~]# kubectl delete deployments.apps web
deployment.apps "web" deleted
[root@k8s-master ~]# kubectl get deployments.apps
No resources found in default namespace.
1.5 运行和调试示例
#运行pod
[root@k8s-master ~]# kubectl run testpod --image nginx
pod/testpod created
[root@k8s-master ~]# kubectl get pods
NAME      READY   STATUS    RESTARTS   AGE
testpod   1/1     Running   0          7s
#端口暴漏
[root@k8s-master ~]# kubectl get  services
NAME         TYPE        CLUSTER-IP   EXTERNAL-IP   PORT(S)   AGE
kubernetes   ClusterIP   10.96.0.1    <none>        443/TCP   2d14h

[root@k8s-master ~]# kubectl expose pod testpod --port 80 --target-port 80
service/testpod exposed

[root@k8s-master ~]# kubectl get services
NAME         TYPE        CLUSTER-IP     EXTERNAL-IP   PORT(S)   AGE
kubernetes   ClusterIP   10.96.0.1      <none>        443/TCP   2d14h
testpod      ClusterIP   10.106.78.42   <none>        80/TCP    18s
[root@k8s-master ~]# curl  10.106.78.42
<!DOCTYPE html>
<html>
<head>
<title>Welcome to nginx!</title>
#查看资源详细信息
[root@k8s-master ~]# kubectl describe pods testpod
#查看资源日志
[root@k8s-master ~]# kubectl logs pods/testpod
/docker-entrypoint.sh: /docker-entrypoint.d/ is not empty, will attempt to perform configuration
/docker-entrypoint.sh: Looking for shell scripts in /docker-entrypoint.d/
2024/08/29 05:37:29 [notice] 1#1: using the "epoll" event method
2024/08/29 05:37:29 [notice] 1#1: nginx/1.27.1
2024/08/29 05:37:29 [notice] 1#1: built by gcc 12.2.0 (Debian 12.2.0-14)
2024/08/29 05:37:29 [notice] 1#1: OS: Linux 5.14.0-427.13.1.el9_4.x86_64
2024/08/29 05:37:29 [notice] 1#1: getrlimit(RLIMIT_NOFILE): 1073741816:1073741816
2024/08/29 05:37:29 [notice] 1#1: start worker processes
2024/08/29 05:37:29 [notice] 1#1: start worker process 29
10.244.0.0 - - [29/Aug/2024:05:41:11 +0000] "GET / HTTP/1.1" 200 615 "-" "curl/7.76.1" "-"
10.244.0.0 - - [29/Aug/2024:05:42:51 +0000] "GET / HTTP/1.1" 200 615 "-" "curl/7.76.1" "-"
#运行交互pod
[root@k8s-master ~]# kubectl run -it testpod --image busybox

If you don't see a command prompt, try pressing enter.
/ #
/ #	              #ctrl+pq退出不停止pod

#运行非交互pod
[root@k8s-master ~]# kubectl run  nginx  --image nginx
pod/nginx created

#进入到已经运行的容器,且容器有交互环境
[root@k8s-master ~]# kubectl attach pods/testpod  -it
If you don't see a command prompt, try pressing enter.
/ #
/ #

#在已经运行的pod中运行指定命令
[root@k8s-master ~]# kubectl exec  -it pods/nginx  /bin/bash
kubectl exec [POD] [COMMAND] is DEPRECATED and will be removed in a future version. Use kubectl exec [POD] -- [COMMAND] instead.
root@nginx:/#
#日志文件到pod中
[root@k8s-master ~]# kubectl cp anaconda-ks.cfg nginx:/
[root@k8s-master ~]# kubectl exec  -it pods/nginx  /bin/bash
kubectl exec [POD] [COMMAND] is DEPRECATED and will be removed in a future version. Use kubectl exec [POD] -- [COMMAND] instead.
root@nginx:/# ls
anaconda-ks.cfg  boot  docker-entrypoint.d   etc   lib    media  opt   root  sbin  sys  usr
bin              dev   docker-entrypoint.sh  home  lib64  mnt    proc  run   srv   tmp  var
root@nginx:/#

#复制pod中的文件到本机
[root@k8s-master ~]# kubectl cp  nginx:/anaconda-ks.cfg anaconda-ks.cfg
tar: Removing leading `/' from member names
1.6 高级命令示例
#利用命令生成yaml模板文件
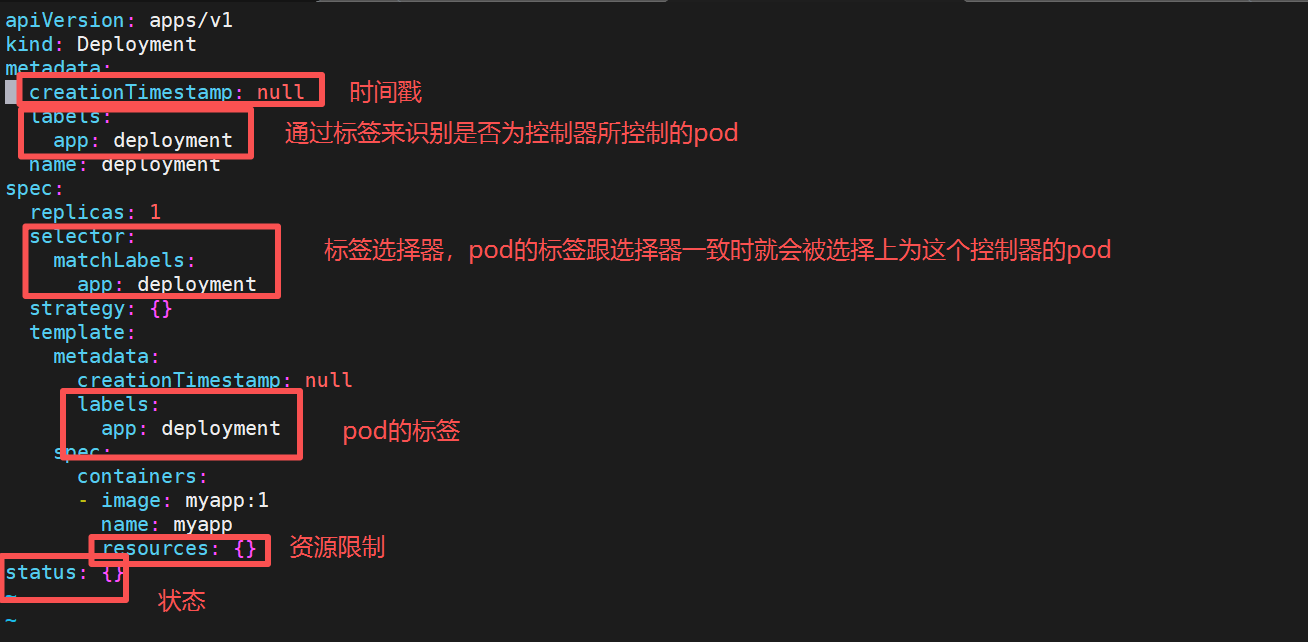
[root@k8s-master ~]# kubectl create deployment --image nginx webcluster --dry-run=client   -o yaml  > webcluster.yml


#利用yaml文件生成资源
[root@k8s-master ~]# vim webcluster.yml
apiVersion: apps/v1
kind: Deployment
metadata:
  creationTimestamp: null
  labels:
    app: webcluster
  name: webcluster
spec:
  replicas: 2
  selector:
    matchLabels:
      app: webcluster
  template:
    metadata:
      labels:
        app: webcluster
    spec:
      containers:
      - image: nginx
        name: nginx

[root@k8s-master ~]# kubectl apply -f webcluster.yml
deployment.apps/webcluster created

[root@k8s-master ~]# kubectl get deployments.apps
NAME         READY   UP-TO-DATE   AVAILABLE   AGE
webcluster   2/2     2            2           21s

[root@k8s-master ~]# kubectl delete -f webcluster.yml
deployment.apps "webcluster" deleted
#管理资源标签
[root@k8s-master ~]# kubectl run nginx --image  nginx
[root@k8s-master ~]# kubectl get pods  --show-labels
NAME                          READY   STATUS    RESTARTS   AGE   LABELS
nginx                         1/1     Running   0          12s   run=nginx

[root@k8s-master ~]# kubectl label pods nginx app=lee
[root@k8s-master ~]# kubectl get pods  --show-labels
NAME                          READY   STATUS    RESTARTS   AGE   LABELS
nginx                         1/1     Running   0          57s   app=lee,run=nginx

#更改标签
[root@k8s-master ~]# kubectl label pods nginx app=webcluster --overwrite

#删除标签
[root@k8s-master ~]# kubectl label pods nginx app-
pod/nginx unlabeled
[root@k8s-master ~]# kubectl get pods nginx --show-labels
NAME    READY   STATUS    RESTARTS   AGE     LABELS
nginx   1/1     Running   0          7m56s   run=nginx

#标签时控制器识别pod示例的标识
[root@k8s-master ~]# kubectl get pods --show-labels
NAME                          READY   STATUS    RESTARTS   AGE     LABELS
nginx                         1/1     Running   0          11m     run=nginx
webcluster-7c584f774b-66zbd   1/1     Running   0          2m10s   app=webcluster,pod-template-hash=7c584f774b
webcluster-7c584f774b-9x2x2   1/1     Running   0          35m     app=webcluster,pod-template-hash=7c584f774b

#删除pod上的标签
root@k8s-master ~]# kubectl label pods webcluster-7c584f774b-66zbd app-
pod/webcluster-7c584f774b-66zbd unlabeled

#控制器会重新启动新pod
[root@k8s-master ~]# kubectl get pods --show-labels
NAME                          READY   STATUS    RESTARTS   AGE     LABELS
nginx                         1/1     Running   0          11m     run=nginx
webcluster-7c584f774b-66zbd   1/1     Running   0          2m39s   pod-template-hash=7c584f774b
webcluster-7c584f774b-9x2x2   1/1     Running   0          36m     app=webcluster,pod-template-hash=7c584f774b
webcluster-7c584f774b-hgprn   1/1     Running   0          2s      app=webcluster,pod-template-hash=7c584f774b
二 什么是pod
官方文档:https://kubernetes.io/zh/docs/concepts/workloads/pods/
- Pod是可以创建和管理Kubernetes计算的最小可部署单元
- 一个Pod代表着集群中运行的一个进程,每个pod都有一个唯一的ip。
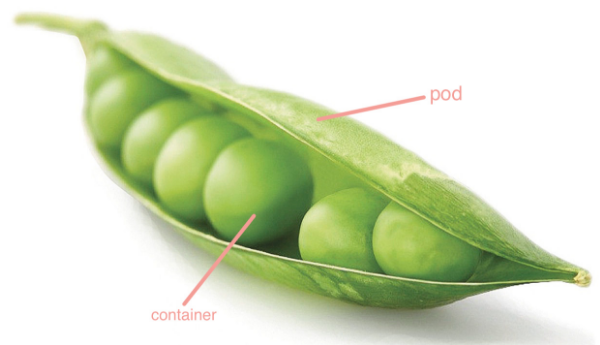
- 一个pod类似一个豌豆荚,包含一个或多个容器(通常是docker)
- 多个容器间共享IPC、Network和UTC namespace。
2.1 直接运行pod(生产不推荐)
优点:
灵活性高:
- 可以精确控制 Pod 的各种配置参数,包括容器的镜像、资源限制、环境变量、命令和参数等,满足特定的应用需求。
学习和调试方便:
- 对于学习 Kubernetes 的原理和机制非常有帮助,通过手动创建 Pod 可以深入了解 Pod 的结构和配置方式。在调试问题时,可以更直接地观察和调整 Pod 的设置。
适用于特殊场景:
- 在一些特殊情况下,如进行一次性任务、快速验证概念或在资源受限的环境中进行特定配置时,手动创建 Pod 可能是一种有效的方式。
缺点:
管理复杂:
- 如果需要管理大量的 Pod,手动创建和维护会变得非常繁琐和耗时。难以实现自动化的扩缩容、故障恢复等操作。
缺乏高级功能:
- 无法自动享受 Kubernetes 提供的高级功能,如自动部署、滚动更新、服务发现等。这可能导致应用的部署和管理效率低下。
可维护性差:
- 手动创建的 Pod 在更新应用版本或修改配置时需要手动干预,容易出现错误,并且难以保证一致性。相比之下,通过声明式配置或使用 Kubernetes 的部署工具可以更方便地进行应用的维护和更新。
#使用命令直接运行pod
#没运行pod时
[root@master pods]# kubectl get pods
No resources found in default namespace.

[root@master pods]# kubectl run testpod --image nginx
pod/testpod created

[root@master pods]# kubectl get pods
NAME      READY   STATUS    RESTARTS   AGE
testpod   1/1     Running   0          7s

#查看pods的详细信息
[root@master pods]# kubectl get pods -o wide
NAME      READY   STATUS    RESTARTS   AGE   IP              NODE    NOMINATED NODE   READINESS GATES
testpod   1/1     Running   0          48s   10.244.104.12   node2   <none>           <none>
[root@master pods]# kubectl describe pods testpod
2.2 利用控制器管理pod(推荐)
高可用性和可靠性:
- 自动故障恢复:如果一个 Pod 失败或被删除,控制器会自动创建新的 Pod 来维持期望的副本数量。确保应用始终处于可用状态,减少因单个 Pod 故障导致的服务中断。
- 健康检查和自愈:可以配置控制器对 Pod 进行健康检查(如存活探针和就绪探针)。如果 Pod 不健康,控制器会采取适当的行动,如重启 Pod 或删除并重新创建它,以保证应用的正常运行。
可扩展性:
- 轻松扩缩容:可以通过简单的命令或配置更改来增加或减少 Pod 的数量,以满足不同的工作负载需求。例如,在高流量期间可以快速扩展以处理更多请求,在低流量期间可以缩容以节省资源。
- 水平自动扩缩容(HPA):可以基于自定义指标(如 CPU 利用率、内存使用情况或应用特定的指标)自动调整 Pod 的数量,实现动态的资源分配和成本优化。
版本管理和更新:
- 滚动更新:对于 Deployment 等控制器,可以执行滚动更新来逐步替换旧版本的 Pod 为新版本,确保应用在更新过程中始终保持可用。可以控制更新的速率和策略,以减少对用户的影响。
- 回滚:如果更新出现问题,可以轻松回滚到上一个稳定版本,保证应用的稳定性和可靠性。
声明式配置:
- 简洁的配置方式:使用 YAML 或 JSON 格式的声明式配置文件来定义应用的部署需求。这种方式使得配置易于理解、维护和版本控制,同时也方便团队协作。
- 期望状态管理:只需要定义应用的期望状态(如副本数量、容器镜像等),控制器会自动调整实际状态与期望状态保持一致。无需手动管理每个 Pod 的创建和删除,提高了管理效率。
服务发现和负载均衡:
- 自动注册和发现:Kubernetes 中的服务(Service)可以自动发现由控制器管理的 Pod,并将流量路由到它们。这使得应用的服务发现和负载均衡变得简单和可靠,无需手动配置负载均衡器。
- 流量分发:可以根据不同的策略(如轮询、随机等)将请求分发到不同的 Pod,提高应用的性能和可用性。
多环境一致性:
- 一致的部署方式:在不同的环境(如开发、测试、生产)中,可以使用相同的控制器和配置来部署应用,确保应用在不同环境中的行为一致。这有助于减少部署差异和错误,提高开发和运维效率。
示例:
#建立名为testpods的控制器并自动运行pod
[root@master pods]# kubectl create deployment testpods --image nginx
deployment.apps/testpods created
[root@master pods]# kubectl get pods
NAME                        READY   STATUS              RESTARTS   AGE
testpods-5fc56795bb-xl5jb   0/1     ContainerCreating   0          4s

#为testpods扩容
[root@master pods]# kubectl scale deployment testpods --replicas 6
deployment.apps/testpods scaled
[root@master pods]# kubectl get pods
NAME                        READY   STATUS              RESTARTS   AGE
testpods-5fc56795bb-2vhwx   1/1     Running             0          5s
testpods-5fc56795bb-8mp2z   1/1     Running             0          5s
testpods-5fc56795bb-dvnhj   0/1     ContainerCreating   0          5s
testpods-5fc56795bb-s25p8   1/1     Running             0          5s
testpods-5fc56795bb-xb9f7   0/1     ContainerCreating   0          5s
testpods-5fc56795bb-xl5jb   1/1     Running             0          27s

#为testpods缩容
[root@master pods]# kubectl scale deployment testpods --replicas 2
deployment.apps/testpods scaled
[root@master pods]# kubectl get pods
NAME                        READY   STATUS    RESTARTS   AGE
testpods-5fc56795bb-2vhwx   1/1     Running   0          23s
testpods-5fc56795bb-xl5jb   1/1     Running   0          45s
[root@master pods]#
2.3 示例-利用控制器进行应用版本的更新与回滚
#利用控制器建立测试pod
[root@master pods]# kubectl create deployment testpods --image myapp:v1 --replicas=2
deployment.apps/testpods created

#暴露端口,供集群内部访问
[root@master pods]# kubectl expose deployment testpods --port 80 --target-port 80
service/testpods exposed
[root@master pods]# kubectl get service
NAME         TYPE        CLUSTER-IP    EXTERNAL-IP   PORT(S)   AGE
kubernetes   ClusterIP   10.96.0.1     <none>        443/TCP   8d
testpods     ClusterIP   10.98.29.51   <none>        80/TCP    7s

#访问测试
[root@master pods]# curl 10.98.29.51
Hello MyApp | Version: v1 | <a href="hostname.html">Pod Name</a>

#查看历史版本当前只有一个
[root@master pods]# kubectl rollout history deployment testpods
deployment.apps/testpods
REVISION  CHANGE-CAUSE
1         <none>

#更新控制器镜像版本
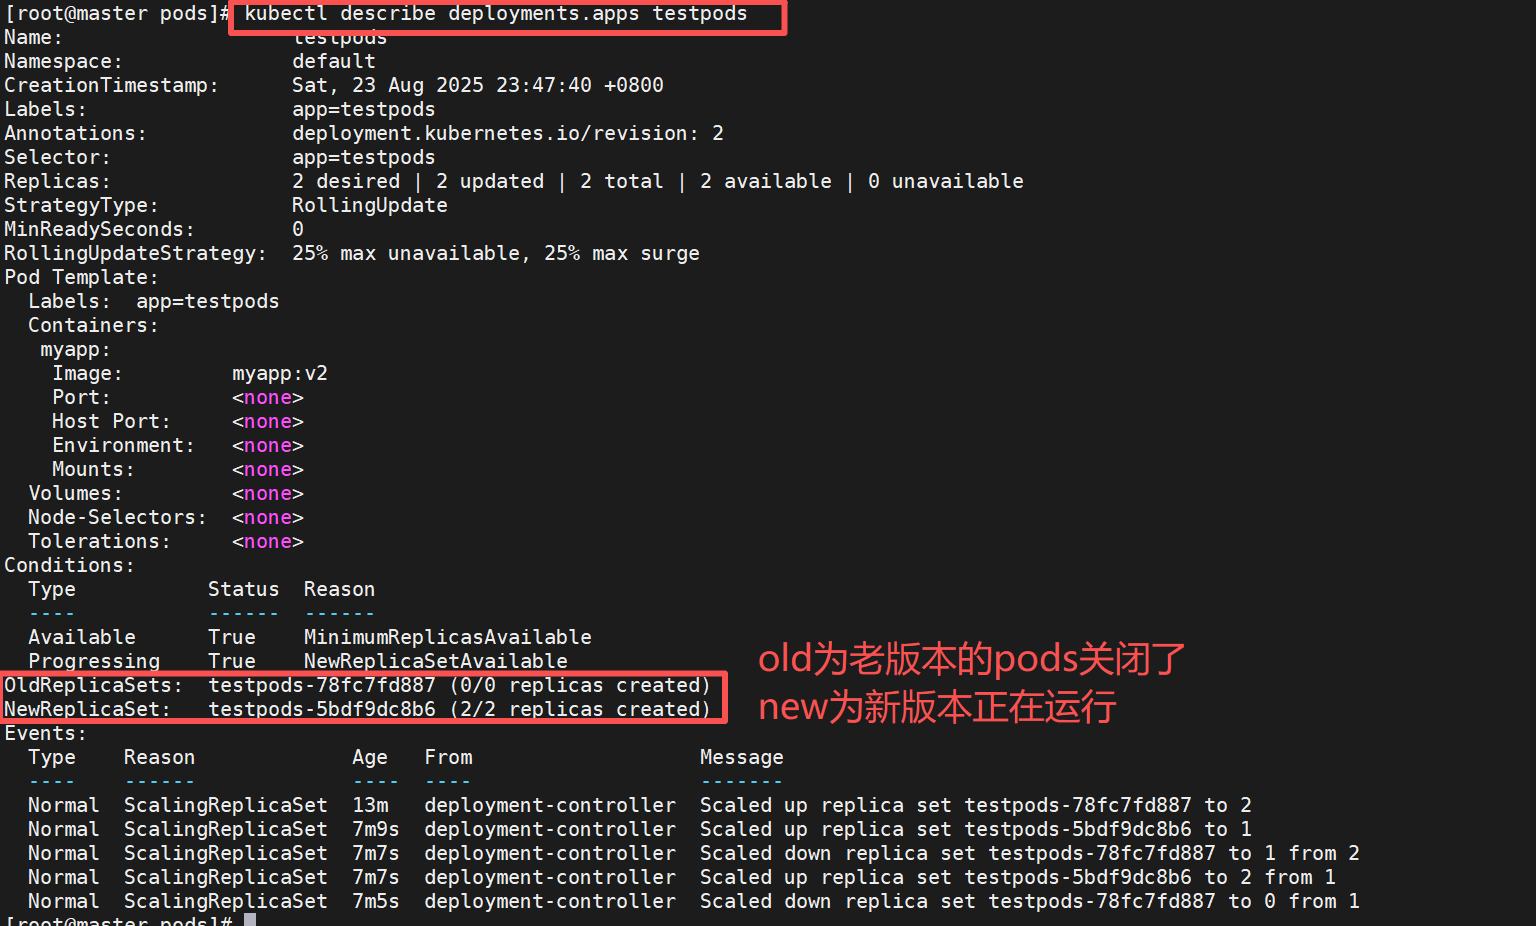
[root@master pods]# kubectl set image deployment/testpods myapp=myapp:v2
deployment.apps/testpods image updated

#查看历史版本
[root@master pods]# kubectl rollout history deployment testpods
deployment.apps/testpods
REVISION  CHANGE-CAUSE
1         <none>
2         <none>

#访问测试
[root@master pods]# curl 10.98.29.51
Hello MyApp | Version: v2 | <a href="hostname.html">Pod Name</a>
#版本回滚
[root@master pods]# kubectl rollout history deployment testpods
deployment.apps/testpods
REVISION  CHANGE-CAUSE
1         <none>
2         <none>

[root@master pods]# kubectl rollout undo deployment testpods --to-revision 1
deployment.apps/testpods rolled back
[root@master pods]# curl 10.98.29.51
Hello MyApp | Version: v1 | <a href="hostname.html">Pod Name</a>

[root@master pods]# kubectl rollout history deployment testpods
deployment.apps/testpods
REVISION  CHANGE-CAUSE
2         <none>	#2为v2版本
3         <none>
2.4 利用yaml文件部署示例
2.4.1 yaml文件部署的优势
声明式配置:
- 清晰表达期望状态:以声明式的方式描述应用的部署需求,包括副本数量、容器配置、网络设置等。这使得配置易于理解和维护,并且可以方便地查看应用的预期状态。
- 可重复性和版本控制:配置文件可以被版本控制,确保在不同环境中的部署一致性。可以轻松回滚到以前的版本或在不同环境中重复使用相同的配置。
- 团队协作:便于团队成员之间共享和协作,大家可以对配置文件进行审查和修改,提高部署的可靠性和稳定性。
灵活性和可扩展性:
- 丰富的配置选项:可以通过 YAML 文件详细地配置各种 Kubernetes 资源,如 Deployment、Service、ConfigMap、Secret 等。可以根据应用的特定需求进行高度定制化。
- 组合和扩展:可以将多个资源的配置组合在一个或多个 YAML 文件中,实现复杂的应用部署架构。同时,可以轻松地添加新的资源或修改现有资源以满足不断变化的需求。
与工具集成:
- 与 CI/CD 流程集成:可以将 YAML 配置文件与持续集成和持续部署(CI/CD)工具集成,实现自动化的应用部署。例如,可以在代码提交后自动触发部署流程,使用配置文件来部署应用到不同的环境。
- 命令行工具支持:Kubernetes 的命令行工具
kubectl对 YAML 配置文件有很好的支持,可以方便地应用、更新和删除配置。同时,还可以使用其他工具来验证和分析 YAML 配置文件,确保其正确性和安全性。
#查看对应的kind的api版本信息等等
[root@master pods]# kubectl explain deployment | less

#查看k8s中所有资源类型
[root@master pods]# kubectl api-resources | less

#查看详细的资源帮助
[root@master pods]# kubectl explain kind【类型】.子列表.子列表
#例子
[root@master pods]# kubectl explain pod.spec.containers
2.4.2 资源清单参数
| 参数名称 | 类型 | 参数说明 |
|---|---|---|
| version | String | 这里是指的是K8S API的版本,目前基本上是v1,可以用kubectl api-versions命令查询 |
| kind | String | 这里指的是yaml文件定义的资源类型和角色,比如:Pod |
| metadata | Object | 元数据对象,固定值就写metadata |
| metadata.name | String | 元数据对象的名字,这里由我们编写,比如命名Pod的名字 |
| metadata.namespace | String | 元数据对象的命名空间,由我们自身定义 |
| Spec | Object | 详细定义对象,固定值就写Spec |
| spec.containers[] | list | 这里是Spec对象的容器列表定义,是个列表 |
| spec.containers[].name | String | 这里定义容器的名字 |
| spec.containers[].image | string | 这里定义要用到的镜像名称 |
| spec.containers[].imagePullPolicy | String | 定义镜像拉取策略,有三个值可选: (1) Always: 每次都尝试重新拉取镜像 (2) IfNotPresent:如果本地有镜像就使用本地镜像 (3) )Never:表示仅使用本地镜像 |
| spec.containers[].command[] | list | 指定容器运行时启动的命令,若未指定则运行容器打包时指定的命令 |
| spec.containers[].args[] | list | 指定容器运行参数,可以指定多个 |
| spec.containers[].workingDir | String | 指定容器工作目录 |
| spec.containers[].volumeMounts[] | list | 指定容器内部的存储卷配置 |
| spec.containers[].volumeMounts[].name | String | 指定可以被容器挂载的存储卷的名称 |
| spec.containers[].volumeMounts[].mountPath | String | 指定可以被容器挂载的存储卷的路径 |
| spec.containers[].volumeMounts[].readOnly | String | 设置存储卷路径的读写模式,ture或false,默认为读写模式 |
| spec.containers[].ports[] | list | 指定容器需要用到的端口列表 |
| spec.containers[].ports[].name | String | 指定端口名称 |
| spec.containers[].ports[].containerPort | String | 指定容器需要监听的端口号 |
| spec.containers[] ports[].hostPort | String | 指定容器所在主机需要监听的端口号,默认跟上面containerPort相同,注意设置了hostPort同一台主机无法启动该容器的相同副本(因为主机的端口号不能相同,这样会冲突) |
| spec.containers[].ports[].protocol | String | 指定端口协议,支持TCP和UDP,默认值为 TCP |
| spec.containers[].env[] | list | 指定容器运行前需设置的环境变量列表 |
| spec.containers[].env[].name | String | 指定环境变量名称 |
| spec.containers[].env[].value | String | 指定环境变量值 |
| spec.containers[].resources | Object | 指定资源限制和资源请求的值(这里开始就是设置容器的资源上限) |
| spec.containers[].resources.limits | Object | 指定设置容器运行时资源的运行上限 |
| spec.containers[].resources.limits.cpu | String | 指定CPU的限制,单位为核心数,1=1000m |
| spec.containers[].resources.limits.memory | String | 指定MEM内存的限制,单位为MIB、GiB |
| spec.containers[].resources.requests | Object | 指定容器启动和调度时的限制设置 |
| spec.containers[].resources.requests.cpu | String | CPU请求,单位为core数,容器启动时初始化可用数量 |
| spec.containers[].resources.requests.memory | String | 内存请求,单位为MIB、GIB,容器启动的初始化可用数量 |
| spec.restartPolicy | string | 定义Pod的重启策略,默认值为Always. (1)Always: Pod-旦终止运行,无论容器是如何 终止的,kubelet服务都将重启它 (2)OnFailure: 只有Pod以非零退出码终止时,kubelet才会重启该容器。如果容器正常结束(退出码为0),则kubelet将不会重启它 (3) Never: Pod终止后,kubelet将退出码报告给Master,不会重启该 |
| spec.nodeSelector | Object | 定义Node的Label过滤标签,以key:value格式指定 |
| spec.imagePullSecrets | Object | 定义pull镜像时使用secret名称,以name:secretkey格式指定 |
| spec.hostNetwork | Boolean | 定义是否使用主机网络模式,默认值为false。设置true表示使用宿主机网络,不使用docker网桥,同时设置了true将无法在同一台宿主机 上启动第二个副本 |
示例1-运行单个容器pod
# --dry-run=client:客户端模拟运行,不会真正在集群中创建资源,仅用于生成配置
# -o yaml:输出格式为 YAML
与 --dry-run=server 的区别:
Kubernetes 还提供 --dry-run=server 参数,两者的区别在于:
--dry-run=client:仅在本地客户端验证,不与集群交互,速度快,但无法检查集群层面的约束(如资源名称是否已存在),输出的模板为简要信息。--dry-run=server:会向 API 服务器发送请求,但服务器会在执行前验证配置(如名称是否冲突、权限是否足够),最终不会实际创建资源,输出的模板为全部信息。
#输出模板
[root@master ~]# kubectl run fjwyyy --image myapp:v1 --dry-run=client -o yaml > test.yml
#这个命令常用于快速生成基础配置文件,之后你可以根据需要编辑 test.yml(如添加资源限制、环境变量、挂载卷等)
apiVersion: v1
kind: Pod
metadata:
  #creationTimestamp: null				#注释的为默认,先不提及,先做简单的单个pod
  labels:
    run: fjwyyy
  name: fjwyyy
spec:
  containers:
  - image: myapp:v1
    name: fjwyyy
    #resources: {}
  #dnsPolicy: ClusterFirst
  #restartPolicy: Always
#status: {}

[root@master ~]# kubectl apply -f test.yml

示例2-运行多个容器pod
[root@master ~]# vim test.yml
apiVersion: v1
kind: Pod
metadata:
  labels:
    run: fjwyyy
  name: fjwyyy
spec:
  containers:
  - image:  nginx:latest		#两个相同镜像都要开80端口
    name: web1

  - image:  nginx:latest
    name: web2

[root@master ~]# kubectl apply -f test.yml
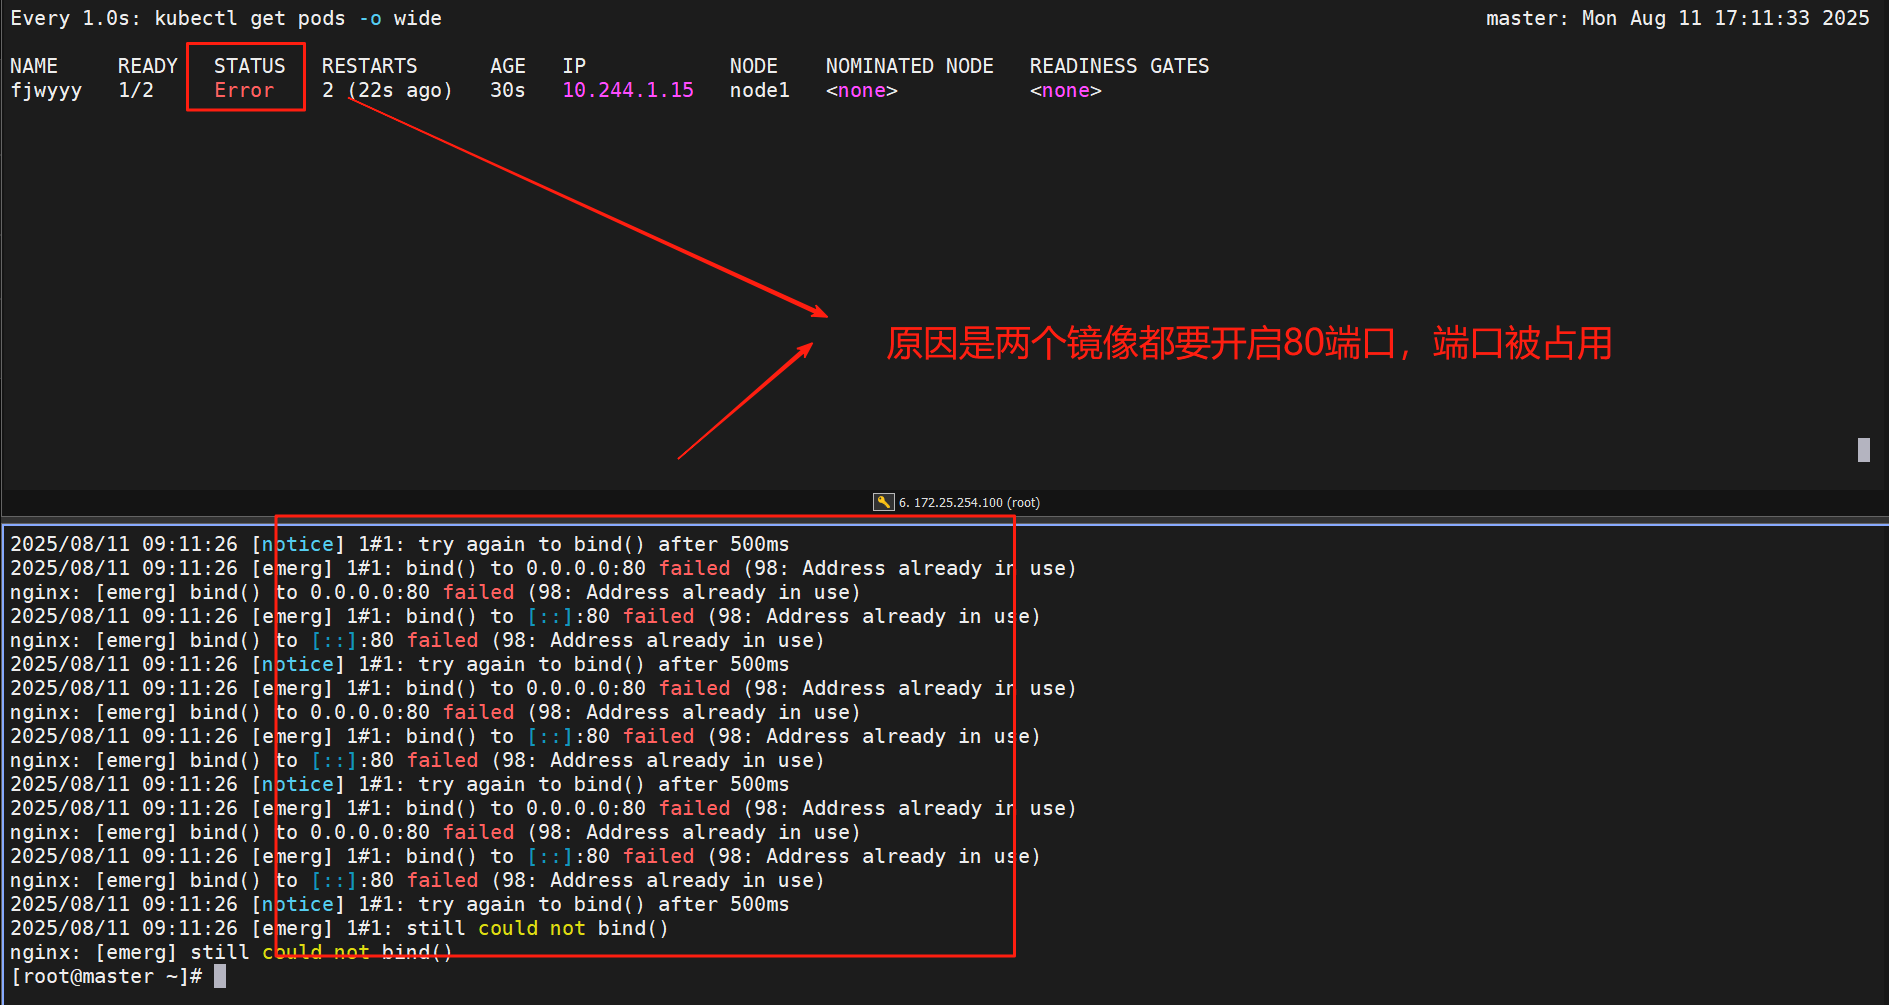
#开启另一个不占用80端口的镜像容器,但是需要设置交互不然会关闭
[root@master ~]# vim test.yml
apiVersion: v1
kind: Pod
metadata:
  labels:
    run: fjwyyy
  name: fjwyyy
spec:
  containers:
  - image:  nginx:latest
    name: web1

  - image:  busyboxplus:latest
    name: box1
    command:
      - /bin/sh
      - -c
      - sleep 1000000000
	#开启时打开shell,占用1000000000s,防止没有驻守进程关闭容器

[root@master ~]# kubectl apply -f test.yml

示例3-pod间的网络整合
#一个pod开启多个容器都是公用一个网络
[root@master ~]# vim test.yml
apiVersion: v1
kind: Pod
metadata:
  labels:
    run: fjwyyy
  name: fjwyyy
spec:
  containers:
  - image:  nginx:latest			#开启一个具有80端口的容器
    name: web1

  - image:  busyboxplus:latest		#开启一个没有具有80端口的容器
    name: box1
    command:
      - /bin/sh
      - -c
      - sleep 1000000000

[root@master ~]# kubectl  apply -f test.yml	#部署pods
#测试
[root@master ~]# kubectl exec fjwyyy -c box1 -- curl -s localhost
#访问出来的是nginx的默认发布页,box1容器是没开端口映射80端口的访问的是web1的80端口,可以看出同一个pod共用一个网络
示例4-端口映射
#端口映射可以在直接访问node节点的IP来访问pod开启的服务
[root@master pods]# kubectl run tespod --image=myapp:v1 --dry-run=client -o yaml > testpod.yml
[root@master pods]# vim testpod.yml
apiVersion: v1
kind: Pod
metadata:
  labels:
    run: tespod
  name: tespod
spec:
  containers:
  - image: myapp:v1
    name: tespod
    ports:
    - name: http
      containerPort: 80
      hostPort: 80
      protocol: TCP

[root@master pods]# kubectl apply -f testpod.yml
pod/tespod created

#查看在哪个节点开启
[root@master pods]# kubectl get pods -o wide
NAME     READY   STATUS    RESTARTS   AGE     IP              NODE    NOMINATED NODE   READINESS GATES
tespod   1/1     Running   0          2m15s   10.244.104.19   node2   <none>           <none>

#访问测试
[root@master pods]# curl 172.25.254.20
Hello MyApp | Version: v1 | <a href="hostname.html">Pod Name</a>
[root@master pods]# curl node2
Hello MyApp | Version: v1 | <a href="hostname.html">Pod Name</a>
示例5-设置环境变量
[root@master pods]# vim testpod.yml
apiVersion: v1
kind: Pod
metadata:
  labels:
    run: fjw
  name: testpod
spec:
  containers:
    - image: busyboxplus:latest
      name: busybox
      command: ["/bin/sh","-c","echo $NAME;sleep 3000000"]
      env:
      - name: NAME
        value: fjw

[root@master pods]# kubectl apply -f testpod.yml
pod/testpod configured
[root@master pods]# kubectl logs pods/testpod busybox
fjw
示例6-容器启动管理
[root@k8s-master ~]# vim pod.yml
apiVersion: v1
kind: Pod
metadata:
  labels:
    run: fjwyyy
  name: test
spec:
  restartPolicy: Always				#默认值,可以设置为never删除了不重启
  containers:
    - image: myapp:v1
      name: myapp
[root@k8s-master ~]# kubectl apply -f pod.yml
pod/test created

[root@k8s-master ~]# kubectl get pods  -o wide
NAME   READY   STATUS    RESTARTS   AGE   IP           NODE        NOMINATED NODE   READINESS GATES
test   1/1     Running   0          6s    10.244.2.3   k8s-node2   <none>           <none>

[root@k8s-node2 ~]# docker rm -f ccac1d64ea81
#删除了还会重启
示例7-选择运行节点
[root@k8s-master ~]# vim pod.yml
apiVersion: v1
kind: Pod
metadata:
  labels:
    run: fjwyyy
  name: test
spec:
  nodeSelector:
   	kubernetes.io/hostname: k8s-node1		#选择node1的标签就会在node1上运行
  restartPolicy: Always
  containers:
    - image: myapp:v1
      name: myapp
[root@k8s-master ~]# kubectl apply -f pod.yml
pod/test created

[root@k8s-master ~]# kubectl get pods  -o wide
NAME   READY   STATUS    RESTARTS   AGE   IP           NODE        NOMINATED NODE   READINESS GATES
test   1/1     Running   0          21s   10.244.1.5   k8s-node1   <none>           <none>
示例8-共享宿主机网络
[root@k8s-master ~]# vim pod.yml
apiVersion: v1
kind: Pod
metadata:
  labels:
    run: fjwyyy
  name: test
spec:
  hostNetwork: true
  restartPolicy: Always
  containers:
    - image: busybox:latest
      name: busybox
      command: ["/bin/sh","-c","sleep 100000"]
[root@k8s-master ~]# kubectl apply -f pod.yml
pod/test created
[root@k8s-master ~]# kubectl exec -it pods/test -c busybox -- /bin/sh
/ # ifconfig
cni0      Link encap:Ethernet  HWaddr E6:D4:AA:81:12:B4
          inet addr:10.244.2.1  Bcast:10.244.2.255  Mask:255.255.255.0
          inet6 addr: fe80::e4d4:aaff:fe81:12b4/64 Scope:Link
          UP BROADCAST RUNNING MULTICAST  MTU:1450  Metric:1
          RX packets:6259 errors:0 dropped:0 overruns:0 frame:0
          TX packets:6495 errors:0 dropped:0 overruns:0 carrier:0
          collisions:0 txqueuelen:1000
          RX bytes:506704 (494.8 KiB)  TX bytes:625439 (610.7 KiB)

docker0   Link encap:Ethernet  HWaddr 02:42:99:4A:30:DC
          inet addr:172.17.0.1  Bcast:172.17.255.255  Mask:255.255.0.0
          UP BROADCAST MULTICAST  MTU:1500  Metric:1
          RX packets:0 errors:0 dropped:0 overruns:0 frame:0
          TX packets:0 errors:0 dropped:0 overruns:0 carrier:0
          collisions:0 txqueuelen:0
          RX bytes:0 (0.0 B)  TX bytes:0 (0.0 B)

eth0      Link encap:Ethernet  HWaddr 00:0C:29:6A:A8:61
          inet addr:172.25.254.20  Bcast:172.25.254.255  Mask:255.255.255.0
          inet6 addr: fe80::8ff3:f39c:dc0c:1f0e/64 Scope:Link
          UP BROADCAST RUNNING MULTICAST  MTU:1500  Metric:1
          RX packets:27858 errors:0 dropped:0 overruns:0 frame:0
          TX packets:14454 errors:0 dropped:0 overruns:0 carrier:0
          collisions:0 txqueuelen:1000
          RX bytes:26591259 (25.3 MiB)  TX bytes:1756895 (1.6 MiB)

flannel.1 Link encap:Ethernet  HWaddr EA:36:60:20:12:05
          inet addr:10.244.2.0  Bcast:0.0.0.0  Mask:255.255.255.255
          inet6 addr: fe80::e836:60ff:fe20:1205/64 Scope:Link
          UP BROADCAST RUNNING MULTICAST  MTU:1450  Metric:1
          RX packets:0 errors:0 dropped:0 overruns:0 frame:0
          TX packets:0 errors:0 dropped:40 overruns:0 carrier:0
          collisions:0 txqueuelen:0
          RX bytes:0 (0.0 B)  TX bytes:0 (0.0 B)

lo        Link encap:Local Loopback
          inet addr:127.0.0.1  Mask:255.0.0.0
          inet6 addr: ::1/128 Scope:Host
          UP LOOPBACK RUNNING  MTU:65536  Metric:1
          RX packets:163 errors:0 dropped:0 overruns:0 frame:0
          TX packets:163 errors:0 dropped:0 overruns:0 carrier:0
          collisions:0 txqueuelen:1000
          RX bytes:13630 (13.3 KiB)  TX bytes:13630 (13.3 KiB)

veth9a516531 Link encap:Ethernet  HWaddr 7A:92:08:90:DE:B2
          inet6 addr: fe80::7892:8ff:fe90:deb2/64 Scope:Link
          UP BROADCAST RUNNING MULTICAST  MTU:1450  Metric:1
          RX packets:6236 errors:0 dropped:0 overruns:0 frame:0
          TX packets:6476 errors:0 dropped:0 overruns:0 carrier:0
          collisions:0 txqueuelen:0
          RX bytes:592532 (578.6 KiB)  TX bytes:622765 (608.1 KiB)

/ # exit
三 pod的资源限制
资源请求与限制:
-
Request:确保容器获得 “最低保障资源”,K8s 调度器仅会将 Pod 调度到 “剩余资源≥Request” 的节点。
-
Limit:防止容器 “过度占用资源”,CPU 超限时会被限流(不会杀死),内存超限时会被 OOM 杀死。
QoS(服务质量等级):
K8s 根据 Pod 的资源请求 / 限制,将 Pod 分为 3 类 QoS,决定节点资源不足时的 “驱逐优先级”:
资源限制会影响pod的Qos Class资源优先级,资源优先级分为Guaranteed > Burstable > BestEffort
QoS(Quality of Service)即服务质量
| 资源设定 | 优先级类型 |
|---|---|
| 资源限定未设定 | BestEffort |
| 资源限定设定且最大和最小不一致 | Burstable |
| 资源限定设定且最大和最小一致,内存和cpu都要设定 | Guaranteed |
示例:
[root@master pod]# vim pod.yml
apiVersion: v1
kind: Pod
metadata:
  labels:
    run: test
  name: test
spec:
  containers:
  - image: myapp:v1
    name: test
    resources:
      limits:				#pod使用最高限制
        cpu: 500m			#cpu单位m毫秒
        memory: 500M		#内存单位M	1M=1000kb 1Mi=1024kb
      requests:				#pod期望使用值不能大于limits可以<=
        cpu: 200m
        memory: 200M

[root@master pod]# kubectl delete -f pod.yml

[root@master pod]# kubectl get pods
NAME   READY   STATUS    RESTARTS   AGE
test   1/1     Running   0          7s

[root@master pod]# kubectl describe pods test
    Limits:
      cpu:     500m
      memory:  500M
    Requests:
      cpu:        200m
      memory:     200M

QoS Class:                   Burstable	#limits与requests不相同
										#相同为Guaranteed
四 pod的生命周期
4.1 INIT 容器
-
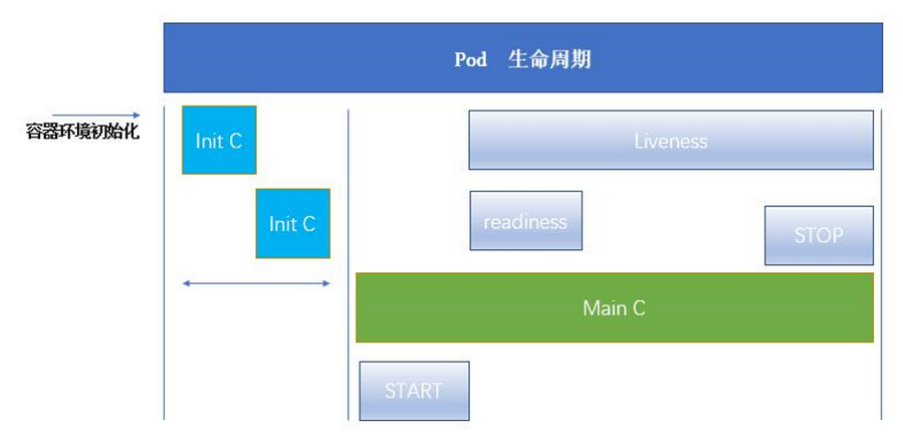
Pod 可以包含多个容器,应用运行在这些容器里面,同时 Pod 也可以有一个或多个先于应用容器启动的 Init 容器。
-
Init 容器与普通的容器非常像,除了如下两点:
-
它们总是运行到完成
-
init 容器不支持 Readiness,因为它们必须在 Pod 就绪之前运行完成,每个 Init 容器必须运行成功,下一个才能够运行。
-
-
如果Pod的 Init 容器失败,Kubernetes 会不断地重启该 Pod,直到 Init 容器成功为止。但是,如果 Pod 对应的 restartPolicy 值为 Never,它不会重新启动。
4.1.1 INIT 容器的功能
- Init 容器可以包含一些安装过程中应用容器中不存在的实用工具或个性化代码。
- Init 容器可以安全地运行这些工具,避免这些工具导致应用镜像的安全性降低。
- 应用镜像的创建者和部署者可以各自独立工作,而没有必要联合构建一个单独的应用镜像。
- Init 容器能以不同于Pod内应用容器的文件系统视图运行。因此,Init容器可具有访问 Secrets 的权限,而应用容器不能够访问。
- 由于 Init 容器必须在应用容器启动之前运行完成,因此 Init 容器提供了一种机制来阻塞或延迟应用容器的启动,直到满足了一组先决条件。一旦前置条件满足,Pod内的所有的应用容器会并行启动。
4.1.2 INIT 容器示例
[root@master pod]# vim pod.yml
apiVersion: v1
kind: Pod
metadata:
  labels:
    run: test
  name: test
spec:
  containers:
  - image: myapp:v1
    name: test
  initContainers:
  - name: init-myservice
    image: busybox
    command: ["sh","-c","until test -e /testfile;do echo wating for myservice; sleep 2;done"]

[root@master pod]# kubectl apply -f pod.yml
pod/test created
[root@master pod]# kubectl get pods
NAME   READY   STATUS     RESTARTS   AGE
test   0/1     Init:0/1   0          3s

[root@master pod]# kubectl logs pods/test init-myservice
wating for myservice
wating for myservice
wating for myservice
wating for myservice

#当一个pod中有多个容器就要用-c来指定操作哪个容器
[root@master pod]# kubectl exec pods/test -c init-myservice -- /bin/sh -c "touch /testfile"

[root@master pod]# kubectl get pods
NAME   READY   STATUS    RESTARTS   AGE
test   1/1     Running   0          2m52s
4.2 探针
探针是由 kubelet 对容器执行的定期诊断:
- ExecAction:在容器内执行指定命令。如果命令退出时返回码为 0 则认为诊断成功。
- TCPSocketAction:对指定端口上的容器的 IP 地址进行 TCP 检查。如果端口打开,则诊断被认为是成功的。
- HTTPGetAction:对指定的端口和路径上的容器的 IP 地址执行 HTTP Get 请求。如果响应的状态码大于等于200 且小于 400,则诊断被认为是成功的。
每次探测都将获得以下三种结果之一:
- 成功:容器通过了诊断。
- 失败:容器未通过诊断。
- 未知:诊断失败,因此不会采取任何行动。
Kubelet 可以选择是否执行在容器上运行的三种探针执行和做出反应:
- livenessProbe:指示容器是否正在运行。如果存活探测失败,则 kubelet 会杀死容器,并且容器将受到其重启策略的影响。如果容器不提供存活探针,则默认状态为 Success。
- readinessProbe:指示容器是否准备好服务请求。如果就绪探测失败,端点控制器将从与 Pod 匹配的所有 Service 的端点中删除该 Pod 的 IP 地址。初始延迟之前的就绪状态默认为 Failure。如果容器不提供就绪探针,则默认状态为 Success。
- startupProbe: 指示容器中的应用是否已经启动。如果提供了启动探测(startup probe),则禁用所有其他探测,直到它成功为止。如果启动探测失败,kubelet 将杀死容器,容器服从其重启策略进行重启。如果容器没有提供启动探测,则默认状态为成功Success。
ReadinessProbe 与 LivenessProbe 的区别
- ReadinessProbe 当检测失败后,将 Pod 的 IP:Port 从对应的 EndPoint 列表中删除。
- LivenessProbe 当检测失败后,将杀死容器并根据 Pod 的重启策略来决定作出对应的措施
StartupProbe 与 ReadinessProbe、LivenessProbe 的区别
- 如果三个探针同时存在,先执行 StartupProbe 探针,其他两个探针将会被暂时禁用,直到 pod 满足 StartupProbe 探针配置的条件,其他 2 个探针启动,如果不满足按照规则重启容器。
- 另外两种探针在容器启动后,会按照配置,直到容器消亡才停止探测,而 StartupProbe 探针只是在容器启动后按照配置满足一次后,不在进行后续的探测。
4.2.1 探针示例
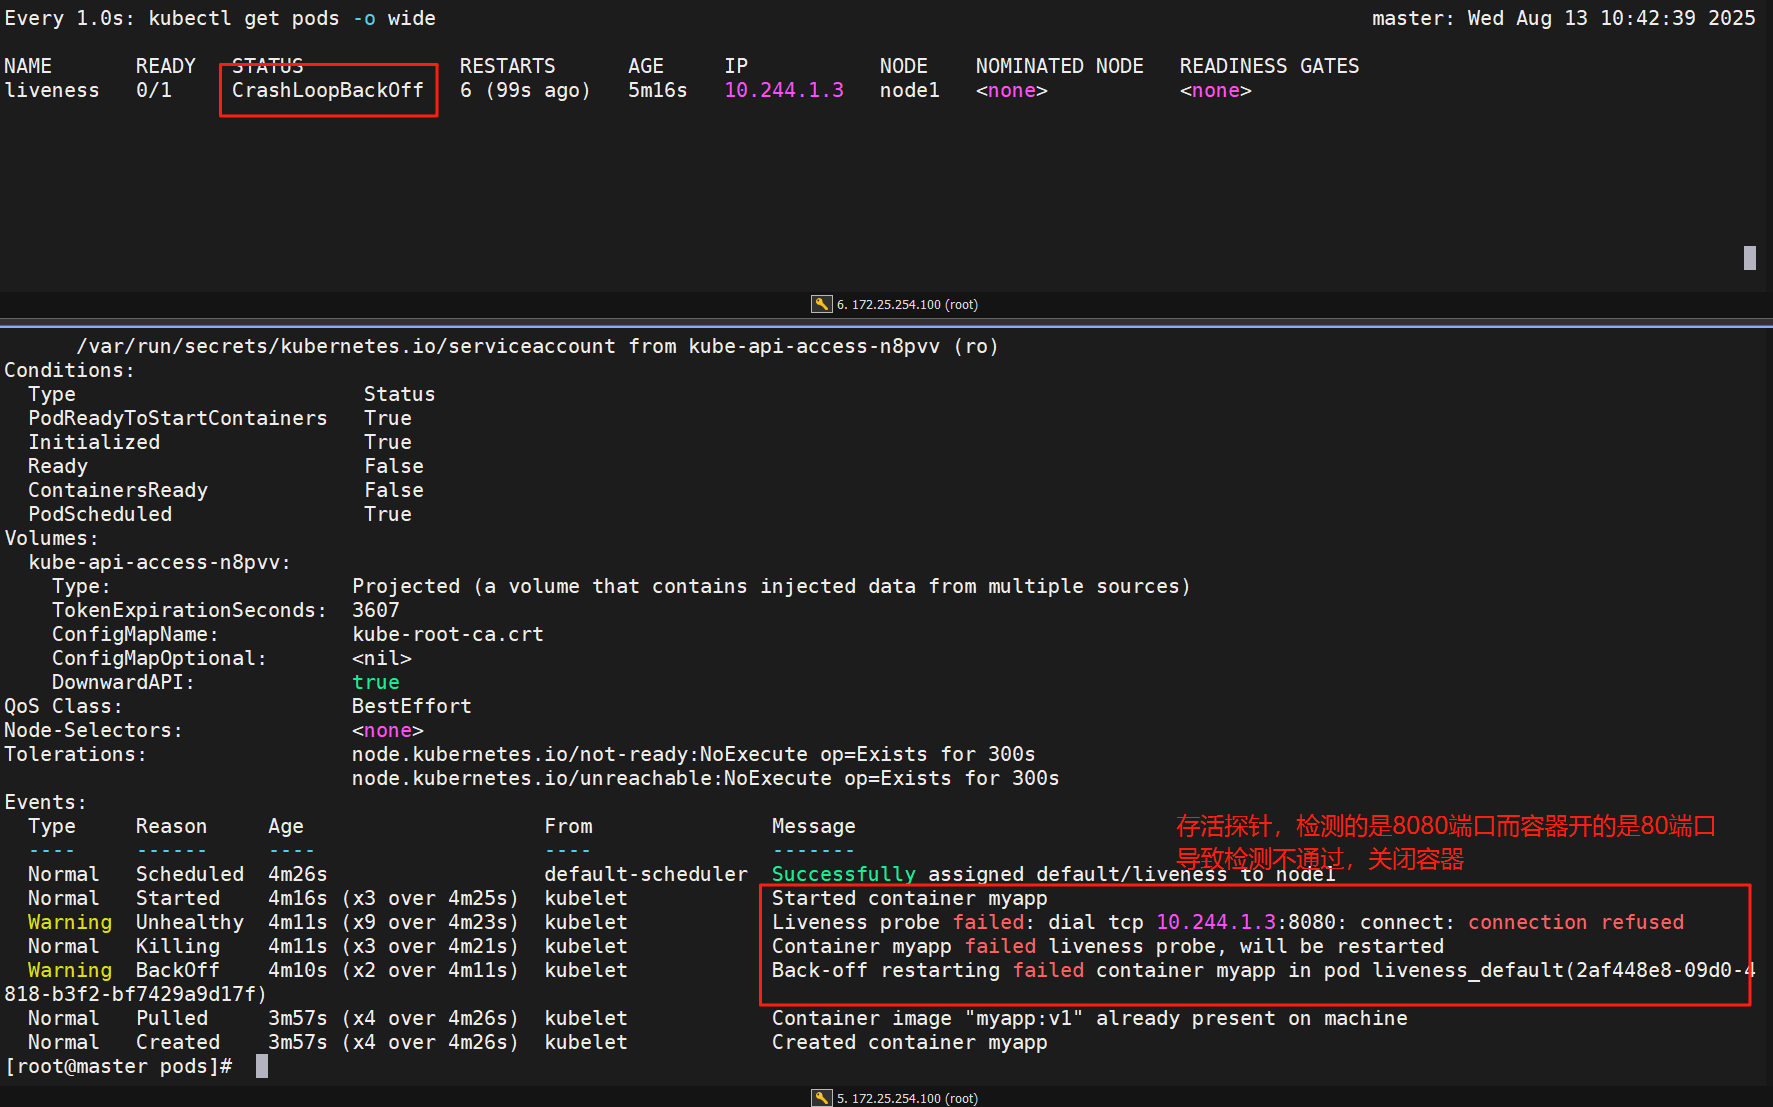
存活探针
[root@k8s-master ~]# vim pod.yml
apiVersion: v1
kind: Pod
metadata:
  labels:
    name: liveness
  name: liveness
spec:
  containers:
    - image: myapp:v1
      name: myapp
      livenessProbe:
        tcpSocket:						#检测端口存在性
          port: 8080
        initialDelaySeconds: 3			#容器启动后要等待多少秒后就探针开始工作,默认是 0
        periodSeconds: 1				#执行探测的时间间隔,默认为 10s
        timeoutSeconds: 1				#探针执行检测请求后,等待响应的超时时间,默认为 1s

[root@k8s-master ~]# kubectl apply -f pod.yml
测试
就绪探针
[root@k8s-master ~]# vim pod.yml
apiVersion: v1
kind: Pod
metadata:
  labels:
    name: readiness
  name: readiness
spec:
  containers:
    - image: myapp:v1
      name: myapp
      readinessProbe:
        httpGet:
          path: /test.html
          port: 80
        initialDelaySeconds: 1
        periodSeconds: 3
        timeoutSeconds: 1

#测试:
[root@k8s-master ~]# kubectl expose pod readiness --port 80 --target-port 80

[root@k8s-master ~]# kubectl get pods
NAME        READY   STATUS    RESTARTS   AGE
readiness   0/1     Running   0          5m25s

[root@k8s-master ~]# kubectl describe pods readiness
Warning  Unhealthy  26s (x66 over 5m43s)  kubelet            Readiness probe failed: HTTP probe failed with statuscode: 404

[root@k8s-master ~]# kubectl describe services readiness
Name:              readiness
Namespace:         default
Labels:            name=readiness
Annotations:       <none>
Selector:          name=readiness
Type:              ClusterIP
IP Family Policy:  SingleStack
IP Families:       IPv4
IP:                10.100.171.244
IPs:               10.100.171.244
Port:              <unset>  80/TCP
TargetPort:        80/TCP
Endpoints:										#没有暴漏端口,就绪探针探测不满足暴漏条件
Session Affinity:  None
Events:            <none>

kubectl exec pods/readiness -c myapp -- /bin/sh -c "echo test > /usr/share/nginx/html/test.html"

[root@k8s-master ~]# kubectl get pods
NAME        READY   STATUS    RESTARTS   AGE
readiness   1/1     Running   0          7m49s

[root@k8s-master ~]# kubectl describe services readiness
Name:              readiness
Namespace:         default
Labels:            name=readiness
Annotations:       <none>
Selector:          name=readiness
Type:              ClusterIP
IP Family Policy:  SingleStack
IP Families:       IPv4
IP:                10.100.171.244
IPs:               10.100.171.244
Port:              <unset>  80/TCP
TargetPort:        80/TCP
Endpoints:         10.244.2.8:80			#满组条件端口暴漏
Session Affinity:  None
Events:            <none>

码道开发者社区,聚焦华为云码道 CodeArts 代码智能体,沉淀 Agent、Skill、鸿蒙开发实战内容,供开发者查阅资料、交流技术、分享工程实践
更多推荐



 37
37 0
0- 0


 已为社区贡献7条内容

所有评论(0)