容器编排大王Kubernetes——存储管理与优化(5)
一 什么是ConfigMap?
ConfigMap 用于存储非敏感的配置数据(如应用参数、环境变量、配置文件等),以键值对形式存在,可被 Pod 中的容器引用。
核心特性:
- 非敏感数据:明文存储,适合存放不涉及安全的配置(如数据库地址、日志级别)。
- 多种数据格式:支持单个键值对、多行配置文件(通过
files字段)。 - 动态更新:部分引用方式支持配置热更新(需应用配合 reload)。
[!NOTE]
etcd限制了文件大小不能超过1M
configmap的使用场景
- 填充环境变量的值
- 设置容器内的命令行参数
- 填充卷的配置文件
- 热更新
二 CM创建方式
2.1 通过字面值创建
[root@master ~]# kubectl create cm fjw-config --from-literal name=fjw --from-literal pass=fjw
[root@master ~]# kubectl describe cm fjw-config
Name:         fjw-config
Namespace:    default
Labels:       <none>
Annotations:  <none>

Data
====
name:
----
fjw
pass:
----
fjw

BinaryData
====

Events:  <none>
2.2 通过文件创建
[root@master ch]# vim name
[root@master ch]# vim pass
[root@master ch]# kubectl create cm fjw2-config --from-file name --from-file pass
[root@master ch]# kubectl describe cm fjw2-config
Name:         fjw2-config
Namespace:    default
Labels:       <none>
Annotations:  <none>

Data
====
name:
----
fjw

pass:
----
fjw


BinaryData
====

Events:  <none>
2.3 通过目录创建
[root@master ch]# cp name pass userlist/
[root@master ch]# kubectl create cm fjw3-config --from-file userlist/

[root@master ch]# kubectl describe cm fjw3-config
Name:         fjw3-config
Namespace:    default
Labels:       <none>
Annotations:  <none>

Data
====
name:
----
fjw

pass:
----
fjw


BinaryData
====

Events:  <none>
2.4 通过yaml文件创建
[root@master ch]# kubectl create cm fjw4-config --from-file=name --from-file=pass --dry-run=client -o yaml > cm.yml

[root@master ch]# cat cm.yml
apiVersion: v1
data:
  name: |
    fjw
  pass: |
    fjw
kind: ConfigMap
metadata:
  name: fjw4-config

[root@master ch]# kubectl apply -f cm.yml
[root@master ch]# kubectl describe cm fjw4-config
Name:         fjw4-config
Namespace:    default
Labels:       <none>
Annotations:  <none>

Data
====
pass:
----
fjw

name:
----
fjw


BinaryData
====

Events:  <none>
三 CM的使用方式
3.1 注入环境变量
示例1
#将cm中的内容映射为指定变量
[root@master ch]# kubectl run  testpod --image=busyboxplus --dry-run=client -o yaml > testpod.yml
[root@master ch]# cat testpod.yml
apiVersion: v1
kind: Pod
metadata:
  labels:
    run: testpod
  name: testpod
spec:
  containers:
  - image: busyboxplus
    name: testpod
    command:
      - /bin/sh
      - -c
      - env
    env:
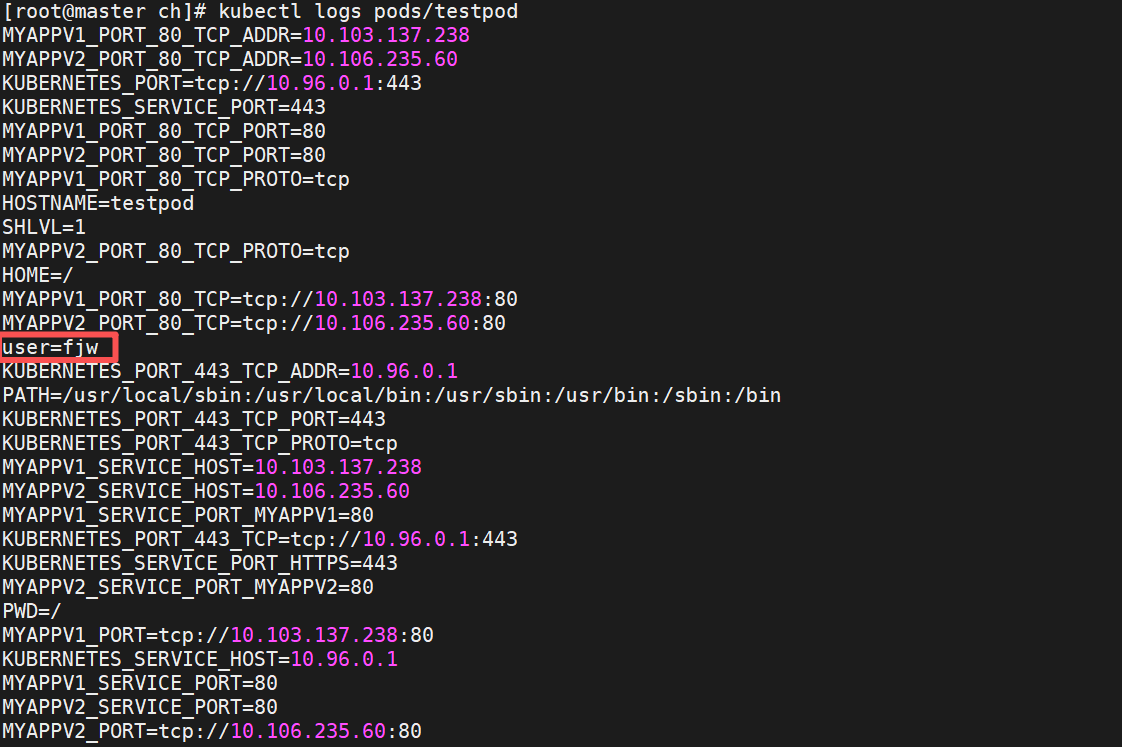
    - name: user
      valueFrom:				#指定键名
        configMapKeyRef:		#利用cm注入变量
          name: userlist
          key: username
  restartPolicy: Never

[root@master ch]# kubectl apply -f testpod.yml

[root@master ch]# kubectl logs pods/testpod
示例2
#把cm中的值直接映射为变量
[root@master ch]# kubectl get cm namelist -o yaml
apiVersion: v1
data:
  nam1: fjw
  name2: yyy
kind: ConfigMap
metadata:
  creationTimestamp: "2025-08-16T12:57:07Z"
  name: namelist
  namespace: default
  resourceVersion: "294675"
  uid: 4b56d9d2-6854-4f6a-b846-7d86bc84df82

[root@master ch]# vim cmenv_test.yml
apiVersion: v1
kind: Pod
metadata:
  labels:
    run: testpod
  name: testpod
spec:
  containers:
  - image: busyboxplus:latest
    name: testpod
    command:
      - /bin/sh
      - -c
      - env
    envFrom:
      - configMapRef:
          name: namelist
  restartPolicy: Never

[root@ma[root@master ch]# kubectl logs pods/testpod
......
MYAPPV1_PORT_80_TCP_PORT=80
NGINXCONF_SERVICE_HOST=10.104.7.138
PHPMYSQLADMIN_SERVICE_PORT_PHPMYADMIN=80
MYAPPV1_PORT_80_TCP_PROTO=tcp
MYAPPV2_PORT_80_TCP_PORT=80
name2=yyy				#注入的变量
HOSTNAME=testpod
SHLVL=1
MYAPPV2_PORT_80_TCP_PROTO=tcp
HOME=/
PHPMYSQLADMIN_PORT_80_TCP_PROTO=tcp
KUBERNETES_PORT_443_TCP_ADDR=10.96.0.1
nam1=fjw				#注入变量
PATH=/usr/local/sbin:/usr/local/bin:/usr/sbin:/usr/bin:/sbin:/bin
KUBERNETES_PORT_443_TCP_PORT=443
......
示例3
#在pod命令行中使用变量
[root@master ch]# vim cmenv_test.yml
apiVersion: v1
kind: Pod
metadata:
  labels:
    run: testpod
  name: testpod
spec:
  containers:
  - image: busyboxplus:latest
    name: testpod
    command:
      - /bin/sh
      - -c
      - echo ${name1} ${name2}
    envFrom:
      - configMapRef:
          name: namelist
  restartPolicy: Never

[root@master ch]# kubectl apply -f cmenv_test.yml
[root@master ch]# kubectl logs pods/testpod
fjw yyy
3.2 变量注入-企业示例
#生成cm资源
[root@master ch]# kubectl describe cm phpmyadmin
Name:         phpmyadmin
Namespace:    default
Labels:       <none>
Annotations:  <none>

Data
====
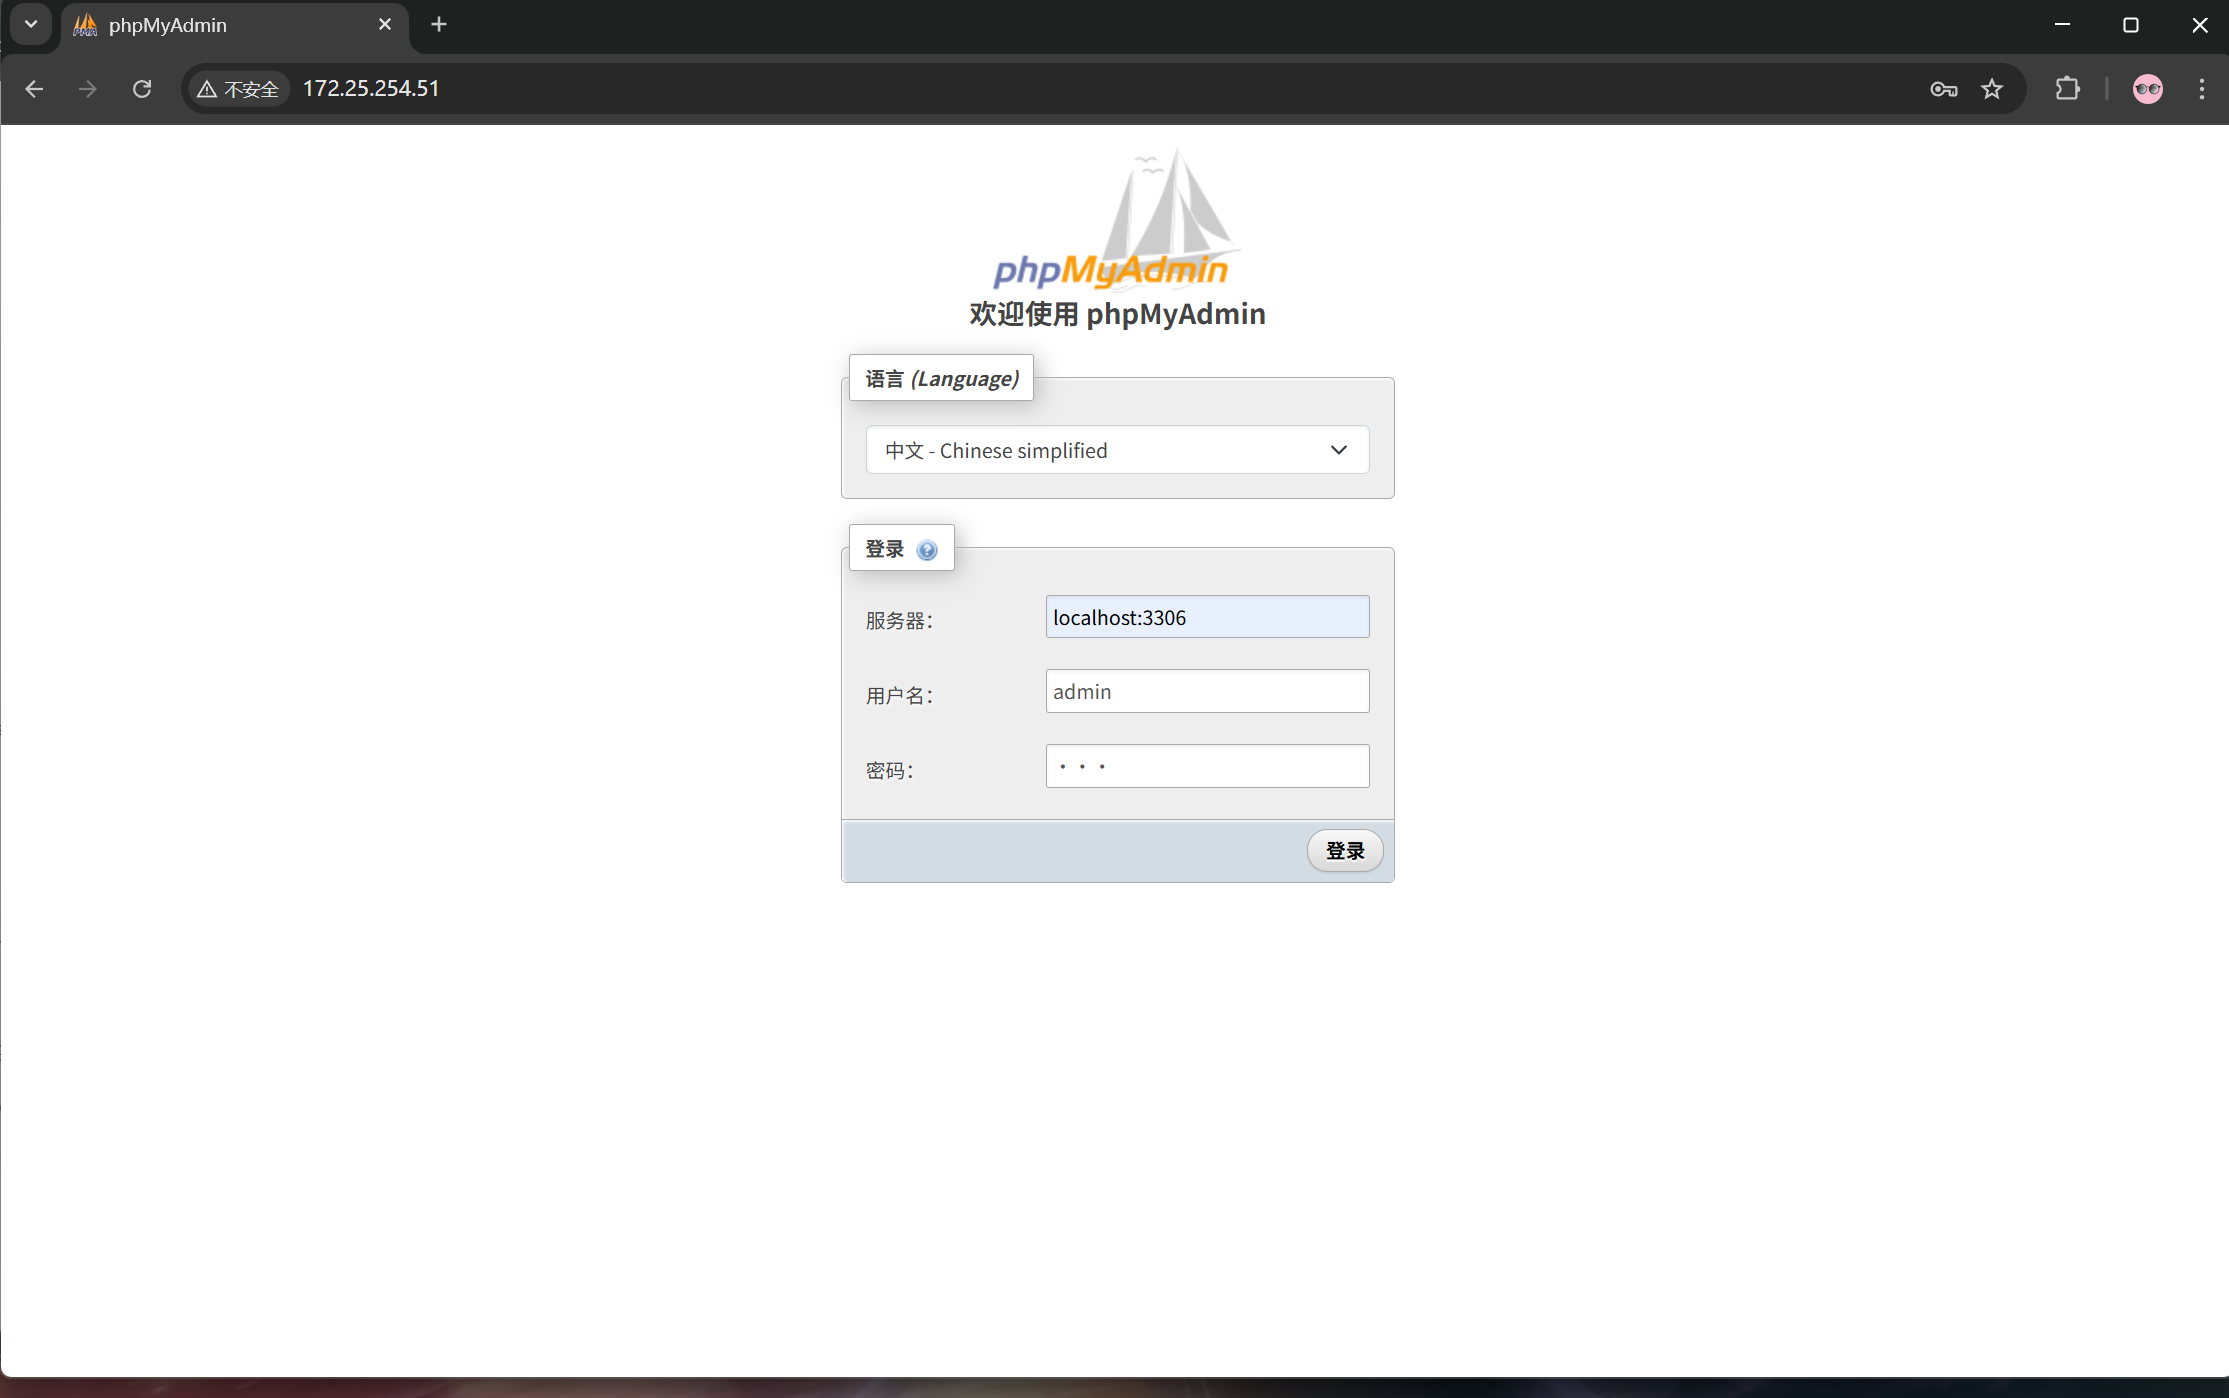
PMA_ARBITRARY:				#在web页面中可以手动输入数据库地址和端口
----
1
MYSQL_ROOT_PASSWORD:		#设定数据库密码
----
fjw

BinaryData
====
Events:  <none>

#生成pod与微服务
[root@master ch]# cat phpmyadmin.yml
apiVersion: v1
kind: Pod
metadata:
  labels:
    run: phpmysqladmin
  name: phpmysqladmin
spec:
  containers:
  - image: mysql:8.0
    name: mysql
    ports:
      - containerPort: 3306
    envFrom:
    - configMapRef:
        name: phpmyadmin
  - image: phpmyadmin:latest
    name: phpmyadmin
    ports:
      - containerPort: 80
        protocol: TCP
        hostPort: 80
    envFrom:
    - configMapRef:
        name: phpmyadmin

---
apiVersion: v1
kind: Service
metadata:
  labels:
    run: phpmysqladmin
  name: phpmysqladmin
spec:
  ports:
  - port: 80
    name: phpmyadmin
    protocol: TCP
    targetPort: 80
  - port: 3306
    name: mysql
    protocol: TCP
    targetPort: 3306
  selector:
    run: phpmysqladmin
  type: LoadBalancer

#测试
[root@master ch]# kubectl apply -f phpmyadmin.yml
3.3 通过数据卷使用CM
#建立要注入的cm
[root@master ch]# kubectl describe cm testfile
Name:         testfile
Namespace:    default
Labels:       <none>
Annotations:  <none>

Data
====
file1:
----
fjw
file2:
----
yyy

BinaryData
====

Events:  <none>

[root@master ch]# cat testpod.yml
apiVersion: apps/v1
kind: Deployment
metadata:
  labels:
    app: testfile
  name: testfile
spec:
  replicas: 1
  selector:
    matchLabels:
      app: testfile
  template:
    metadata:
      labels:
        app: testfile
    spec:
      containers:
      - image: busyboxplus
        name: test
        command:
          - /bin/sh
          - -c
          - sleep 100000000
        volumeMounts:				#调用卷策略
        - name: testfile			#调用的卷名称
          mountPath: /config		#挂载到容器的目录
      restartPolicy: Always

      volumes:						#声明卷策略
        - name: testfile			#创建的卷名称
          configMap:
            name: testfile			#要使用的CM


[root@master ch]# kubectl apply -f testpod.yml
#测试
[root@master ch]# kubectl exec -it pods/testfile-7ff4c758b-pfdgr sh
/ # cd config/
/config # cat file1
fjw
/config #
3.4 示例-利用CM注入pod中的配置文件
#建立配置文件模板
[root@master ch]# cat nginx.conf
server {
    listen 8080;
    root /usr/share/nginx/html/;
    index index.html;
}

#利用模板生成cm
[root@master ch]# kubectl create cm nginxconf --from-file=nginxconf
[root@master ch]# kubectl describe cm nginxconf
Name:         nginxconf
Namespace:    default
Labels:       <none>
Annotations:  <none>

Data
====
nginx.conf:
----
server {
    listen 80;
    root /usr/share/nginx/html/;
    index index.html;
}

BinaryData
====

Events:  <none>

#建立nginx控制器文件
[root@master ch]# cat nginxpod.yml
apiVersion: apps/v1
kind: Deployment
metadata:
  labels:
    app: nginxconf
  name: nginxconf
spec:
  replicas: 1
  selector:
    matchLabels:
      app: nginxconf
  template:
    metadata:
      labels:
        app: nginxconf
    spec:
      containers:
      - image: nginx:latest
        name: nginx
        volumeMounts:
        - name: nginxconf
          mountPath: /etc/nginx/conf.d

      volumes:
        - name: nginxconf
          configMap:
            name: nginxconf

#测试
[root@master ch]# kubectl get pods nginxconf-57bdf7689d-xcrc2 -o wide
NAME                         READY   STATUS    RESTARTS   AGE   IP            NODE    NOMINATED NODE   READINESS GATES
nginxconf-57bdf7689d-xcrc2   1/1     Running   0          35s   10.244.2.10   node2   <none>           <none>
[root@master ch]# curl 10.244.2.10:8080
3.5通过热更新cm修改配置
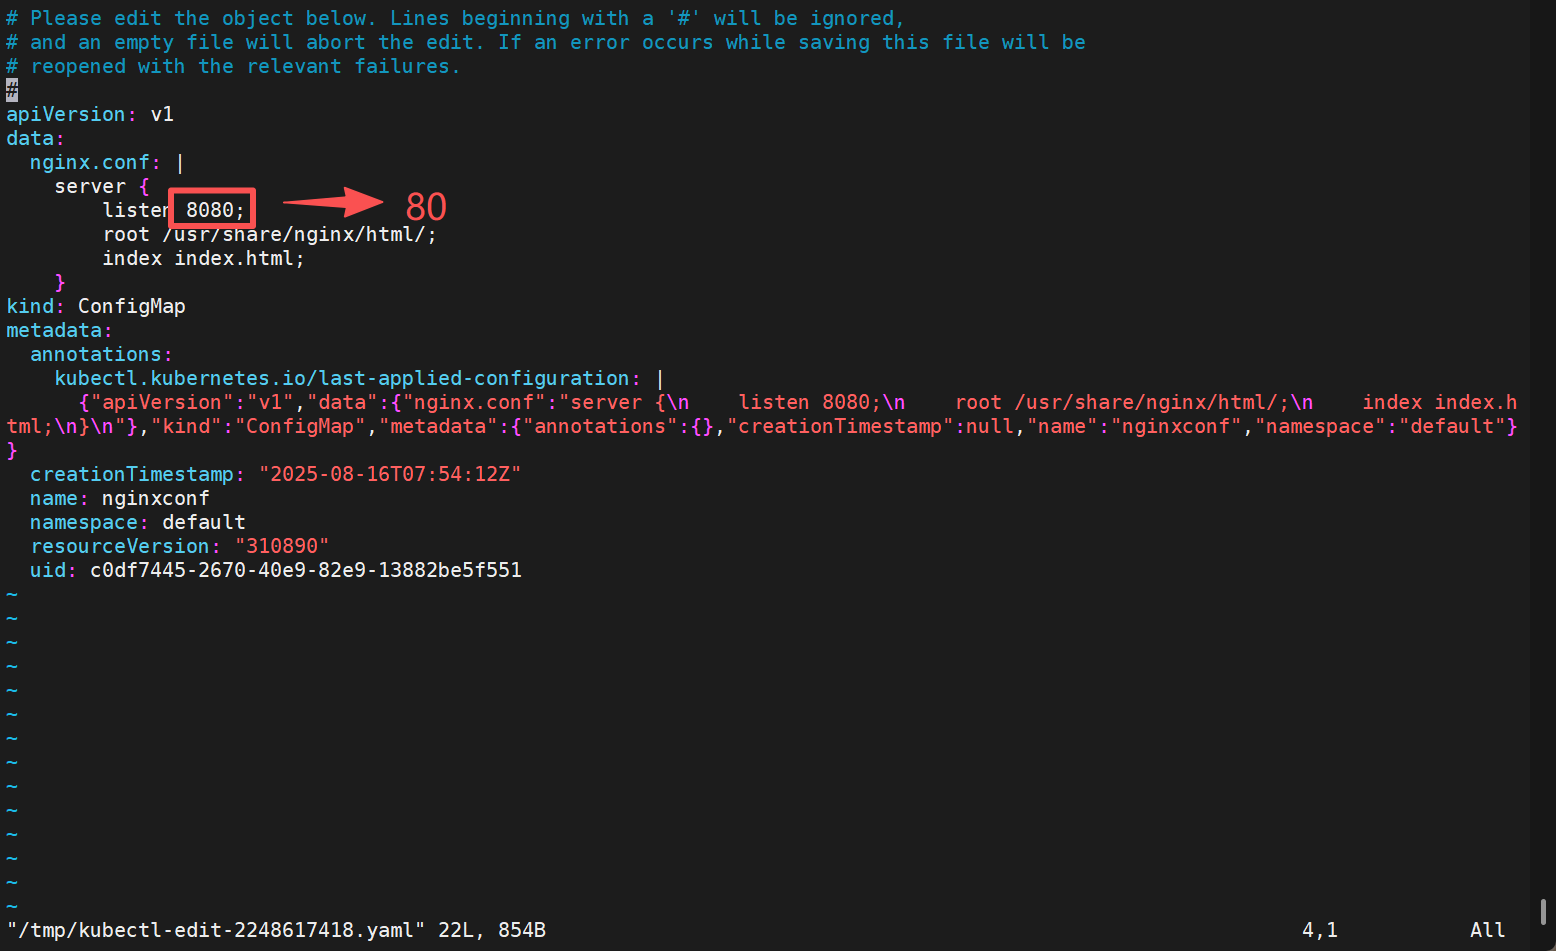
[root@master ch]# kubectl edit cm nginxconf
#查看容器的配置文件
[root@master ch]# kubectl exec pods/nginxconf-57bdf7689d-xcrc2 -- cat /etc/nginx/conf.d/nginx.conf
server {
    listen 8080;
    root /usr/share/nginx/html/;
    index index.html;
}

#由于配置文件修改后不会生效,需要删除pod后控制器会重建pod,这时就生效了
[root@master ch]# kubectl delete pods nginxconf-57bdf7689d-xcrc2

[root@master ch]# kubectl get pods/nginxconf-57bdf7689d-zv5n8 -o wide
NAME                         READY   STATUS    RESTARTS   AGE   IP            NODE    NOMINATED NODE   READINESS GATES
nginxconf-57bdf7689d-zv5n8   1/1     Running   0          17s   10.244.2.11   node2   <none>           <none>
[root@master ch]# curl 10.244.2.11
四 什么是secret?
Secret 用于存储敏感数据(如密码、Token、证书等),与 ConfigMap 类似,但数据会被 Base64 编码(注意:Base64 不是加密,仅为编码)。
secret的类型
- Opaque(默认,通用密钥)
- kubernetes.io/tls(TLS证书)
- kubernetes.io/dockerconfigjson(镜像仓库凭证)
secret的使用场景
- 填充环境变量的值
- 为镜像仓库做凭证
- 挂载Volume
- 存放加密信息
五 secret的创建方式
5.1 通过命令直接创建
[root@master ch]# echo -n fjw > name1.txt
[root@master ch]# echo -n yyy > name2.txt
[root@master ch]# kubectl create secret generic namelist --from-file name1.txt --from-file name2.txt
[root@master ch]# kubectl get secrets namelist -o yaml
apiVersion: v1
data:
  name1.txt: Zmp3		#通过base64加密
  name2.txt: eXl5
kind: Secret
metadata:
  creationTimestamp: "2025-08-16T12:21:23Z"
  name: namelist
  namespace: default
  resourceVersion: "291171"
  uid: d46369ea-6868-4f73-a079-cc06e286c5a1
type: Opaque
5.2 编写yaml文件创建
#要加密的信息进行转码后再填入yaml文件
[root@master ch]# echo -n fjw | base64
Zmp3
[root@master ch]# echo -n yyy | base64
eXl5

#生成yaml模板
[root@master ch]# kubectl create secret generic userlist --from-literal test=fjw --dry-run=client -o yaml > se_test.yml

[root@master ch]# vim se_test.yml
apiVersion: v1
data:
  name1: Zmp3
  name2: eXl5
kind: Secret
metadata:
  creationTimestamp: null
  name: userlist

[root@master ch]# kubectl apply -f se_test.yml
[root@master ch]# kubectl get secrets namelist -o yaml
apiVersion: v1
data:
  name1.txt: Zmp3
  name2.txt: eXl5
kind: Secret
metadata:
  creationTimestamp: "2025-08-16T12:21:23Z"
  name: namelist
  namespace: default
  resourceVersion: "291171"
  uid: d46369ea-6868-4f73-a079-cc06e286c5a1
type: Opaque
六 Secret的使用方法
6.1 注入环境变量
[root@master ch]# vim pod1.yml
apiVersion: v1
kind: Pod
metadata:
  labels:
    run: bbp
  name: bbp
spec:
  containers:
  - image: busyboxplus:latest
    name: bbp
    command:
      - /bin/sh
      - -c
      - env
    env:
    - name: user
      valueFrom:
        secretKeyRef:				#注入变量
          name: userlist
          key: db_user
    - name: pass
      valueFrom:
        secretKeyRef:
          name: userlist
          key: db_pass
  restartPolicy: Never

[root@master ch]# kubectl app -f pod1.yml
[root@master ch]# kubectl logs pods/bbp
......
MYAPPV1_PORT_80_TCP_PROTO=tcp
MYAPPV2_PORT_80_TCP_PORT=80
PHPMYSQLADMIN_SERVICE_PORT_PHPMYADMIN=80
HOSTNAME=bbp
SHLVL=1
MYAPPV2_PORT_80_TCP_PROTO=tcp
HOME=/
NGINXCONF_PORT_8080_TCP_PORT=8080
NGINXCONF_PORT_8080_TCP_PROTO=tcp
PHPMYSQLADMIN_PORT=tcp://10.104.105.17:80
PHPMYSQLADMIN_SERVICE_PORT=80
pass=fjw		#注入的环境变量
PHPMYSQLADMIN_PORT_3306_TCP=tcp://10.104.105.17:3306
NGINXCONF_PORT=tcp://10.104.7.138:8080
NGINXCONF_SERVICE_PORT=8080
MYAPPV1_PORT_80_TCP=tcp://10.103.137.238:80
MYAPPV2_PORT_80_TCP=tcp://10.106.235.60:80
PHPMYSQLADMIN_PORT_80_TCP_ADDR=10.104.105.17
NGINXCONF_PORT_8080_TCP=tcp://10.104.7.138:8080
PHPMYSQLADMIN_PORT_80_TCP_PORT=80
PHPMYSQLADMIN_PORT_80_TCP_PROTO=tcp
user=root		#注入的环境变量
KUBERNETES_PORT_443_TCP_ADDR=10.96.0.1
PATH=/usr/local/sbin:/usr/local/bin:/usr/sbin:/usr/bin:/sbin:/bin
KUBERNETES_PORT_443_TCP_PORT=443
......
6.2 将Secret挂载到Volume中
[root@k8s-master secrets]# kubectl run  nginx --image nginx --dry-run=client -o yaml > pod1.yaml

#向固定路径映射
[root@k8s-master secrets]# vim pod1.yaml
apiVersion: v1
kind: Pod
metadata:
  labels:
    run: nginx
  name: nginx
spec:
  containers:
  - image: nginx
    name: nginx
    volumeMounts:
    - name: secrets
      mountPath: /secret
      readOnly: true

  volumes:
  - name: secrets
    secret:
      secretName: userlist

[root@k8s-master secrets]# kubectl apply -f pod1.yaml
pod/nginx created


[root@k8s-master secrets]# kubectl exec  pods/nginx -it -- /bin/bash
root@nginx:/# cat /secret/
cat: /secret/: Is a directory
root@nginx:/# cd /secret/
root@nginx:/secret# ls
password  username
root@nginx:/secret# cat password
leeroot@nginx:/secret# cat username
fjwroot@nginx:/secret#
6.3 向指定路径映射Secret
#向指定路径映射
[root@k8s-master secrets]# vim pod2.yaml
apiVersion: v1
kind: Pod
metadata:
  labels:
    run: nginx1
  name: nginx1
spec:
  containers:
  - image: nginx
    name: nginx1
    volumeMounts:
    - name: secrets
      mountPath: /secret
      readOnly: true

  volumes:
  - name: secrets
    secret:
      secretName: userlist
      items:
      - key: username				#指定secret中的一个密钥
        path: my-users/username		#为容器挂载目录的子目录

[root@k8s-master secrets]# kubectl apply -f pod2.yaml
pod/nginx1 created
[root@k8s-master secrets]# kubectl exec  pods/nginx1 -it -- /bin/bash
root@nginx1:/# cd secret/
root@nginx1:/secret# ls
my-users
root@nginx1:/secret# cd my-users
root@nginx1:/secret/my-users# ls
username
root@nginx1:/secret/my-users# cat username
6.4 存储docker registry的认证信息
创建一个私有项目
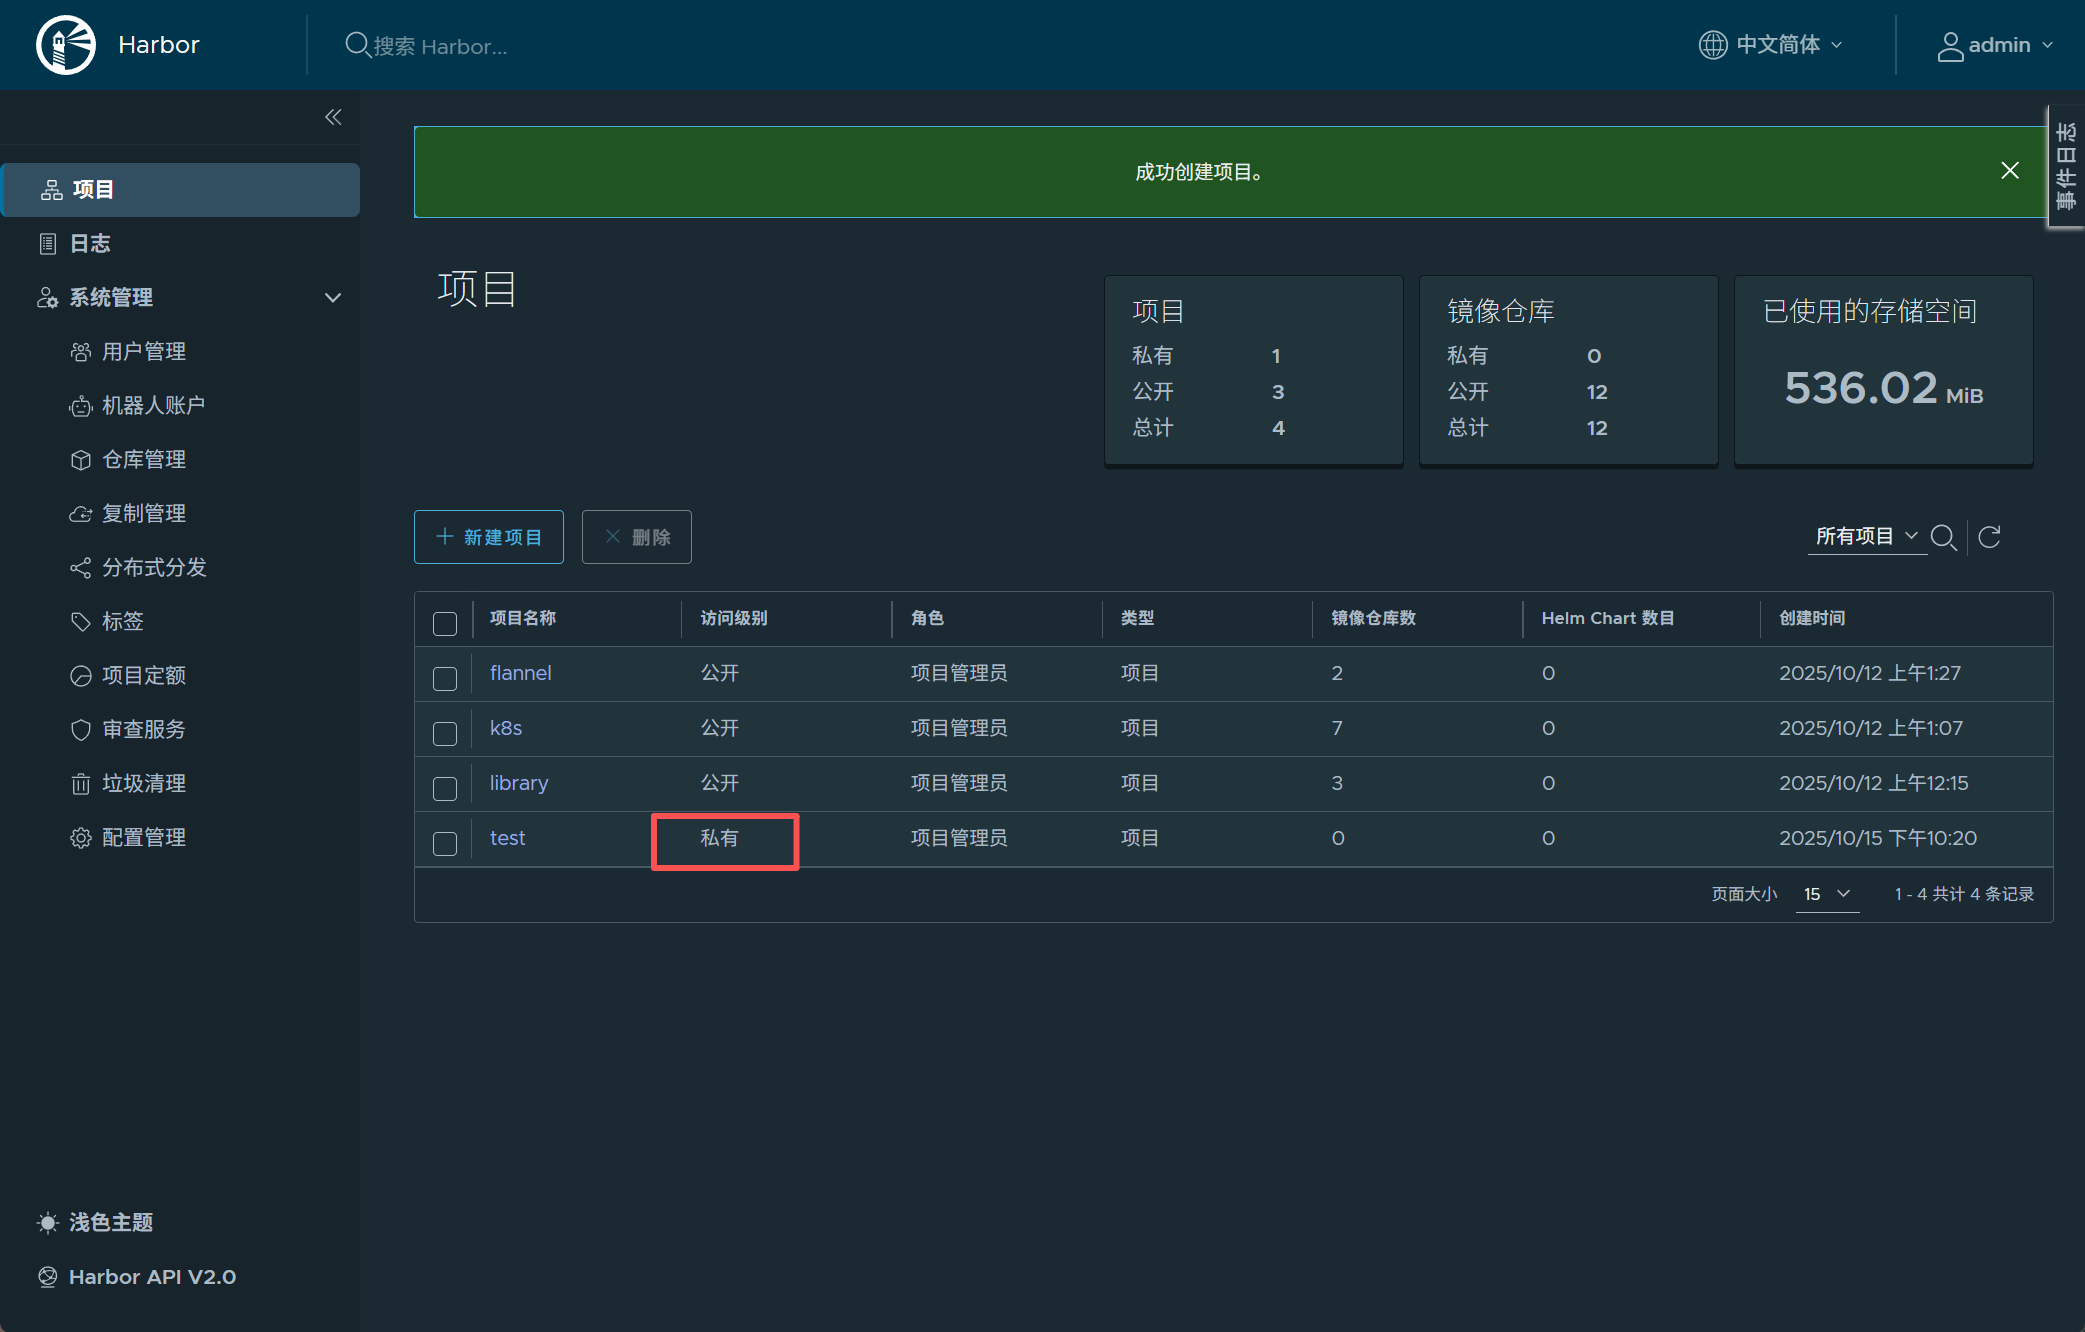
#上传一个没有上传过的镜像到私有仓库
[root@master ~]# docker tag timinglee/game2048:latest  reg.fy.org/test/game2048:latest
[root@master ~]# docker push reg.fy.org/test/game2048:latest

#建立用于docker 仓库认证的secret
[root@master storage]# kubectl create secret docker-registry docker-auth --docker-server reg.fy.org --docker-username admin --docker-password yyy --docker-email fjwyyyorg@163.com

#生成模板文件
[root@master storage]# cat test.yml
apiVersion: v1
kind: Pod
metadata:
  labels:
    run: test
  name: test
spec:
  containers:
  - image: reg.fy.org/test/game2048			#拉取私有仓库的镜像要输入镜像全称
    name: test
  imagePullSecrets:
  - name: docker-auth			#仓库认证信息


[root@master storage]# kubectl apply -f test.yml
[root@master storage]# kubectl get pods
NAME   READY   STATUS    RESTARTS   AGE
test   1/1     Running   0          23s
如果不想注入仓库认证信息拉取私有镜像
#查看default默认认证
[root@master storage]# kubectl describe sa -n default
Name:                default
Namespace:           default
Labels:              <none>
Annotations:         <none>
Image pull secrets:  <none>
Mountable secrets:   <none>
Tokens:              <none>
Events:              <none>

[root@master storage]# kubectl edit sa -n default
apiVersion: v1
imagePullSecrets:			#添加仓库认证serect
- name: docker-auth
kind: ServiceAccount
metadata:
  creationTimestamp: "2025-10-12T03:17:45Z"
  name: default
  namespace: default
  resourceVersion: "369"
  uid: c858e62b-daec-4fba-bcb4-5454b40e268f

[root@master storage]# kubectl describe sa -n default
Name:                default
Namespace:           default
Labels:              <none>
Annotations:         <none>
Image pull secrets:  docker-auth		#编辑后,注入了仓库认证secret
Mountable secrets:   <none>
Tokens:              <none>
Events:              <none>

[root@master storage]# cat test.yml
apiVersion: v1
kind: Pod
metadata:
  labels:
    run: test
  name: test
spec:
  containers:
  - image: reg.fy.org/test/game2048			#拉取私有仓库的镜像要输入镜像全称
    name: test

[root@master storage]# kubectl apply -f test.yml
[root@master storage]# kubectl get pods
NAME   READY   STATUS    RESTARTS   AGE
test   1/1     Running   0          23s
七 Volumes(卷)
-
容器中文件在磁盘上是临时存放的,这给容器中运行的特殊应用程序带来一些问题
-
当容器崩溃时,kubelet将重新启动容器,容器中的文件将会丢失,因为容器会以干净的状态重建。
-
当在一个 Pod 中同时运行多个容器时,常常需要在这些容器之间共享文件。
-
Kubernetes 卷具有明确的生命周期与使用它的 Pod 相同
-
卷比 Pod 中运行的任何容器的存活期都长,在容器重新启动时数据也会得到保留
-
当一个 Pod 不再存在时,卷也将不再存在。
-
Kubernetes 可以支持许多类型的卷,Pod 也能同时使用任意数量的卷。
-
卷不能挂载到其他卷,也不能与其他卷有硬链接。 Pod 中的每个容器必须独立地指定每个卷的挂载位置。
kubernets支持的卷的类型
官网:https://kubernetes.io/zh/docs/concepts/storage/volumes/
k8s支持的卷的类型如下:
-
awsElasticBlockStore 、azureDisk、azureFile、cephfs、cinder、configMap、csi
-
downwardAPI、emptyDir、fc (fibre channel)、flexVolume、flocker
-
gcePersistentDisk、gitRepo (deprecated)、glusterfs、hostPath、iscsi、local、
-
nfs、persistentVolumeClaim、projected、portworxVolume、quobyte、rbd
-
scaleIO、secret、storageos、vsphereVolume
7.1 emptyDir卷
功能:
当Pod指定到某个节点上时,首先创建的是一个emptyDir卷,并且只要 Pod 在该节点上运行,卷就一直存在。卷最初是空的。 尽管 Pod 中的容器挂载 emptyDir 卷的路径可能相同也可能不同,但是这些容器都可以读写 emptyDir 卷中相同的文件。 当 Pod 因为某些原因被从节点上删除时,emptyDir 卷中的数据也会永久删除
emptyDir 的使用场景:
-
缓存空间,例如基于磁盘的归并排序。
-
耗时较长的计算任务提供检查点,以便任务能方便地从崩溃前状态恢复执行。
-
在 Web 服务器容器服务数据时,保存内容管理器容器获取的文件。
示例:
[root@k8s-master volumes]# vim pod1.yml
apiVersion: v1
kind: Pod
metadata:
  name: vol1
spec:
  containers:
  - image: busyboxplus:latest
    name: vm1
    command:
    - /bin/sh
    - -c
    - sleep 30000000
    volumeMounts:
    - mountPath: /cache
      name: cache-vol
  - image: nginx:latest
    name: vm2
    volumeMounts:
    - mountPath: /usr/share/nginx/html
      name: cache-vol
  volumes:
  - name: cache-vol
    emptyDir:
      medium: Memory					#默认使用节点的磁盘存储,使用内存(tmpfs),适合临时缓存等场景
      sizeLimit: 100Mi

[root@k8s-master volumes]# kubectl apply -f pod1.yml

#查看pod中卷的使用情况
[root@k8s-master volumes]# kubectl describe pods vol1

#测试效果

[root@k8s-master volumes]# kubectl exec -it pods/vol1 -c vm1 -- /bin/sh
/ # cd /cache/
/cache # ls
/cache # curl localhost
<html>
<head><title>403 Forbidden</title></head>
<body>
<center><h1>403 Forbidden</h1></center>
<hr><center>nginx/1.27.1</center>
</body>
</html>
/cache # echo hello world > index.html
/cache # curl  localhost
hello world
/cache # dd if=/dev/zero of=bigfile bs=1M count=101
dd: writing 'bigfile': No space left on device
101+0 records in
99+1 records out
7.2 hostpath卷
功能:
hostPath 卷能将主机节点文件系统上的文件或目录挂载到您的 Pod 中,不会因为pod关闭而被删除
hostPath 的一些用法
-
运行一个需要访问 Docker 引擎内部机制的容器,挂载 /var/lib/docker 路径。
-
在容器中运行 cAdvisor(监控) 时,以 hostPath 方式挂载 /sys。
-
允许 Pod 指定给定的 hostPath 在运行 Pod 之前是否应该存在,是否应该创建以及应该以什么方式存在
hostPath的安全隐患
- 具有相同配置(例如从 podTemplate 创建)的多个 Pod 会由于节点上文件的不同而在不同节点上有不同的行为,不能跨节点使用。
- 当 Kubernetes 按照计划添加资源感知的调度时,这类调度机制将无法考虑由 hostPath 使用的资源。
- 基础主机上创建的文件或目录只能由 root 用户写入。您需要在 特权容器 中以 root 身份运行进程,或者修改主机上的文件权限以便容器能够写入 hostPath 卷。
示例:
[root@k8s-master storage]# vim vol2.yml
apiVersion: v1
kind: Pod
metadata:
  labels:
    run: hostpath
  name: hostpath
spec:
  containers:
  - image: busyboxplus
    name: busybox
    command:
      - /bin/sh
      - -c
      - sleep 1000000
    volumeMounts:
    - mountPath: /data
      name: hostpath-vol

  volumes:
  - name: hostpath-vol
    hostPath:						#使用卷的类型为hostpath
      path: /pod-date
      type: DirectoryOrCreate		#path的路径不存在时建立

[root@master volumes]# kubectl apply -f vol2.yml
#测试
[root@node1 pod-date]# touch file{1..10}

[root@master volumes]# kubectl exec -it pods/hostpath -- /bin/sh
/data # ls
file1   file10  file2   file3   file4   file5   file6   file7   file8   file9

#当pod被删除后hostPath不会被清理
[root@master volumes]# kubectl delete -f vol2.yml
[root@node1 pod-date]# ls
file1  file10  file2  file3  file4  file5  file6  file7  file8  file9
7.3 nfs卷
1.部署nfs共享主机与所有k8s系欸但安装nfs-utils
#部署nfs主机
[root@reg ~]# dnf install nfs-utils -y
[root@reg ~]# systemctl enable --now nfs-server.service
[root@reg ~]# vim /etc/exports
/pod_data *(rw,sync,no_root_squash)
[root@reg ~]# exportfs -rv		#生效策略
[root@reg ~]# showmount  -e		#查看共享的资源目录
Export list for reg.fy.org:
/nfsdata *

#在k8s所有节点中安装nfs-utils
[root@reg ~]# for i in {100,10,20}; do ssh -l root 172.25.254.$i dnf install nfs-utils -y ; done
2.部署nfs卷
[root@master volumes]# vim nfs1.yml
apiVersion: v1
kind: Pod
metadata:
  labels:
    run: nfs1
  name: nfs1
spec:
  containers:
  - image: nginx
    name: nginx1
    volumeMounts:
    - mountPath: /usr/share/nginx/html
      name: nfs-vol

  volumes:
  - name: nfs-vol
    nfs:
      server: 172.25.254.200
      path: /pod_data

[root@master volumes]# vim nfs2.yml
apiVersion: v1
kind: Pod
metadata:
  labels:
    run: nfs2
  name: nfs2
spec:
  containers:
  - image: nginx
    name: nginx2
    volumeMounts:
    - mountPath: /usr/share/nginx/html
      name: nfs-vol

  volumes:
  - name: nfs-vol
    nfs:
      server: 172.25.254.200
      path: /pod_data


[root@master volumes]# kubectl apply -f nfs1.yml
pod/nfs1 configured
[root@master volumes]# kubectl apply -f nfs2.yml
pod/nfs2 configured
3.测试
#在nfs主机
[root@reg ~]# cd /pod_data/
[root@reg pod_data]# echo hello world > index.html

#激活nfs卷
[root@master volumes]# kubectl exec -it pods/nfs1 -- /bin/bash
root@nfs1:/# cd /usr/share/nginx/html/
root@nfs1:/usr/share/nginx/html# ls
index.html
root@nfs1:/usr/share/nginx/html# exit
exit

#查看pod容器的IP
[root@master volumes]# kubectl get pods -o wide
NAME                         READY   STATUS    RESTARTS        AGE     IP            NODE    NOMINATED NODE   READINESS GATES
nfs1                         1/1     Running   0               144m    10.244.1.11   node1   <none>           <none>
nfs2                         1/1     Running   0               144m    10.244.2.8    node2   <none>           <none>

[root@master volumes]# curl 10.244.2.8
hello world
[root@master volumes]# curl 10.244.1.11
hello world
三者核心区别对比表
| 特性 | emptyDir | hostPath | NFS |
|---|---|---|---|
| 数据持久化 | 否(Pod 删除则丢失) | 是(节点本地保留) | 是(NFS 服务器独立存储) |
| 跨节点访问 | 否 | 否(仅限同一节点) | 是(全集群可达) |
| 共享范围 | 同一 Pod 内的容器 | 同一节点上的 Pod | 集群内所有 Pod |
| 存储位置 | Pod 所在节点的临时目录 | 节点指定路径(如 /data) | 远程 NFS 服务器 |
| 依赖条件 | 无需预先配置 | 需在节点手动创建路径 | 需部署 NFS 服务器并配置共享 |
| 典型场景 | 容器间临时共享数据 | 节点级应用访问本地文件 | 跨节点共享持久化数据 |
| 生产适用性 | 适合临时数据 | 不推荐(节点依赖风险) | 适合中小规模持久化场景 |
八 PV持久卷
8.1 静态持久卷pv与静态持久卷声明pvc
PersistentVolume(持久卷,简称PV)
-
pv是集群内由管理员提供的网络存储的一部分。
-
PV也是集群中的一种资源。是一种volume插件,
-
但是它的生命周期却是和使用它的Pod相互独立的。
-
PV这个API对象,捕获了诸如NFS、ISCSI、或其他云存储系统的实现细节
-
pv有两种提供方式:静态和动态
-
静态PV:集群管理员创建多个PV,它们携带着真实存储的详细信息,它们存在于Kubernetes API中,并可用于存储使用
-
动态PV:当管理员创建的静态PV都不匹配用户的PVC时,集群可能会尝试专门地供给volume给PVC。这种供给基于StorageClass
-
PersistentVolumeClaim(持久卷声明,简称PVC)
-
是用户的一种存储请求
-
它和Pod类似,Pod消耗Node资源,而PVC消耗PV资源
-
Pod能够请求特定的资源(如CPU和内存)。PVC能够请求指定的大小和访问的模式持久卷配置
-
PVC与PV的绑定是一对一的映射。没找到匹配的PV,那么PVC会无限期得处于unbound未绑定状态
volumes访问模式
-
ReadWriteOnce – 该volume只能被单个节点以读写的方式映射
-
ReadOnlyMany – 该volume可以被多个节点以只读方式映射
-
ReadWriteMany – 该volume可以被多个节点以读写的方式映射
-
在命令行中,访问模式可以简写为:
-
RWO - ReadWriteOnce
-
ROX - ReadOnlyMany
-
RWX – ReadWriteMany
-
-
volumes回收策略
-
Retain:保留,需要手动回收
-
Recycle:回收,自动删除卷中数据(在当前版本中已经废弃)
-
Delete:删除,相关联的存储资产,如AWS EBS,GCE PD,Azure Disk,or OpenStack Cinder卷都会被删除
注意:
[!NOTE]
只有NFS和HostPath支持回收利用
AWS EBS,GCE PD,Azure Disk,or OpenStack Cinder卷支持删除操作。
volumes状态说明
-
Available 卷是一个空闲资源,尚未绑定到任何申领
-
Bound 该卷已经绑定到某申领
-
Released 所绑定的申领已被删除,但是关联存储资源尚未被集群回收
-
Failed 卷的自动回收操作失败
8.2 静态PV实例部署
示例:
#建立实验目录
[root@reg pod_data]# mkdir pv{1..3}
[root@reg pod_data]# ls
pv1  pv2  pv3

#编写创建pv的yml文件,pv是集群资源,不在任何namespace中
[root@k8s-master pvc]# vim pv.yml
apiVersion: v1
kind: PersistentVolume
metadata:
  name: pv1
spec:
  capacity:
    storage: 5Gi
  volumeMode: Filesystem
  accessModes:
  - ReadWriteOnce
  persistentVolumeReclaimPolicy: Retain
  storageClassName: nfs
  nfs:
    path: /nfsdata/pv1
    server: 172.25.254.250

---
apiVersion: v1
kind: PersistentVolume
metadata:
  name: pv2
spec:
  capacity:
    storage: 15Gi
  volumeMode: Filesystem
  accessModes:
  - ReadWriteMany
  persistentVolumeReclaimPolicy: Retain
  storageClassName: nfs
  nfs:
    path: /nfsdata/pv2
    server: 172.25.254.250
---
apiVersion: v1
kind: PersistentVolume
metadata:
  name: pv3
spec:
  capacity:
    storage: 25Gi
  volumeMode: Filesystem
  accessModes:
  - ReadOnlyMany
  persistentVolumeReclaimPolicy: Retain
  storageClassName: nfs
  nfs:
    path: /nfsdata/pv3
    server: 172.25.254.250

[root@k8s-master pvc]# kubectl get  pv
NAME   CAPACITY   ACCESS MODES   RECLAIM POLICY   STATUS      CLAIM   STORAGECLASS   VOLUMEATTRIBUTESCLASS   REASON   AGE
pv1    5Gi        RWO            Retain           Available           nfs            <unset>                          4m50s
pv2    15Gi       RWX            Retain           Available           nfs            <unset>                          4m50s
pv3    25Gi       ROX            Retain           Available           nfs            <unset>                          4m50s

#建立pvc,pvc是pv使用的申请,需要保证和pod在一个namesapce中
[root@k8s-master pvc]# vim pvc.ym
apiVersion: v1
kind: PersistentVolumeClaim
metadata:
  name: pvc1
spec:
  storageClassName: nfs
  accessModes:
    - ReadWriteOnce
  resources:
    requests:
      storage: 1Gi

---
apiVersion: v1
kind: PersistentVolumeClaim
metadata:
  name: pvc2
spec:
  storageClassName: nfs
  accessModes:
    - ReadWriteMany
  resources:
    requests:
      storage: 10Gi

---
apiVersion: v1
kind: PersistentVolumeClaim
metadata:
  name: pvc3
spec:
  storageClassName: nfs
  accessModes:
    - ReadOnlyMany
  resources:
    requests:
      storage: 15Gi
[root@k8s-master pvc]# kubectl get pvc
NAME   STATUS   VOLUME   CAPACITY   ACCESS MODES   STORAGECLASS   VOLUMEATTRIBUTESCLASS   AGE
pvc1   Bound    pv1      5Gi        RWO            nfs            <unset>                 5s
pvc2   Bound    pv2      15Gi       RWX            nfs            <unset>                 4s
pvc3   Bound    pv3      25Gi       ROX            nfs            <unset>                 4s

#在其他namespace中无法应用
[root@k8s-master pvc]# kubectl -n kube-system  get pvc
No resources found in kube-system namespace.
在pod中使用pvc
[root@k8s-master pvc]# vim pod.yml
apiVersion: v1
kind: Pod
metadata:
  name: fjwyyy
spec:
  containers:
  - image: nginx
    name: nginx
    volumeMounts:
    - mountPath: /usr/share/nginx/html
      name: vol1
  volumes:
  - name: vol1
    persistentVolumeClaim:
      claimName: pvc1

[root@k8s-master pvc]# kubectl get pods  -o wide
NAME        READY   STATUS    RESTARTS   AGE   IP            NODE        NOMINATED NODE   READINESS GATES
fjwyyy   1/1     Running   0          83s   10.244.2.54   k8s-node2   <none>           <none>
[root@k8s-master pvc]# kubectl exec -it pods/fjwyyy -- /bin/bash
root@fjwyyy:/# curl  localhost
<html>
<head><title>403 Forbidden</title></head>
<body>
<center><h1>403 Forbidden</h1></center>
<hr><center>nginx/1.27.1</center>
</body>
</html>
root@fjwyyy:/# cd /usr/share/nginx/
root@fjwyyy:/usr/share/nginx# ls
html
root@fjwyyy:/usr/share/nginx# cd html/
root@fjwyyy:/usr/share/nginx/html# ls

[root@reg ~]# echo fjwyyy > /data/pv1/index.html

[root@k8s-master pvc]# kubectl exec -it pods/fjwyyy -- /bin/bash
root@fjwyyy:/# cd /usr/share/nginx/html/
root@fjwyyy:/usr/share/nginx/html# ls
index.html
九 动态PV–存储类storageClass
官网: https://github.com/kubernetes-sigs/nfs-subdir-external-provisioner
9.1 存储类storageClass介绍
使用存储类可以动态基于pod的创建来创建PV与绑定对应的PVC,删除时可以删除PVC来删除PV
-
StorageClass提供了一种描述存储类(class)的方法,不同的class可能会映射到不同的服务质量等级和备份策略或其他策略等。
-
每个 StorageClass 都包含 provisioner、parameters 和 reclaimPolicy 字段, 这些字段会在StorageClass需要动态分配 PersistentVolume 时会使用到
StorageClass的属性
属性说明:https://kubernetes.io/zh/docs/concepts/storage/storage-classes/
Provisioner(存储分配器):用来决定使用哪个卷插件分配 PV,该字段必须指定。可以指定内部分配器,也可以指定外部分配器。外部分配器的代码地址为: kubernetes-incubator/external-storage,其中包括NFS和Ceph等。
Reclaim Policy(回收策略):通过reclaimPolicy字段指定创建的Persistent Volume的回收策略,回收策略包括:Delete 或者 Retain,没有指定默认为Delete。
存储分配器NFS Client Provisioner
源码地址:https://github.com/kubernetes-sigs/nfs-subdir-external-provisioner
-
NFS Client Provisioner是一个automatic provisioner,使用NFS作为存储,自动创建PV和对应的PVC,本身不提供NFS存储,需要外部先有一套NFS存储服务。
-
PV以 namespace−{namespace}-namespace−{pvcName}-${pvName}的命名格式提供(在NFS服务器上)
-
PV回收的时候以 archieved-namespace−{namespace}-namespace−{pvcName}-${pvName} 的命名格式(在NFS服务器上)
9.2 存储类部署
示例:
1.创建sa并授权
[root@master volumes]# cat rbac.yml
apiVersion: v1
kind: Namespace
metadata:
  name: nfs-client-provisioner
---
apiVersion: v1
kind: ServiceAccount
metadata:
  name: nfs-client-provisioner
  namespace: nfs-client-provisioner
---
kind: ClusterRole
apiVersion: rbac.authorization.k8s.io/v1
metadata:
  name: nfs-client-provisioner-runner
rules:
  - apiGroups: [""]
    resources: ["nodes"]
    verbs: ["get", "list", "watch"]
  - apiGroups: [""]
    resources: ["persistentvolumes"]
    verbs: ["get", "list", "watch", "create", "delete"]
  - apiGroups: [""]
    resources: ["persistentvolumeclaims"]
    verbs: ["get", "list", "watch", "update"]
  - apiGroups: ["storage.k8s.io"]
    resources: ["storageclasses"]
    verbs: ["get", "list", "watch"]
  - apiGroups: [""]
    resources: ["events"]
    verbs: ["create", "update", "patch"]
---
kind: ClusterRoleBinding
apiVersion: rbac.authorization.k8s.io/v1
metadata:
  name: run-nfs-client-provisioner
subjects:
  - kind: ServiceAccount
    name: nfs-client-provisioner
    namespace: nfs-client-provisioner
roleRef:
  kind: ClusterRole
  name: nfs-client-provisioner-runner
  apiGroup: rbac.authorization.k8s.io
---
kind: Role
apiVersion: rbac.authorization.k8s.io/v1
metadata:
  name: leader-locking-nfs-client-provisioner
  namespace: nfs-client-provisioner
rules:
  - apiGroups: [""]
    resources: ["endpoints"]
    verbs: ["get", "list", "watch", "create", "update", "patch"]
---
kind: RoleBinding
apiVersion: rbac.authorization.k8s.io/v1
metadata:
  name: leader-locking-nfs-client-provisioner
  namespace: nfs-client-provisioner
subjects:
  - kind: ServiceAccount
    name: nfs-client-provisioner
    namespace: nfs-client-provisioner
roleRef:
  kind: Role
  name: leader-locking-nfs-client-provisioner
  apiGroup: rbac.authorization.k8s.io
2.部署应用
[root@master volumes]# cat deployment.yml
apiVersion: apps/v1
kind: Deployment
metadata:
  name: nfs-client-provisioner
  labels:
    app: nfs-client-provisioner
  namespace: nfs-client-provisioner
spec:
  replicas: 1
  strategy:
    type: Recreate
  selector:
    matchLabels:
      app: nfs-client-provisioner
  template:
    metadata:
      labels:
        app: nfs-client-provisioner
    spec:
      serviceAccountName: nfs-client-provisioner
      containers:
        - name: nfs-client-provisioner
          image: sig-storage/nfs-subdir-external-provisioner:v4.0.2
          volumeMounts:
            - name: nfs-client-root
              mountPath: /persistentvolumes
          env:
            - name: PROVISIONER_NAME
              value: k8s-sigs.io/nfs-subdir-external-provisioner
            - name: NFS_SERVER
              value: 172.25.254.200
            - name: NFS_PATH
              value: /pod_data
      volumes:
        - name: nfs-client-root
          nfs:
            server: 172.25.254.200
            path: /pod_data
3.创建存储类
[root@master volumes]# cat class.yml
apiVersion: storage.k8s.io/v1
kind: StorageClass
metadata:
  name: nfs-client
provisioner: k8s-sigs.io/nfs-subdir-external-provisioner
parameters:
  archiveOnDelete: "false"
4.创建pvc
[root@master volumes]# cat auto_pvc.yml
kind: PersistentVolumeClaim
apiVersion: v1
metadata:
  name: test-claim
spec:
  storageClassName: nfs-client
  accessModes:

   - ReadWriteMany
     resources:
         requests:
     storage: 1G

[root@master volumes]# kubectl apply -f auto_pvc.yml

#在共享目录查看自动创建的共享目录
[root@reg pod_data]# ls
default-test-claim-pvc-0c63c468-0ac1-4591-9172-947b90eef814

[root@master volumes]# kubectl get pvc

9.3 存储类企业示例
动态PV+statefulset
1.创建无头服务
[root@master volumes]# cat headless.yml
apiVersion: v1
kind: Service
metadata:
  labels:
    app: nginx
  name: nginx-svc
spec:
  clusterIP: None
  selector:
    app: nginx
  type: ClusterIP

[root@master volumes]# kubectl apply -f headless.yml

[root@master volumes]# kubectl get svc
NAME         TYPE        CLUSTER-IP   EXTERNAL-IP   PORT(S)   AGE
kubernetes   ClusterIP   10.96.0.1    <none>        443/TCP   3d5h
nginx-svc    ClusterIP   None         <none>        <none>    44m
2.创建statefulset控制pod,并引用存储类
[root@master volumes]# cat statefulset.yml
apiVersion: apps/v1
kind: StatefulSet
metadata:
  labels:
    app: nginx		#要与svc标签一样
  name: web
spec:
  serviceName: "nginx-svc"
  replicas: 3
  selector:
    matchLabels:
      app: nginx	#要与svc标签一样
  template:
    metadata:
      labels:
        app: nginx	#要与svc标签一样
    spec:
      containers:
      - image: nginx
        name: nginx
        volumeMounts:
        - name: www
          mountPath: /usr/share/nginx/html

  volumeClaimTemplates:
  - metadata:
      name: www
    spec:
      storageClassName: nfs-client	#引用部署好的存储类来调用分配器
      accessModes:
      - ReadWriteOnce
      resources:
        requests:
          storage: 1Gi

[root@master volumes]# kubectl apply -f statefulset.yml


[root@master volumes]# kubectl get pods
NAME    READY   STATUS    RESTARTS   AGE
web-0   1/1     Running   0          8m32s
web-1   1/1     Running   0          8m27s
web-2   1/1     Running   0          8m23s

[root@reg pod_data]# ls
default-www-web-0-pvc-f5486d8a-9765-4d80-8b92-5863377001b9
default-www-web-1-pvc-64be3371-7f5b-417d-82eb-f1741b1fe626
default-www-web-2-pvc-747096f2-7c9d-46d5-8365-c96b0ffa7037
3.测试
#为每个pod建立index.html文件
[root@reg pod_data]# echo web-0 > default-www-web-0-pvc-f5486d8a-9765-4d80-8b92-5863377001b9/index.html
[root@reg pod_data]# echo web-1 > default-^Cw-web-0-pvc-f5486d8a-9765-4d80-8b92-5863377001b9/index.html
[root@reg pod_data]# echo web-1 > default-www-web-1-pvc-64be3371-7f5b-417d-82eb-f1741b1fe626/index.html
[root@reg pod_data]# echo web-2 > default-www-web-2-pvc-747096f2-7c9d-46d5-8365-c96b0ffa7037/index.html

#建立测试pod访问web-0~2
[root@master volumes]# kubectl run -it testpod --image busyboxplus
/ # curl  web-0.nginx-svc
web-0
/ # curl  web-1.nginx-svc
web-1
/ # curl  web-2.nginx-svc
web-2

#在主机上测试
[root@master volumes]# cat /etc/resolv.conf
# Generated by NetworkManager
nameserver 10.96.0.10		#添加k8s中的DNS解析服务器
nameserver 8.8.8.8

[root@master volumes]# curl web-0.nginx-svc.default.svc.cluster.local
web-0
[root@master volumes]# curl web-1.nginx-svc.default.svc.cluster.local
web-1
[root@master volumes]# curl web-2.nginx-svc.default.svc.cluster.local
web-2


#删掉重新建立statefulset
[root@master volumes]# kubectl delete -f statefulset.yml
[root@master volumes]# kubectl apply  -f statefulset.yml


#访问依然不变
[root@k8s-master statefulset]# kubectl attach -it pods/testpod
/ # cu
curl  cut
/ # curl  web-0.nginx-svc
web-0
/ # curl  web-1.nginx-svc
web-1
/ # curl  web-2.nginx-svc
web-2
9.4 statefulset的弹缩
可以使用命令与编辑配置文件来进行弹缩
命令
$ kubectl scale statefulsets <stateful-set-name> --replicas=<new-replicas>
编辑配置文件
$ kubectl edit statefulsets.apps <stateful-set-name>
statefulset有序回收
[root@master volumes]# kubectl scale statefulset web --replicas=0
statefulset.apps/web scaled
[root@master volumes]# kubectl delete -f statefulset.yml
statefulset.apps "web" deleted
此时pvc还存在,对应的存储目录也还在
[root@reg pod_data]# ls
default-www-web-0-pvc-f5486d8a-9765-4d80-8b92-5863377001b9
default-www-web-1-pvc-64be3371-7f5b-417d-82eb-f1741b1fe626
default-www-web-2-pvc-747096f2-7c9d-46d5-8365-c96b0ffa7037

#删除了pvc对应的pv也会删除,因为使用的是存储类
[root@master volumes]# kubectl delete pvc --all
persistentvolumeclaim "www-web-0" deleted
persistentvolumeclaim "www-web-1" deleted
persistentvolumeclaim "www-web-2" deleted
[root@master volumes]# kubectl get pvc
No resources found in default namespace.
[root@master volumes]# kubectl get pv
No resources found

码道开发者社区,聚焦华为云码道 CodeArts 代码智能体,沉淀 Agent、Skill、鸿蒙开发实战内容,供开发者查阅资料、交流技术、分享工程实践
更多推荐



 28
28 0
0- 0


 已为社区贡献7条内容

所有评论(0)