Kubernetes HELM
Kubernetes HELM
一、Helm 概念
在没使用 Helm 之前,向 kubernetes 部署应用要依次部署 deployment、svc 等,步骤较繁琐。随着很多项目微服务化,复杂的应用在容器中部署以及管理显得较为复杂,helm 通过打包的方式,支持发布的版本管理和控制,很大程度上简化了 Kubernetes 应用的部署和管理
官网地址:helm.sh/zh/
Helm 本质就是让 Kubernetes 的应用管理(Deployment、Service 等)可配置,能动态生成。通过动态生成 Kubernetes资源清单文件(deployment.yaml,service.yaml)后再调用 Kubectl 自动实现 Kubernetes 资源部署。 Helm 可以理解为是 Kubernetes 的 yum 工具
1.1 Helm 重要概念
Chart、Repository 和 Release
-
Chart:代表着 Helm 包。它包含在 Kubernetes 集群内部运行应用程序,工具或服务所需的所有资源定义。可以把它看作是 Homebrew formula,Apt dpkg,或 Yum RPM 在Kubernetes 中的等价物。
-
Repository(仓库):是用来存放和共享 charts 的地方。它就像 Perl 的 CPAN 档案库网络或是 Fedora 的 软件包仓库,只不过它是供 Kubernetes 包所使用的。
-
Release:是运行在 Kubernetes 集群中的 chart 的实例。一个 chart 通常可以在同一个集群中安装多次。每一次安装都会创建一个新的 release。
- 以 MySQL chart 为例,如果你想在你的集群中运行两个数据库,你可以安装该 chart 两次。每一个数据库都会拥有它自己的 release 和 release name。
Helm cli 和 Repository
- Helm cli:helm 客户端组件,负责和 kubernetes apiServer 通信
- Repository:用于发布和存储 Chart 的仓库
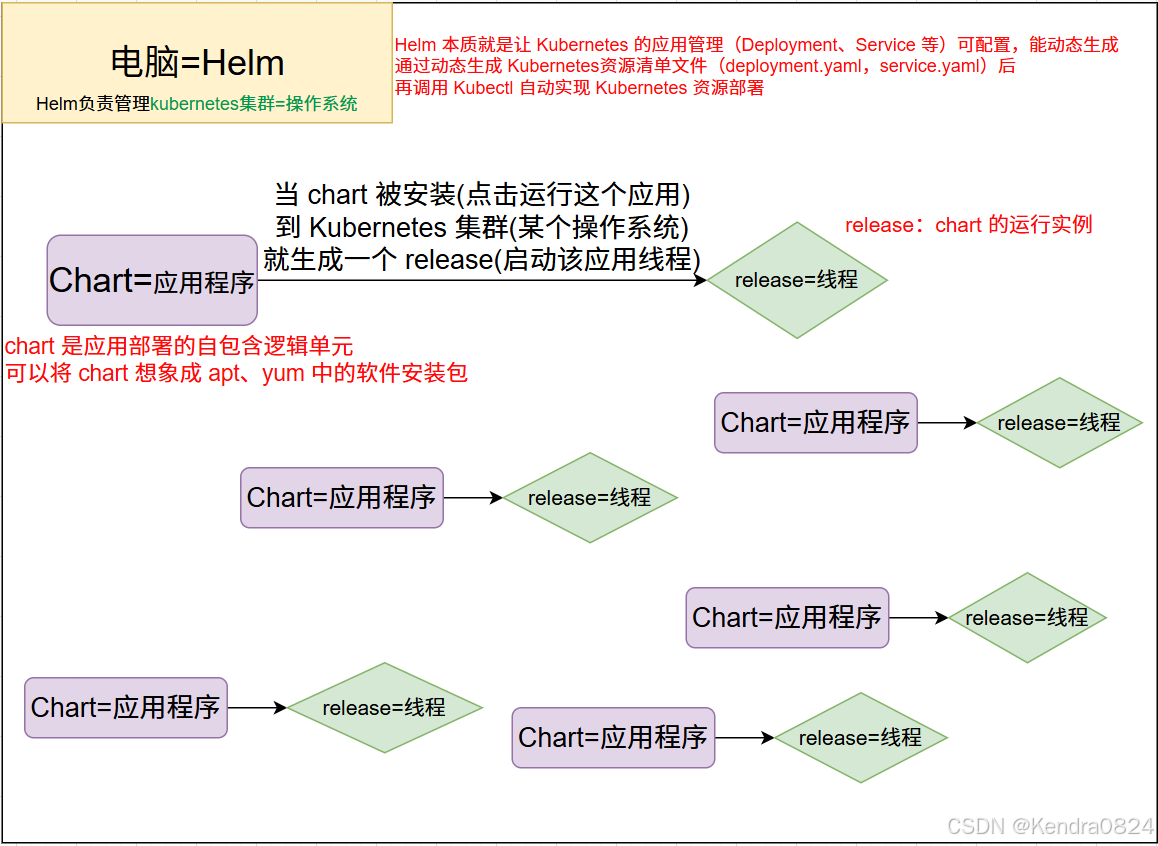
1.2 Helm 组件结构
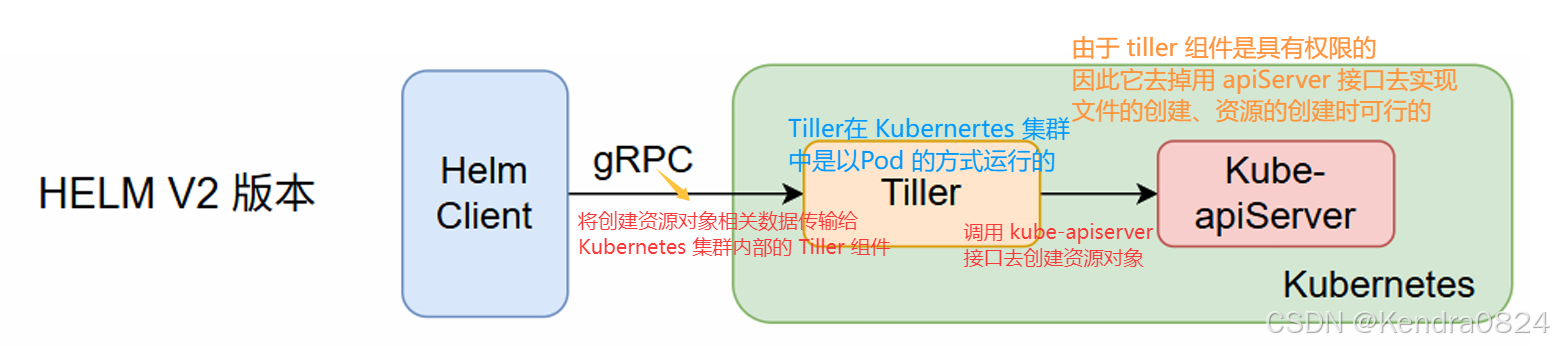
在 V2 版 Helm 诞生的时,RBAC 还没有完整的被应用在各个环境中,RBAC 有一个非常重要的特性, 就是它的鉴权过程完全可以由几个 API 接口去实现。比如开发一个第三方客户端,第三方工具,就可以通过接口调用实现鉴权过程。所以在这种背景下,RBAC 对于整个行业的普及就造成了一个分水岭
-
V2版本:Helm V2 是 C/S 架构,主要分为客户端 Helm 和服务器端 tiller
-
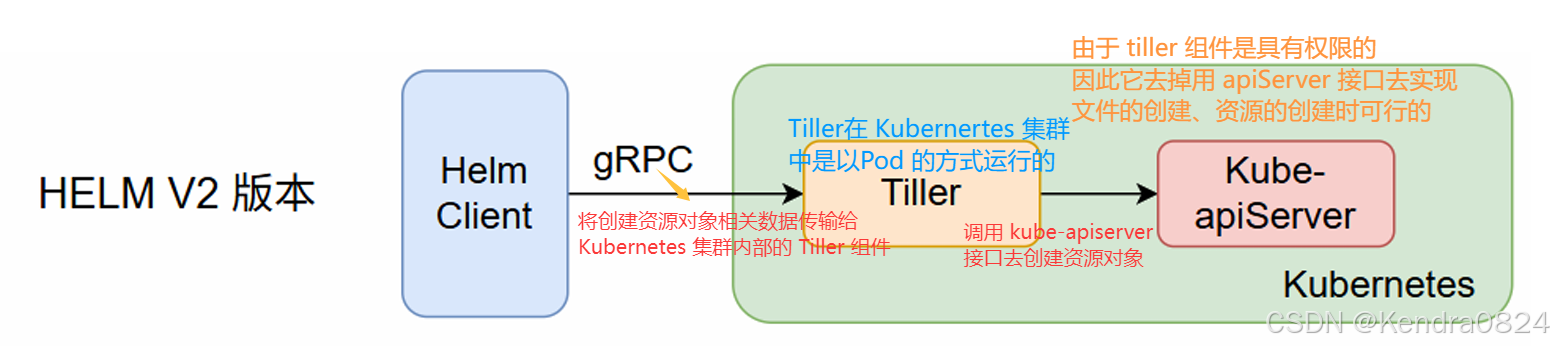
V3版本:Helm 客户端通过 HTTPS 协议直接向 Kubernetes 集群的 kube-apiServer 发送请求 来实现对应的业务部署
好处:
- Helm 的架构变的更为简单和灵活
- 不再需要创建 ServiceAccount,直接使用当前环境中的 kubeconfig 配置
- 可以直接和 kubernetes APl 交互,更为安全
- 不再需要使用 helm init 来进行初始化
二、Helm 安装及演示
2.1 Helm 安装
2.1.1 二进制安装
每个 Helm 版本都提供了各种操作系统的二进制版本,这些版本可以手动下载和安装

# 下载二进制安装文件
wget https://get.helm.sh/helm-v3.18.2-linux-amd64.tar.gz--2025-06-14
[root@master ~]# ls
4  5  6  7  8  helm-v3.18.3-linux-amd64.tar.gz

# 解压安装文件
[root@master ~]# tar -xzf helm-v3.18.3-linux-amd64.tar.gz
[root@master ~]# ls
4  5  6  7  8  helm-v3.18.3-linux-amd64.tar.gz  linux-amd64
[root@master ~]# cd linux-amd64/
[root@master linux-amd64]# ls
helm  LICENSE  README.md		#是一个具有可执行权限的文件

# 将解压目录下的 helm 文件复制到 /usr/local/bin 目录下
[root@master linux-amd64]# cp -a helm /usr/bin/
[root@master linux-amd64]# cd
[root@master ~]# rm -rf helm-v3.18.3-linux-amd64.tar.gz linux-amd64/
[root@master ~]# ls
4  5  6  7  8

# 验证是否安装成功
[root@master .cache]# helm version
version.BuildInfo{Version:"v3.18.3", GitCommit:"6838ebcf265a3842d1433956e8a622e3290cf324", GitTreeState:"clean", GoVersion:"go1.24.4"}
2.1.2 脚本安装
Helm现在有个安装脚本可以自动拉取最新的Helm版本并在本地安装
脚本安装:
# 从指定 URL 下载 Helm 3 的安装脚本并保存到本地
curl -fsSL -o get_helm.sh https://raw.githubusercontent.com/helm/helm/main/scripts/get-helm-3
chmod 700 get_helm.sh
./get_helm.sh

# 如果想直接执行安装,运行
curl https://raw.githubusercontent.com/helm/helm/main/scripts/get-helm-3 | bash
curl:命令行下用于传输网络数据的工具,支持 HTTP/HTTPS 等协议
-f(- -fail):若 HTTP 请求返回错误状态码(如 404、500 等),curl 会视为失败并退出,而非默认输出错误页面内容
-s(- -silent):静默模式,不显示下载进度、连接信息等冗余输出
-S(- -show-error):与 -s 配合使用,在静默模式下仍会显示错误信息(若发生错误)
-L(- -location):若目标 URL 返回重定向(如 301/302),自动跟随重定向到最终地址
-o get_helm.sh:指定输出文件,将下载的内容保存到当前目录下名为 get_helm.sh 的文件中(-o 后接文件名)
2.1.3 包管理器安装
从 Fedora 35(对应 RedHat 8.4)开始, 官方仓库可以使用 helm 了,可以调用以下命令安装helm:
dnf install helm
2.2 初始化
2.2.1 添加仓库(应用商店)
安装好 Helm 之后,就可以从 Artifact Hub 中查找需要的 Helm chart 仓库并添加(eg. 添加 bitnami 仓库)
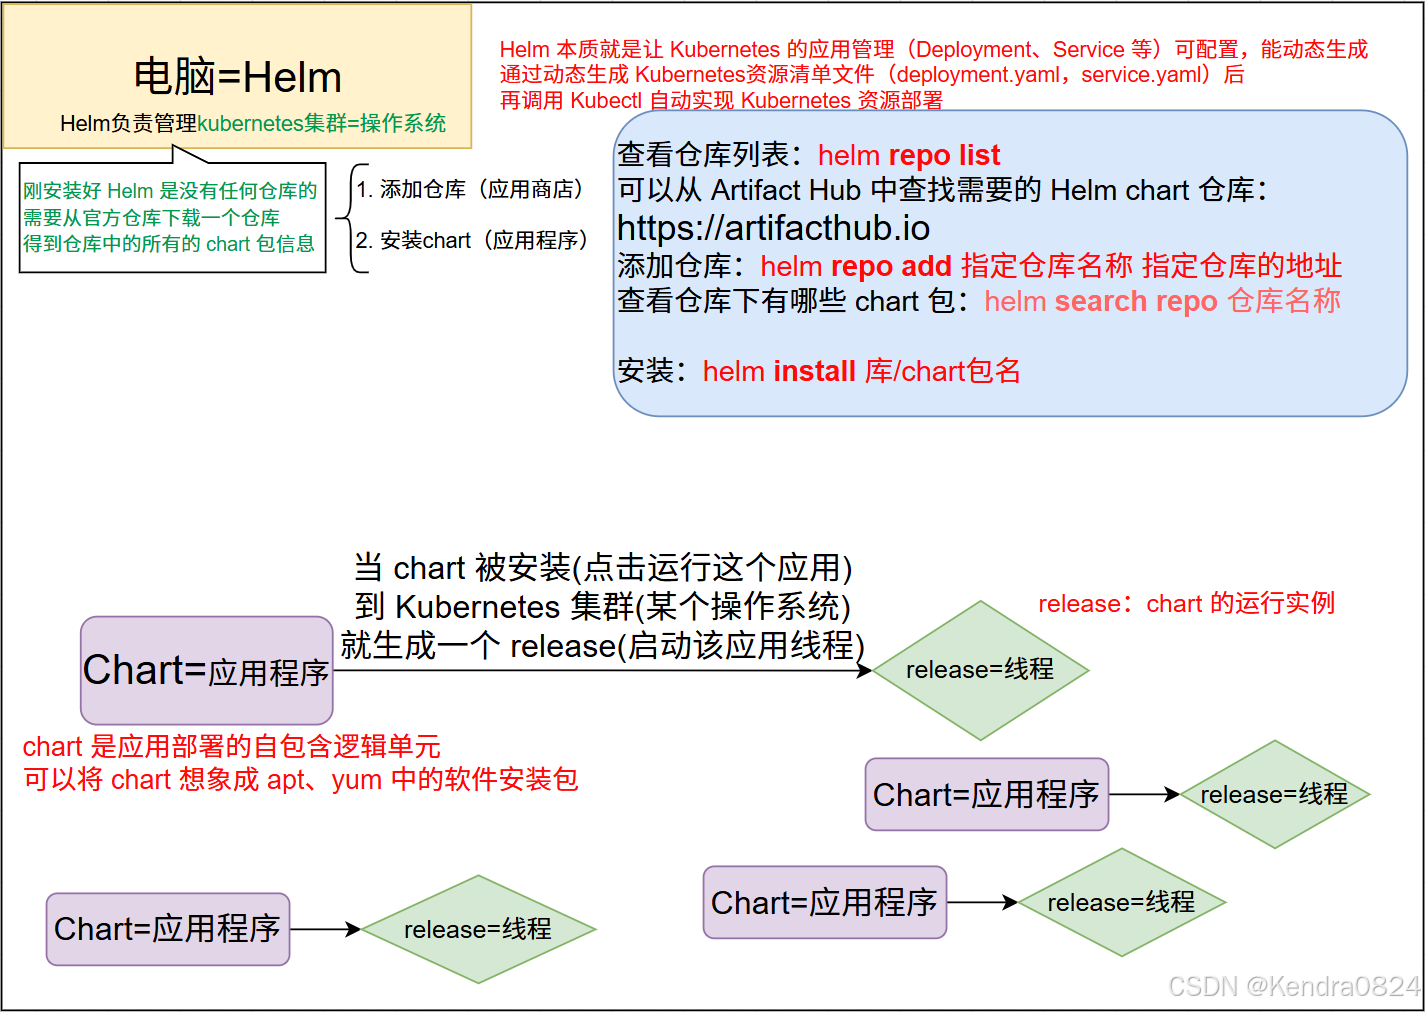
刚安装好 Helm 是没有任何仓库的。如果想完成安装操作,需要先添加一个仓库
添加仓库:helm repo add 指定仓库名称 指定仓库的地址
查看仓库:helm repo list
查看某个仓库下有哪些 chart 包:helm search repo 仓库名称
删除仓库:helm repo remove 仓库名称
安装 chart 包中的软件:helm install 库/chart包名
# 查看仓库列表(刚安装好 Helm 是没有任何仓库的)
[root@master ~]# helm repo list
Error: no repositories to show

# 添加仓库,语法:helm repo add 指定仓库名称 指定仓库的地址
国内:
	helm repo add ingress-nginx "https://helm-charts.itboon.top/ingress-nginx" --force-update
#将 Kubernetes 官方维护的 ingress-nginx 控制器的 Helm Chart 仓库注册到本地 Helm 客户端,并给它起了一个本地别名 `ingress-nginx`。 这是使用 Helm 轻松安装和管理 ingress-nginx 的必要准备步骤

海外:
    helm repo add ingress-nginx https://kubernetes.github.io/ingress-nginx

# 这里只添加 bitnami 作为演示
		helm repo add bitnami "https://helm-charts.itboon.top/bitnami" --force-update
    helm repo add bitnami https://charts.bitnami.com/bitnami

#执行这个命令后会从官方仓库下载这个仓库下所有的 chart 包信息
helm repo ls

helm search repo bitnami     #查看这个仓库下有哪些 chart 包
这些仓库的缓存会放在当前的 .cache 的目录下
#[root@master ~]# helm repo add ingress-nginx "https://helm-charts.itboon.top/ingress-nginx" --force-update
#"ingress-nginx" has been added to your repositories
[root@master ~]# helm repo add bitnami "https://helm-charts.itboon.top/bitnami" --force-update
"bitnami" has been added to your repositories
[root@master ~]# helm repo ls
NAME         	URL
#ingress-nginx	https://helm-charts.itboon.top/ingress-nginx
bitnami      	https://helm-charts.itboon.top/bitnami

# 在这个文件中记录的是存放的是有哪些下载包
[root@master ~]# helm search repo bitnami
NAME                                        	CHART VERSION	APP VERSION  	DESCRIPTION
bitnami/airflow                             	24.2.0       	3.0.2        	Apache Airflow is a tool to express and execute...
bitnami/apache                              	11.3.18      	2.4.63       	Apache HTTP Server is an open-source HTTP serve...
bitnami/apisix                              	5.0.4        	3.13.0       	Apache APISIX is high-performance, real-time AP...
bitnami/appsmith                            	6.0.12       	1.78.0       	Appsmith is an open source platform for buildin...
bitnami/argo-cd                             	9.0.25       	3.0.9        	Argo CD is a continuous delivery tool for Kuber...
bitnami/argo-workflows                      	12.0.6       	3.6.10       	Argo Workflows is meant to orchestrate Kubernet...
...........................

[root@master ~]# ls -a
.              .bash_logout   .cache   .kube        .ssh        .trae-cn
..             .bash_profile  .config  .lesshst     .tcshrc     .trae-cn-server
.bash_history  .bashrc        .cshrc   linux-amd64  .trae-aicc  .viminfo
[root@master ~]# cd .cache/
[root@master .cache]# ls
helm  Microsoft
[root@master .cache]# cd helm/
[root@master helm]# ls
repository
[root@master helm]# cd repository/
[root@master repository]# ls
bitnami-charts.txt  bitnami-index.yaml	#索引文件:记录了一些索引信息,里面是每个 chart 包的完整信息
ingress-nginx-charts.txt  ingress-nginx-index.yaml
tar 包的方式添加:
[root@master ~]# ls
4  5  6  7  8  repositry.tar.gz
[root@master ~]# ls -a
.   6              .bash_logout   .config   repositry.tar.gz  .trae-cn
..  7              .bash_profile  .cshrc    .ssh              .trae-cn-server
4   8              .bashrc        .kube     .tcshrc           .viminfo
5   .bash_history  .cache         .lesshst  .trae-aicc
[root@master ~]# cd .cache/
[root@master .cache]# ls
helm  Microsoft
[root@master .cache]# cd helm/	#没有这个目录就mkdir创建
[root@master helm]# ls
[root@master helm]# tar -xzf /root/repositry.tar.gz 	#解压到当前目录l
[root@master helm]# ls
repository
[root@master helm]# cd repository/
[root@master repository]# ls
bitnami-charts.txt  ingress-nginx-charts.txt
bitnami-index.yaml  ingress-nginx-index.yaml
- 国内
# 将 ingress-nginx 的 Helm 仓库添加到本地 Helm 客户端
[root@master ~]# helm repo add ingress-nginx "https://helm-charts.itboon.top/ingress-nginx" --force-update
作用是:
- 注册仓库信息: 它告诉你的本地 Helm 客户端:“有一个叫
ingress-nginx(你指定的别名)的 Helm 仓库,它的 Charts 存放在https://kubernetes.github.io/ingress-nginx这个地址。” - 下载仓库索引: Helm 会连接到该 URL,下载这个仓库的
index.yaml文件。这个索引文件包含了仓库中所有可用 Charts 的列表、它们的版本信息以及下载这些 Charts 的具体位置。
helm: 这是 Helm 命令行工具本身。repo: 这是 Helm 的一个子命令,专门用于管理 Helm 仓库(存储 Helm Charts 的地方)。add: 这是helm repo的一个子命令,表示你要添加一个新的仓库。ingress-nginx: 这是你为这个仓库设置的本地别名(local name)。你可以自由命名它(例如my-ingress),但使用ingress-nginx是一个清晰且标准的做法。你后续在安装或搜索 Chart 时会用到这个别名。https://kubernetes.github.io/ingress-nginx: 这是 Ingress-NGINX 项目的官方 Helm Chart 仓库的 URL。这是存放 ingress-nginx 控制器 Helm Chart 的实际位置。
# 将 Bitnami Helm 仓库添加到本地 Helm 客户端,并强制更新仓库索引
[root@master ~]# helm repo add bitnami "https://helm-charts.itboon.top/bitnami" --force-update
helm
Kubernetes 的包管理工具(类似 apt/yum)。repo add
添加新的 Helm 仓库到本地配置。bitnami
本地仓库别名(可自定义),后续操作需通过此名称引用该仓库。https://helm-charts.itboon.top/bitnami
仓库的实际 URL(这是一个 Bitnami 的国内镜像源,非官方地址)。--force-update
关键选项:强制立即更新仓库索引(即使同名仓库已存在)。
2.2.2 安装 chart(应用程序)
先更新仓库,以便于从最新的 charts 列表进行安装
# 更新仓库
[root@master repository]# helm repo update
Hang tight while we grab the latest from your chart repositories...
...Successfully got an update from the "ingress-nginx" chart repository
...Successfully got an update from the "bitnami" chart repository
Update Complete. ⎈Happy Helming!⎈

# 查看所有能够修改的配置参数
helm show values bitnami/apache

# 安装(eg.apache):
[root@master repository]# helm install bitnami/apache --generate-name
NAME: apache-1753089915
LAST DEPLOYED: Mon Jul 21 17:25:15 2025
NAMESPACE: default
STATUS: deployed
REVISION: 1
TEST SUITE: None
NOTES:
CHART NAME: apache
CHART VERSION: 11.3.18
APP VERSION: 2.4.63

Did you know there are enterprise versions of the Bitnami catalog? For enhanced secure software supply chain features, unlimited pulls from Docker, LTS support, or application customization, see Bitnami Premium or Tanzu Application Catalog. See https://www.arrow.com/globalecs/na/vendors/bitnami for more information.

** Please be patient while the chart is being deployed **

1. Get the Apache URL by running:

** Please ensure an external IP is associated to the apache-1753089915 service before proceeding **
** Watch the status using: kubectl get svc --namespace default -w apache-1753089915 **

  export SERVICE_IP=$(kubectl get svc --namespace default apache-1753089915 --template "{{ range (index .status.loadBalancer.ingress 0) }}{{ . }}{{ end }}")
  echo URL            : http://$SERVICE_IP/


WARNING: You did not provide a custom web application. Apache will be deployed with a default page. Check the README section "Deploying your custom web application" in https://github.com/bitnami/charts/blob/main/bitnami/apache/README.md#deploying-a-custom-web-application.


WARNING: There are "resources" sections in the chart not set. Using "resourcesPreset" is not recommended for production. For production installations, please set the following values according to your workload needs:
  - resources
+info https://kubernetes.io/docs/concepts/configuration/manage-resources-containers/
命令执行成功后,会输出很多信息,可通过如下命令来查看
[root@master repository]# helm list -n default		#helm list 用于列出当前的 release
								#版本号为 1
NAME             	NAMESPACE	REVISION	UPDATED                                	STATUS  	CHART         	APP VERSION
apache-1753089915	default  	1       	2025-07-21 17:25:15.448886261 +0800 CST	deployed	apache-11.3.18	2.4.63
# 查看是否被部署好
[root@master repository]# kubectl get svc
NAME                TYPE           CLUSTER-IP     EXTERNAL-IP   PORT(S)                      AGE
apache-1753089915   LoadBalancer   10.0.116.128   <pending>     80:32475/TCP,443:30393/TCP   2m22s
kubernetes          ClusterIP      10.0.0.1       <none>        443/TCP                      12d
#apache 的一个 LoadBalancer 的这个 service 类型已经创建起来

[root@master repository]# kubectl get pod
NAME                                 READY   STATUS    RESTARTS   AGE
apache-1753089915-665fbdb9bd-j8wtd   1/1     Running   0          2m49s
- 查看整个 chart 的基本信息
# 1.chart的基本信息
[root@master repository]# helm show chart bitnami/apache
annotations:
  category: Infrastructure
  images: |
    - name: apache
      image: docker.io/bitnami/apache:2.4.63-debian-12-r18
    - name: apache-exporter
      image: docker.io/bitnami/apache-exporter:1.0.10-debian-12-r11
    - name: git
      image: docker.io/bitnami/git:2.50.0-debian-12-r2
  licenses: Apache-2.0
  tanzuCategory: service
apiVersion: v2
appVersion: 2.4.63
dependencies:
- name: common
  repository: oci://registry-1.docker.io/bitnamicharts
  tags:
  - bitnami-common
  version: 2.x.x
description: Apache HTTP Server is an open-source HTTP server. The goal of this project
  is to provide a secure, efficient and extensible server that provides HTTP services
  in sync with the current HTTP standards.
home: https://bitnami.com
icon: https://dyltqmyl993wv.cloudfront.net/assets/stacks/apache/img/apache-stack-220x234.png
keywords:
- apache
- http
- https
- www
- web
- reverse proxy
maintainers:
- name: Broadcom, Inc. All Rights Reserved.
  url: https://github.com/bitnami/charts
name: apache
sources:
- https://github.com/bitnami/charts/tree/main/bitnami/apache
version: 11.3.18

# 2.chart的所有信息
helm show all bitnami/apache
2.2.3 卸载一个版本
- 卸载指定资源
helm uninstall apache-1753089915

# 查看还在不在
helm list --all
命令执行成功后,指定资源相关的所有资源(包括 service、deployment、pod 等)都会被删除,甚至历史版本也会被删除。如果希望保留历史版本,需要添加 --keep-history 选项
- 查看状态,以便于验证是否成功卸载:
helm status apache-1753089915
2.3 常用命令
官方文档:https://helm.sh/zh/docs/helm/helm/
2.3.1 Helm补全
- helm completion bash - 为 bash 生成自动补全脚本
# 1.在当前shell会话中加载自动补全,在 /root/.bashrc 文件中添加
[root@master ~]# vim /root/.bashrc
source <(helm completion bash)

 # 2. 为每个新的会话加载自动补全,执行一次
[root@master ~]# helm completion bash | sudo tee /etc/bash_completion.d/helm
- helm completion fish - 为 fish 生成自动补全脚本
# 1.在当前shell会话中加载自动补全
[root@master ~]# vim /root/.bashrc
helm completion fish | source

 # 2. 为每个新的会话加载自动补全,执行一次
[root@master ~]# helm completion fish > ~/.config/fish/completions/helm.fish
2.3.2 查找Charts(helm search)
Helm 自带一个强大的搜索命令,可以用来从两种来源中进行搜索:
- helm search hub 从 [Artifact Hub] 的仓库中查找并列出 helm charts。 Artifact Hub中存放了大量不同仓库
- helm search repo 从添加(使用 helm repo add)到本地 helm 客户端中的仓库中进行查找。该命令基于本地数据进行搜索,无需连接互联网。
可以通过运行 helm search hub 命令找到公开可用的charts:
# 从 Artifact Hub 中搜索所有的 wordpress charts
[root@master ~]# helm search hub wordpress
URL        								CHART VERSION   		APP VERSION 		DESCRIPTION
................
使用 helm search repo 命令可以从添加的仓库中查找 chart 的名字
# 从你所添加的仓库中查找chart的名字
[root@master ~]# helm search repo wordpress
2.3.3 安装helm包(helm install)
使用 helm install 命令来安装一个新的 helm 包。最简单的使用方法只需要传入两个参数:
- 命名的 release 名字
- 想安装的 chart 的名称
eg.
# 			 1命名的release名字  2想安装的chart的名称
helm install apache-1612624192 bitnami/apache
在安装过程中,helm 客户端会打印一些有用的信息,其中包括:哪些资源已经被创建,release当前的状态,以及是否还需要执行额外的配置步骤
- Helm按照以下顺序安装资源:
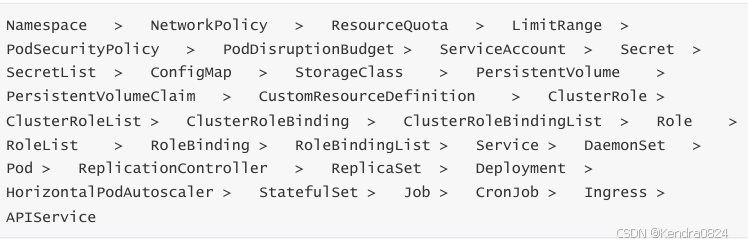
自定义 chart 来指定想要的配置:使用helm show values可以查看 chart 中的可配置选项:
[root@master ~]# helm show values bitnami/apaeche		#查看chart中的可配置选项
..........
service:
	## @param service.type Apache Service type
	##
 	type: LoadBalancer
 	## @param service.ports.http Apache service HTTP port
 	## @param service.ports.https Apache service HTTPS port
 	##
 	ports:
 	  http: 80
 	  https: 443
 	## Node ports to expose
 	## @param service.nodePorts.http Node port for HTTP
 	## @param service.nodePorts.https Node port for HTTPS
............
可以使用 YAML 格式的文件覆盖上述任意配置项,并在安装过程中使用该文件
[root@master ~]# vim 1.values.yaml
service:
  type: NodePort		# 只需要写一下跟默认的不一样的部分就好,会进行一个替换的动作
修改好后保存退出,然后再安装:
[root@master ~]# helm install -f 1.values.yaml bitnami/apache --generate-name
NAME: apache-1749901624
LAST DEPLOYED: Sat Jun 14 19:47:34 2025
NAMESPACE: default
STATUS: deployed
REVISION: 1
TEST SUITE: None
NOTES:
CHART NAME: apache
CHART VERSION: 11.3.14
APP VERSION: 2.4.63
.................
安装过程中有两种方式传递配置数据:
--values(或-f):使用 YAML 文件覆盖配置。可以指定多次,优先使用最右边的文件--set:通过命令行的方式对指定项进行覆盖
如果同时使用两种方式,则 --set 中的值会被合并到 --values 中,但是 --set 中的值优先级更高
在–set 中覆盖的内容会被被保存在 ConfigMap 中。可以通过
helm get values <release-name>来查看指定 release 中 --set 设置的值。也可以通过运行helm upgrade并指定--reset-values字段来清除 --set 中设置的值
--set的格式和限制
--set选项使用0或多个 name/value 对,最简单的用法类似于:--set name=value,等价于如下 YAML格式:
name: value
多个值使用逗号分割,因此 --set a=b,c=d 的 YAML 表示是:
a: b
c: d
支持更复杂的表达式。例如,–set outer.inner=value 被转换成了:
outer:
  inner: value
列表使用花括号( { } )来表示。例如,--set name={a, b, c} 被转换成了:
name:
  - a
  - b
  - c
某些 name/key 可以设置为 null 或者空数组,例如 --set name=[ ],a=null
name: []
a: null
从 2.5.0 版本开始,可以使用数组下标的语法来访问列表中的元素。例如:--set servers[0].port=80就变成了:
servers:
  - port: 80
多个值也可以通过这种方式来设置。--set servers[0].port=80,servers[0].host=example 变成
了:
servers:
  - port: 80
 	host: example
如果需要在 --set 中使用特殊字符,可以使用反斜线来进行转义,--set name=value1\,value2 就变成了:
name: "value1,value2"
- 更多安装方法:helm install 命令可以从多个来源进行安装:
- chart 的仓库(如上所述)
- 本地 chart 压缩包(
helm install foo foo-0.1.1.tgz) - 解压后的 chart 目录(
helm install foo path/to/foo) - 完整的 URL(
helm install foo https://example.com/charts/foo-1.2.3.tgz)
2.3.4 升级release和失败时恢复(helm upgrade|helm rollback)
升级到 chart 的新版本,或是修改 release 的配置:helm upgrade,Helm 会尝试执行最小侵入式升级。即它只会更新自上次发布以来发生了更改的内容
[root@master ~]# vim 2.values.yaml
service:
  type: ClusterIP
[root@master ~]# helm upgrade -f 2.values.yaml apache-1749901624
bitnami/apache
Release "apache-1749901624" has been upgraded. Happy Helming!
NAME: apache-1749901624		#apache-1749901624这个release使用相同的chart进行升级,但是使用了一个新的YAML文件:service.type: ClusterIP
LAST DEPLOYED: Sat Jun 14 20:08:05 2025
NAMESPACE: default
STATUS: deployed
REVISION: 2
TEST SUITE: None
NOTES:
CHART NAME: apache
CHART VERSION: 11.3.14
APP VERSION: 2.4.63
...........................
- 安装、升级、回滚时的有用选项:可以指定一些其他有用的选项来自定义 Helm 在安装、升级、回滚期间的行为
--timeout:一个 Go duration 类型的值, 用来表示等待 Kubernetes 命令完成的超时时间,默认值为 5m0s--wait:表示必须要等到所有的 Pods 都处于 ready 状态,PVC 都被绑定,Deployments 都至少拥有最小 ready 状态 Pods 个数(Desired 减去 maxUnavailable ),并且 Services 都具有 IP 地址(如果是LoadBalancer , 则为 Ingress),才会标记该 release 为成功- 最长等待时间由
--timeout值指定。 - 如果达到超时时间,release 将被标记为 FAILED
- 当Deployment 的 plicas 被设置为1,但其滚动升级策略中的 maxUnavailable 没有被设置为0时,
--wait将返回就绪,因为已经满足了最小 ready Pod 数
- 最长等待时间由
--no-hooks:不运行当前命令的钩子
2.3.5 卸载release(helm uninstall)
从集群中卸载一个 release: helm uninstall
(在 Helm 2 版本中,当一个 release 被删除,会保留一条删除记录。而在 Helm 3 中,删除也会移除 release 的记录)
helm uninstall apache-1749901624
如果想保留删除记录,使用
helm uninstall --keep-history;使用
helm list --uninstalled只会展示使用了 --keep-history 删除的 release
helm list --all会展示 Helm 保留的所有 release 记录,包括失败或删除的条目(指定了 history )
注意,因为现在默认会删除 release,所以不再能够回滚一个已经被卸载的资源了。
2.3.6 使用仓库(helm repo)
helm repo 提供了一组命令用于添加、列出和移除仓库
helm repo list 来查看配置的仓库
[root@master ~]# helm repo list
NAME    URL
bitnami https://charts.bitnami.com/bitnami
使用 helm repo add 来添加新的仓库:
[root@master ~]# helm repo add dev https://example.com/dev-charts
因为 chart 仓库经常在变化,在任何时候都可以通过执行 helm repo update 命令来确保 Helm 客户端是最新的
2.3.7 下载Chart(helm pull)
Helm 的 chart 同时也支持下载,下载下来的是一个tar包,解压后即可获得官方的 chart 目录,基于目 录中提供的文件,我们可以对其中的内容进行修改,进行自定义的发布,同时也可以学习其语法
helm pull [chart URL | repo/chartname] [...] [flags]
例如下载 ingress-nginx:
[root@master ~]# helm pull ingress-nginx/ingress-nginx
2.3.8 删除仓库(helm repo remove)
删除一个或多个仓库
helm repo remove [REPO1 [REPO2 ...]] [flags]
例如 bitnami 仓库
[root@master ~]# helm repo remove bitnami
"bitnami" has been removed from your repositories
2.4 创建自己的 Charts
2.4.1 基本模式
# 首先创建一个模板:
[root@master 10]# helm create myapp
Creating myapp

# 然后进入到这个模板中
[root@master 10]# cd myapp/

# 进入后查看这个模板下有哪些文件:
[root@master myapp]# ls
charts  Chart.yaml  templates  values.yaml
[root@master myapp]# ls charts/
[root@master myapp]# ls templates/
deployment.yaml  _helpers.tpl  hpa.yaml  ingress.yaml  NOTES.txt  serviceaccount.yaml  service.yaml  tests
- Chart.yaml 文件:用于描述这个 chart 包的相关的基本信息,包括 chart 包的名字,包括应用的版本号,包括是谁创建,创建时间等
- charts 目录:用于存放所依赖的 chart 包
- templates 目录:用于存放要执行的所有的资源清单文件
- values.yaml 文件:用于编写从资源清单里抽象出来的配置参数
先执行如下命令来删除不用的文件:
[root@master myapp]# rm -rf values.yaml templates/*
[root@master myapp]# ls
charts  Chart.yaml  templates
接着在 templates 目录下编写 service 资源清单:
[root@master myapp]# vim templates/service.yaml
apiVersion: v1
kind: Service
metadata:
  labels:
  app: myapp-test
  name: myapp-test-202506142058-svc
spec:
  ports:
  - name: 80-80
 	port: 80
 	protocol: TCP
 	targetPort: 80
 	nodePort: 31210
  selector:
 	app: myapp-test
  type: NodePort
[root@master myapp]# vim templates/deployment.yaml
apiVersion: apps/v1
kind: Deployment
metadata:
  labels:
  app: myapp-test
  name: myapp-test-202506142058-deploy
spec:
  replicas: 5
  selector:
 	matchLabels:
 	  app: myapp-test
  template:
 	metadata:
 	  labels:
 		app: myapp-test
 	spec:
 	  containers:
 	  - name: myapp
 		image: harbor.registry.com/library/myapp:1.
创建好相应的资源清单文件后,执行如下命令发布部署:
# 1. 删除之前的
[root@master 10]# helm uninstall apache-1749901624
release "apache-1749901624" uninstalle

# 2. 安装自定义chart包
[root@master myapp]#  cd ..
[root@master 10]# helm install myapp myapp/
NAME: myapp
LAST DEPLOYED: Sat Jun 14 21:01:29 2025
NAMESPACE: default
STATUS: deployed
REVISION: 1
TEST SUITE: None
此时 Pod 和 svc 信息都已经部署好了
2.4.2 注入 Helm 灵魂
可以使用 helm 来安装,也可以直接通过 kubectl apply -f templates/方式来安装,因此并不能体现出 helm 的强大功能
使用 helm 最重要的作用是可以让它动态生成资源模板
- 定义一个安装完成后的通知模
[root@master myapp]# vim templates/NOTES.txt

1、这是一个测试的 myapp chart

2、myapp release 名字:myapp-test-1414212563414218-deploy

3、service 名字:myapp-test-1414212563414218-svc
- 定义 deployment.yaml 资源清单文件模板
[root@master myapp]# vim templates/deployment.yaml
apiVersion: apps/v1
kind: Deployment
metadata:
  labels:
  app: myapp-test
  name: myapp-test-{{ now | date "202506142058" }}-deploy
spec:
  replicas: {{ .Values.replicaCount }}
  selector:
 	matchLabels:
 	  app: myapp-test
  template:
 	metadata:
 	  labels:
 		app: myapp-test
 	spec:
 	  containers:
 	  - image: {{ .Values.image.repository }}:{{ .Values.image.tag }}
 		name: myapp
- 定义 service 资源文件模板
[root@master myapp]# vim templates/service.yam
apiVersion: v1
kind: Service
metadata:
  labels:
  app: myapp-test
  name: myapp-test-{{ now | date "202506142058" }}-svc
spec:
  ports:
  - name: 80-80
 	port: 80
 	protocol: TCP
	targetPort: 80
 	{{- if eq .Values.service.type "NodePort" }}
	nodePort: {{ .Values.service.nodeport }}
 	{{- end}}
  selector:
 	app: myapp-test
  type: {{ .Values.service.type | quote }}
- 编写一个 values.yaml 文件
[root@master myapp]#  vim values.yaml
# Default values for myapp.
# This is a YAML-formatted file.
# Declare variable to be passed into your templates.

replicaCount: 5

image:
  repository: harbor.registry.com/library/myapp
  tag: "1.0"

service:
  type: NodePort
  nodeport: 32321
这样就是一个比较标准的 chart 包了。因此就可以把它打成 tar.gz 文件,并且可以把这个文件给别人安装。
如果你拿到后想修改镜像、版本、副本数或者端口号等,只需要修改 values.yaml 文件即可,而 deployment、service 等资源文件都无须要修改
- 接下来我们将上面编写的部署起来
# 1. 删除之前的
[root@master 10]# helm uninstall myapp
release "myapp" uninstalle

# 2. 然后再安装
[root@master myapp]#  helm install myapp ../myapp/ -f values.yaml
NAME: myapp
LAST DEPLOYED: Sat Jun 14 21:11:29 2025
NAMESPACE: default
STATUS: deployed
REVISION: 1
TEST SUITE: None
NOTES:
1、这是一个测试的 myapp chart

2、myapp release 名字:myapp-test-1414212563414218-deploy

3、service 名字:myapp-test-1414212563414218-svc
这样就部署完了
三、Ingress-nginx
3.1 负载均衡
ingress-nginx 是通过 nginx 来控制服务的。由于 nginx 不具备动态监听配置文件并根据配置文件的变化自动应用,因此需要通过 store 等协程来监听资源变化来决定是否需要重新加载配置文件
而重启服务很可能引进数据丢失,因此 nginx 会尽可能地保障服务的同时减少重启次数
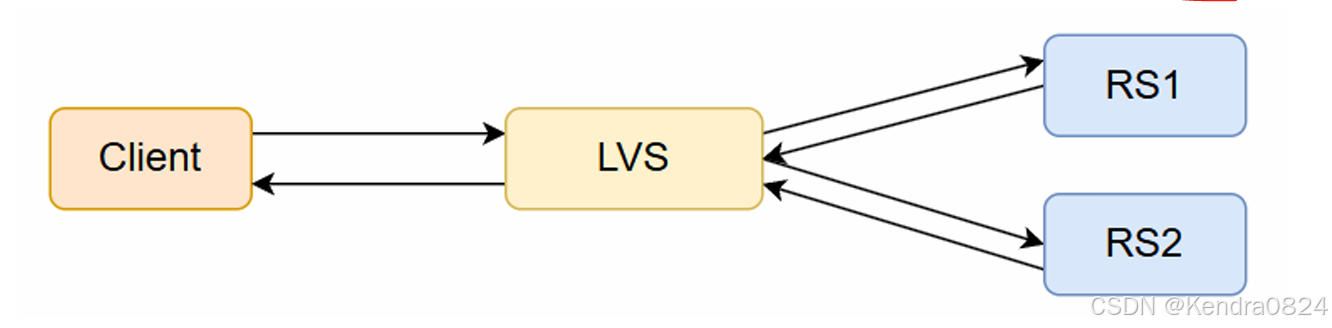
3.1.1 四层负载均衡 LVS
四层负载 LVS:一次完整的 TCP 连接,由 C 与 RS 建立,调度器只起到转发的作用
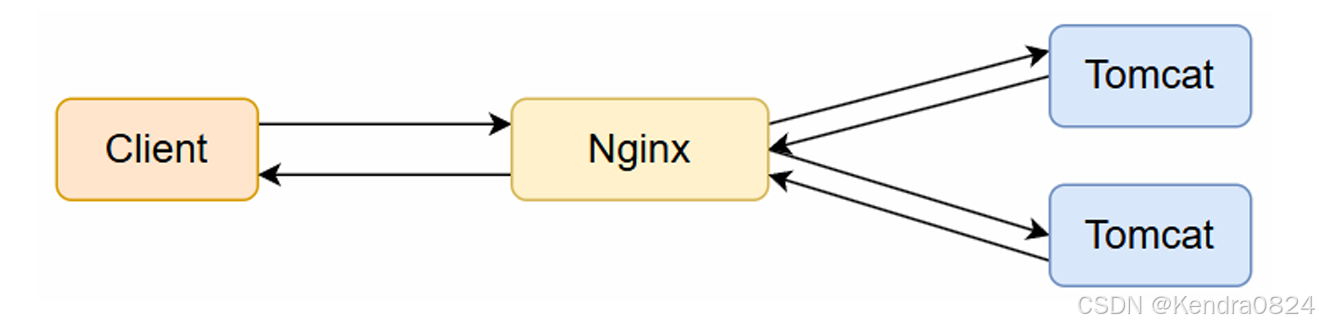
3.1.2 七层负载均衡 Nginx
七层负载 Nginx:两次完整的 TCP 连接,由 C 与调度器建立,调度器与真实服务器建立
apigateway 相对 ingress 的优势
gateway 的 api 暴露(Ingress-nginx)
Ingress & Ingress Controller & API Gateway - Praywu - 博客园
Kubernetes Gateway API 是 Kubernetes 1.18 版本引入的一种新的 API 规范,Gateway API 会成为 Ingress 的下一代替代方案
- Ingress 主要面向 HTTP 流量,Gateway API 提供更丰富的功能,支持 TCP、UDP、TLS 等,不仅仅是 HTTP
- Ingress 的最小路由单元是路径,Gateway API 支持更细粒度的流量路由规则,可以精确到服务级别
- 具有更好的扩展性,通过 CRD 可以轻松地支持各种 Gateway 的自定义类型,更灵活
3.2 基于 Ingress API 的七层实现
Ingress 使用一种能感知协议配置的机制来解析 URI、主机名称、路径等 Web 概念, 让你的 HTTP(或 HTTPS)网络服务可被访问。
Ingress 概念允许通过 Kubernetes API 定义的规则将流量映射到不同后端。
3.3 Ingress 流量与架构分析
3.4 Ingress 安装
不同版本的 Kubernetes 需要安装对应版本支持的 Ingress
3.4.1 导入镜像
- 镜像可从官网下载 https://kubernetes.github.io/ingress-nginx/deploy/
ingress-nginx-4.12.3.gz
# 解压文件
[root@master ~]# tar -xzf ingress-nginx-4.12.3.gz
# ingress-nginx-4.12.3.tgz 是 chart 包,ingress-nginx-v1.12.3-images.tar 是所需要的镜像
[root@master ~]# ls
ingress-nginx-4.12.3.gz  ingress-nginx-4.12.3.tgz  ingress-nginx-v1.12.3-images.tar
[root@master ~]# rm -rf ingress-nginx-4.12.3.gz
[root@master ~]# ls
ingress-nginx-4.12.3.tgz  ingress-nginx-v1.12.3-images.tar
[root@master ~]# tar -xzf ingress-nginx-4.12.3.tgz
[root@master ~]# ls
ingress-nginx  ingress-nginx-4.12.3.tgz  ingress-nginx-v1.12.3-images.tar
[root@master ~]# docker load -i ingress-nginx-v1.12.3-images.tar
08000c18d16d: Loading layer  8.121MB/8.121MB
6f309531a1cd: Loading layer  80.15MB/80.15MB
.........................................
8b179c3e7309: Loading layer  3.584kB/3.584kB
Loaded image: registry.k8s.io/ingress-nginx/controller:v1.12.3
ae078d109446: Loading layer  67.79MB/67.79MB
Loaded image: registry.k8s.io/ingress-nginx/kube-webhook-certgen:v1.5.4
# 镜像拷贝到 node1 和 node2 主机上
[root@master ~]# scp ingress-nginx-v1.12.3-images.tar n1:~
ingress-nginx-v1.12.3-images.tar                         100%  358MB 156.4MB/s   00:02
[root@master ~]# scp ingress-nginx-v1.12.3-images.tar n2:~
ingress-nginx-v1.12.3-images.tar                         100%  358MB 151.4MB/s   00:02
[root@master ~]# ls
ingress-nginx  ingress-nginx-4.12.3.tgz  ingress-nginx-v1.12.3-images.tar
[root@master ~]# rm -rf ingress-nginx-4.12.3.tgz ingress-nginx-v1.12.3-images.tar
[root@master ~]# ls
ingress-nginx
[root@master ~]# cd ingress-nginx/
[root@master ingress-nginx]# ls
changelog   ci      README.md         templates  values.yaml
Chart.yaml  OWNERS  README.md.gotmpl  tests
node 节点上导入镜像:
[root@node1 ~]# ls
ingress-nginx-v1.12.3-images.tar
[root@node1 ~]# docker load -i ingress-nginx-v1.12.3-images.tar
08000c18d16d: Loading layer  8.121MB/8.121MB
.......................................
8814483bb8f7: Loading layer   3.93MB/3.93MB
8b179c3e7309: Loading layer  3.584kB/3.584kB
Loaded image: registry.k8s.io/ingress-nginx/controller:v1.12.3
f464af4b9b25: Loading layer  327.7kB/327.7kB
.........................
ae078d109446: Loading layer  67.79MB/67.79MB
Loaded image: registry.k8s.io/ingress-nginx/kube-webhook-certgen:v1.5.4

[root@node2 ~]# docker load -i ingress-nginx-v1.12.3-images.tar
08000c18d16d: Loading layer  8.121MB/8.121MB
6f309531a1cd: Loading layer  80.15MB/80.15MB
..................
8b179c3e7309: Loading layer  3.584kB/3.584kB
Loaded image: registry.k8s.io/ingress-nginx/controller:v1.12.3
f464af4b9b25: Loading layer  327.7kB/327.7kB
8fa10c0194df: Loading layer  40.96kB/40.96kB
..............
b336e209998f: Loading layer  238.6kB/238.6kB
ae078d109446: Loading layer  67.79MB/67.79MB
Loaded image: registry.k8s.io/ingress-nginx/kube-webhook-certgen:v1.5.4
3.4.2 helm 安装
解压 ingress-nginx-4.12.3.tgz 文件,获取 chart 包(导入镜像时已经操作)
# 修改 values.yaml 文件
[root@master ingress-nginx]# vim values.yaml
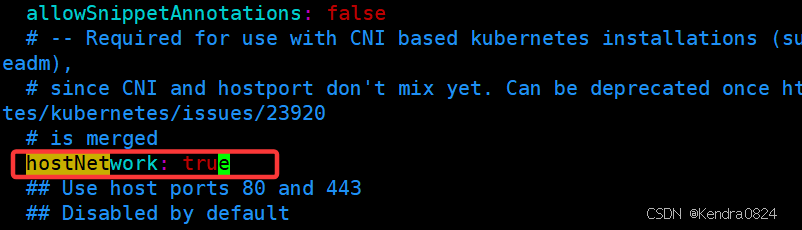
- 将 dnsPolicy 的值从原来的 ClusterFirst 修改为 ClusterFirstWithHostNet,表示集群优先,采用主机网络模式

- 将 hostNetwork 的值从原来的 false 修改为 true,表示共用主机网络名字空间,即可以通过物理机 IP地址和80端口访问这个服务
- 将 kind 类型从原来的 Deployment 修改为 DaemonSet,保证每个节点都有一个pod运行,从而达到高可用

-
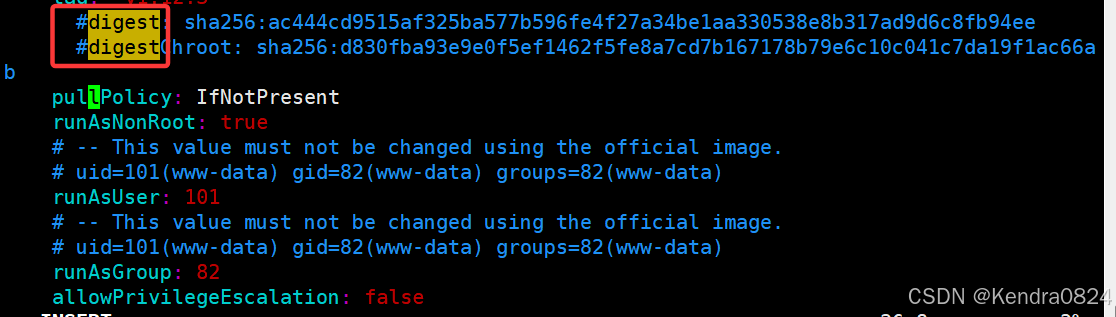
关闭所有镜像的 digest,保证不会重新获取ingress-nginx。即注释掉 digest 和digestChroot这两行
含有digest的行都注释:
-
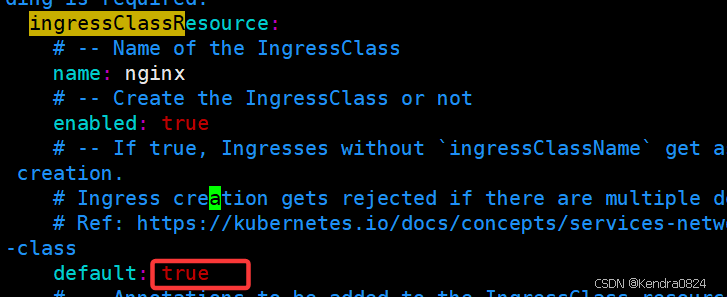
ingressClassResource.default=true,表示把当前这个ingress设置为默认的ingress类。也就是只要不指定,都能被 nginx-ingress 所解释
-
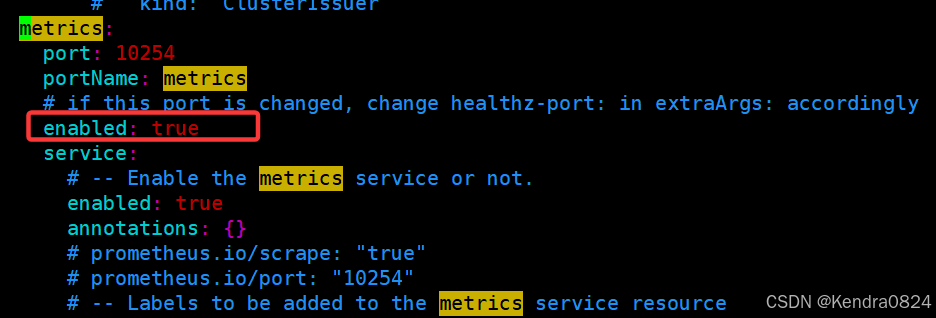
将 config.metrics.enabled=false 修改为 config.metrics.enabled=true,让 prometheus 抓取指标
对于 dnsPolicy 策略来说,有如下两个值可供选择:
- ClusterFirstWithHostNet: 当 Pod 的 hostNetwork 设置为 true 时,使用该 DNS 策略。
- 这意味着 Pod 的网络命名空间与主机共享,Pod 使用主机的网络栈。
- 在此配置下,Pod 将首先尝试通过主机上的 DNS 解析 DNS 请求。如果主机上没有找到,则会将请求发送到 kube-dns 服务,由 kube-dns 服务进行处理。
- 这种策略适用于需要与主机网络共享的特殊情况,但它不会为 Pod 提供专用的 DNS 解析功能。
- ClusterFirst:是 Kubernetes 中默认的 DNS 策略
- 当 Pod 的 hostNetwork 设置为 false 或未设置时,使用该策略。
- 在此策略下,Pod 首先尝试通过 kube-dns 服务解析 DNS 请求。如果 kube-dns 无法解析,则会向上级 DNS 服务器继续发起请求。
- 这种策略适用于大多数情况,其中 Pod 需要使用 Kubernetes 集群的 DNS 服务解析其他 Pod 或服务的主机名。
修改完后执行命令
# 实例名称:ingress-nginx
# 1. 创建一个名字空间(ns=namespace)
[root@master ingress-nginx]# kubectl create ns ingress
namespace/ingress created
[root@master ingress-nginx]# kubectl get ns
NAME              STATUS   AGE
default           Active   13d
ingress           Active   5s
kube-node-lease   Active   13d
kube-public       Active   13d
kube-system       Active   13d

# 2. 通过helm安装ingress
[root@master ingress-nginx]# helm install ingress-nginx -n ingress . -f values.yaml
NAME: ingress-nginx
LAST DEPLOYED: Wed Jul 23 10:35:40 2025
NAMESPACE: ingress
STATUS: deployed
REVISION: 1
TEST SUITE: None
NOTES:
The ingress-nginx controller has been installed.
It may take a few minutes for the load balancer IP to be available.
You can watch the status by running 'kubectl get service --namespace ingress ingress-nginx-controller --output wide --watch'

An example Ingress that makes use of the controller:
  apiVersion: networking.k8s.io/v1
  kind: Ingress
  metadata:
    name: example
    namespace: foo
  spec:
    ingressClassName: nginx
    rules:
      - host: www.example.com
        http:
          paths:
            - pathType: Prefix
              backend:
                service:
                  name: exampleService
                  port:
                    number: 80
              path: /
    # This section is only required if TLS is to be enabled for the Ingress
    tls:
      - hosts:
        - www.example.com
        secretName: example-tls

If TLS is enabled for the Ingress, a Secret containing the certificate and key must also be provided:

  apiVersion: v1
  kind: Secret
  metadata:
    name: example-tls
    namespace: foo
  data:
    tls.crt: <base64 encoded cert>
    tls.key: <base64 encoded key>
  type: kubernetes.io/tls
[root@master 10]# kubectl get pod -n ingress
NAME                             READY   STATUS    RESTARTS   AGE
ingress-nginx-controller-chmtg   1/1     Running   0          109s
ingress-nginx-controller-slbhj   1/1     Running   0          109s
命令说明:
- helm install 安装
- ingress-nginx :指定 release 的名称
- -n ingress :指定名字空间为 ingress,如果不指定默认为 default。
- . :表示基于当前的 chart 包进行安装
- -f values.yaml :表示根据当前的 values.yaml 文
3.5 Ingress 使用
官方文档:Annotations - Ingress-Nginx Controller
1. http 代理
卸载 release:
- helm list
- helm uninstall 名称
[root@master ingress-nginx]# cd
[root@master ~]# ls
ingress-nginx
[root@master ~]# mkdir 10
[root@master ~]# cd 10

[root@master 10]# vim 5.ingress.yaml
[root@master 10]# cat 5.ingress.yaml
apiVersion: apps/v1
kind: Deployment
metadata:
  name: ingress-http-proxy-www1
spec:
  replicas: 2
  selector:
    matchLabels:
      hostname: www1
  template:
    metadata:
      labels:
        hostname: www1
    spec:
      containers:
      - name: nginx
        image: harbor.registry.com/library/myapp:1.0
        imagePullPolicy: IfNotPresent
        ports:
        - containerPort: 80
---
apiVersion: v1
kind: Service
metadata:
  name: ingress-http-proxy-www1
spec:
  ports:
  - port: 80
    targetPort: 80
    protocol: TCP
  selector:
    hostname: www1
---
apiVersion: networking.k8s.io/v1
kind: Ingress
metadata:
  name: ingress-http-proxy-www1
spec:
  ingressClassName: nginx
  rules:
    - host: www1.example.com
      http:
        paths:
        - path: /
          pathType: Prefix
          backend:
            service:
              name: ingress-http-proxy-www1
              port:
                number: 80
[root@master 10]# kubectl create -f 5.ingress.yaml
deployment.apps/ingress-http-proxy-www1 created
service/ingress-http-proxy-www1 created
ingress.networking.k8s.io/ingress-http-proxy-www1 created
[root@master 10]# kubectl get pod
NAME                                      READY   STATUS    RESTARTS      AGE
apache-1753089915-665fbdb9bd-j8wtd        1/1     Running   1 (41h ago)   41h
ingress-http-proxy-www1-9f5d54fd7-cc54t   1/1     Running   0             17m
ingress-http-proxy-www1-9f5d54fd7-qmwmr   1/1     Running   0             17m
[root@master 10]# helm list
NAME             	NAMESPACE	REVISION	UPDATED                                	STATUS  	CHART         	APP VERSION
apache-1753089915	default  	1       	2025-07-21 17:25:15.448886261 +0800 CST	deployed	apache-11.3.18	2.4.63
[root@master 10]# helm uninstall apache-1753089915
release "apache-1753089915" uninstalled
[root@master 10]# kubectl get pod
NAME                                      READY   STATUS    RESTARTS   AGE
ingress-http-proxy-www1-9f5d54fd7-cc54t   1/1     Running   0          18m
ingress-http-proxy-www1-9f5d54fd7-qmwmr   1/1     Running   0          18m

[root@master 10]# kubectl get svc
NAME                      TYPE        CLUSTER-IP     EXTERNAL-IP   PORT(S)   AGE
ingress-http-proxy-www1   ClusterIP   10.0.238.139   <none>        80/TCP    18m
kubernetes                ClusterIP   10.0.0.1       <none>        443/TCP   13d
[root@master 10]# kubectl get ingress
NAME                      CLASS   HOSTS              ADDRESS   PORTS   AGE
ingress-http-proxy-www1   nginx   www1.example.com             80      23m
接着在 windows 的 hosts 文件中配置好域名映射后打开浏览器并输入 http://192.168.86.12 或者 http://192.168.86.13 来访问

主机网络是共享物理机网络模型,所以它是可以通过物理机的 IP 地址和 80 端口来访问的
404 Not Found 说明是访问成功的: Ingress 做了调整,它没有默认服务,即没有指定域名访问,就会报404错误,所以,在 Ingress 资源中需要添加域名解析:
在 Windows\System32\drivers\etc 文件中添加域名解析记录:
C:\Windows\System32\drivers\etc:如果没有权限,就复制到桌面修改完后粘贴到此路径覆盖原文件
192.168.86.12 www1.example.com
#配置好后可测试是否成功:
C:\Users\demo>ping www1.example.com
正在 Ping www1.example.com [192.168.10.12] 具有 32 字节的数据:
来自 192.168.10.12 的回复: 字节=32 时间<1ms TTL=64
来自 192.168.10.12 的回复: 字节=32 时间<1ms TTL=64
来自 192.168.10.12 的回复: 字节=32 时间=1ms TTL=64
来自 192.168.10.12 的回复: 字节=32 时间<1ms TTL=64
........#能够解析到 192.168.10.12 表示配置成功

[root@master 10]# kubectl get pod -n ingress -o wide
NAME                             READY   STATUS    RESTARTS   AGE   IP              NODE    NOMINATED NODE   READINESS GATES
ingress-nginx-controller-chmtg   1/1     Running   0          10m   192.168.86.13   node2   <none>           <none>
ingress-nginx-controller-slbhj   1/1     Running   0          10m   192.168.86.12   node1   <none>           <none>
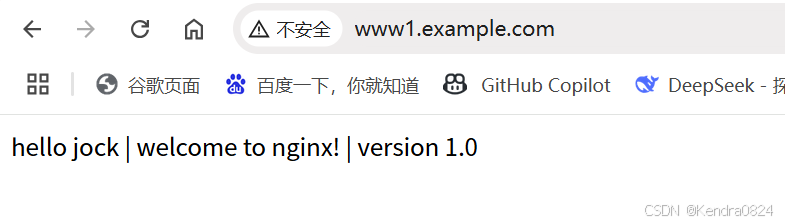
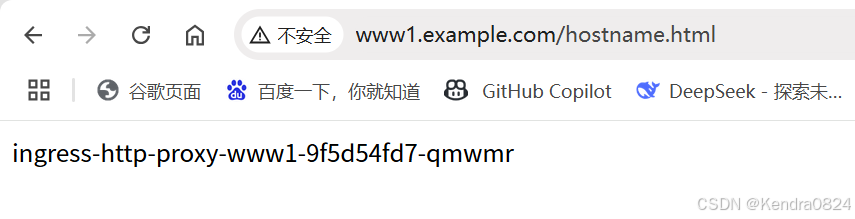
[root@master 10]# curl www1.example.com/hostname.html
ingress-http-proxy-www1-9f5d54fd7-cc54t
[root@master 10]# curl www1.example.com/hostname.html
ingress-http-proxy-www1-9f5d54fd7-qmwmr
[root@master 10]# curl www1.example.com/hostname.html
ingress-http-proxy-www1-9f5d54fd7-qmwmr
[root@master 10]# curl www1.example.com/hostname.html
ingress-http-proxy-www1-9f5d54fd7-cc54t
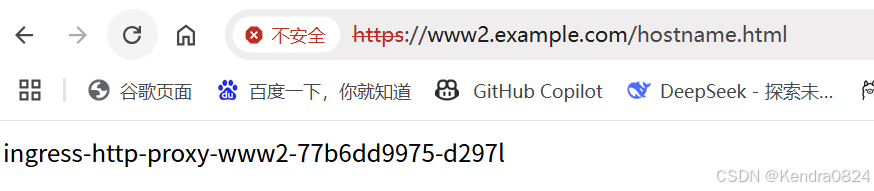
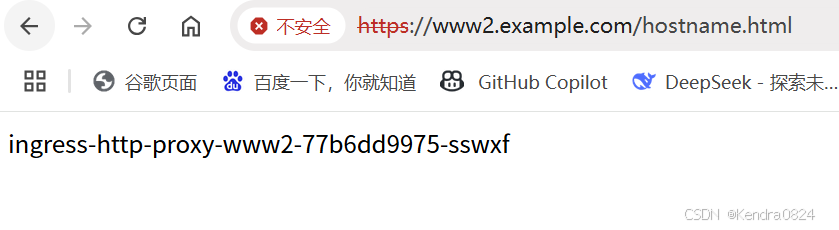
- 即将 www1 全部改为 www2,并且将 myapp 镜像的版本从 1.0 改为 2.0,然后再保存退出后创建对象:
[root@master 10]# cp 5.ingress.yaml 6.ingress.yaml
[root@master 10]# vim 6.ingress.yaml
[root@master 10]# kubectl create -f 6.ingress.yaml
deployment.apps/ingress-http-proxy-www2 created
service/ingress-http-proxy-www2 created
ingress.networking.k8s.io/ingress-http-proxy-www2 created
#创建好后在 windows/system32/driver/etc/hosts 文件中增加域名解析
192.168.86.12  www1.example.com
192.168.86.12  www2.example.com
2. htpps 代理
通过 Ingress 实现 https 代理:
- 生成证书
- 创建 deployment 资源
- 创建 ingress 资源
- 配置映射
- 生成证书:
openssl req -x509 -sha256 -nodes -days 365 -newkey rsa:2048 -keyout tls.key -out tls.crt -subj "/CN=nginxsvc/O=nginxsvc"
[root@master 10]# ls
5.ingress.yaml  6.ingress.yaml
[root@master 10]# mkdir 7
[root@master 10]# cd 7

# 创建 HTTPS 所需要的证书和私钥:
[root@master 7]# openssl req -x509 -sha256 -nodes -days 365 -newkey rsa:2048 -keyout tls.key -out tls.crt -subj "/CN=nginxsvc/O=nginxsvc"
....+..+.......+...+...+......+...+...+...+.................+...+....+..+...+++++++++++++++++++++++++++++++++++++++*....+.....+...+......+.......+..+...+..........+........+....+......+..+...+.......+.................+..........+.....+.+.....+.+...+.....+......+......+...............+......+....+++++++++++++++++++++++++++++++++++++++*......+.........+.+..+.......+........+............+..........+......+...+..............................+.....+.+......+..+...+...+.........+............+.+........+.+...+.....+..........+...+............+..+...++++++
......+++++++++++++++++++++++++++++++++++++++*..........+.....+++++++++++++++++++++++++++++++++++++++*.+............+...+....+.....+....+.....................+.....+..........+......+.........+...........+.......+...........................+...........+............+.+.........+...+..+......................+.....+.............+......+............+...+.........+..+......+...+.+........+......+......+....+......+...........+...+......+.+..................+.....+....+.....+...+....+.....+...+...+....+........+......+.+.....+....+...........+....+...........+...+...+.......+...........+......+.+.....+....+...+..+....+..+....+....................+.+........+.......+..+.+.....+.+.....+.+............++++++
-----
[root@master 7]# ls
tls.crt  tls.key
创建成功后,证书和私钥封装在 secret 对象中:
[root@master 7]# kubectl create secret tls ingress-nginx-tls --key tls.key --cert tls.crt
secret/ingress-nginx-tls created
[root@master 7]# kubectl get secrets
NAME                      TYPE                DATA   AGE
ingress-nginx-admission   Opaque              3      66m
ingress-nginx-tls         kubernetes.io/tls   2      13s
[root@master 7]# kubectl describe secret ingress-nginx-tls
Name:         ingress-nginx-tls
Namespace:    default
Labels:       <none>
Annotations:  <none>

Type:  kubernetes.io/tls

Data
====
tls.crt:  1164 bytes
tls.key:  1704 bytes
命令说明:
- kubectl create secret :表示创建 secret
- tls:表示是 tls 分类的 secret
- ingress-nginx-tls:表示该 secret 的名称
- –key tls.key 指定私钥文件
- –cert tls.crt 指定公钥文件
- 创建deployment资源
[root@master 7]# ls
1.deployment.yaml  tls.crt  tls.key
[root@master 7]# cat 1.deployment.yaml
apiVersion: apps/v1
kind: Deployment
metadata:
  name: ingress-https-proxy-ssl
spec:
  replicas: 2
  selector:
    matchLabels:
      hostname: ssl
  template:
    metadata:
      labels:
        hostname: ssl
    spec:
      containers:
      - name: nginx
        image: harbor.registry.com/library/myapp:3.0
        imagePullPolicy: IfNotPresent
        ports:
        - containerPort: 80
[root@master 7]# kubectl apply -f 1.deployment.yaml
deployment.apps/ingress-https-proxy-ssl created
[root@master 7]# kubectl get pod
NAME                                       READY   STATUS    RESTARTS   AGE
ingress-http-proxy-www1-9f5d54fd7-cc54t    1/1     Running   0          54m
ingress-http-proxy-www1-9f5d54fd7-qmwmr    1/1     Running   0          54m
ingress-http-proxy-www2-77b6dd9975-d297l   1/1     Running   0          9m9s
ingress-http-proxy-www2-77b6dd9975-sswxf   1/1     Running   0          9m9s
ingress-https-proxy-ssl-777c5dbb6f-7sqqk   1/1     Running   0          4s
ingress-https-proxy-ssl-777c5dbb6f-kwrvb   1/1     Running   0          4s
- 创建 ingress 资源
[root@master 7]# vim 2.ingress.yaml
[root@master 7]# cat 2.ingress.yaml
apiVersion: v1
kind: Service
metadata:
  name: ingress-http-proxy-ssl
spec:
  ports:
    - port: 80
      targetPort: 80
      protocol: TCP
  selector:
    hostname: ssl
---
apiVersion: networking.k8s.io/v1
kind: Ingress
metadata:
  name: ingress-http-proxy-ssl
  namespace: default
  annotations:			#强制开启 https 访问
    nginx.ingress.kubernetes.io/ssl-redirect: "true"
spec:
  ingressClassName: nginx
  rules:
    - host: ssl.example.com
      http:
        paths:
          - path: /
            pathType: Prefix
            backend:
              service:
                name: ingress-http-proxy-ssl
                port:
                  number: 80
  tls:
    - hosts:	 # 如果访问的是此域名
      - ssl.example.com
      secretName: ingress-nginx-tls		 # 则由ingress-nginx-tls提供证书,需与上面封闭的对象名一致
annotations 和 labels 的区别:
- labels 是集群内部一些不同资源互相匹配关联,而 annotations 是集群跟外部用户开发的应用之间的匹配关联。
- labels 是 Kubernetes 官方匹配标签,而 annotations 则是针对第三方开发而设定的一些选项。
[root@master 7]# kubectl apply -f 2.ingress.yaml
service/ingress-http-proxy-ssl created
ingress.networking.k8s.io/ingress-http-proxy-ssl created
[root@master 7]# kubectl get svc
NAME                      TYPE        CLUSTER-IP     EXTERNAL-IP   PORT(S)   AGE
ingress-http-proxy-ssl    ClusterIP   10.0.222.126   <none>        80/TCP    5s
ingress-http-proxy-www1   ClusterIP   10.0.238.139   <none>        80/TCP    61m
ingress-http-proxy-www2   ClusterIP   10.2.64.183    <none>        80/TCP    16m
kubernetes                ClusterIP   10.0.0.1       <none>        443/TCP   14d
[root@master 7]# kubectl get ingress
NAME                      CLASS   HOSTS              ADDRESS   PORTS     AGE
ingress-http-proxy-ssl    nginx   ssl.example.com              80, 443   20s
ingress-http-proxy-www1   nginx   www1.example.com             80        62m
ingress-http-proxy-www2   nginx   www2.example.com             80        16m
-
配置映射
192.168.86.12 ssl.example.com
https 加密访问已经成功:
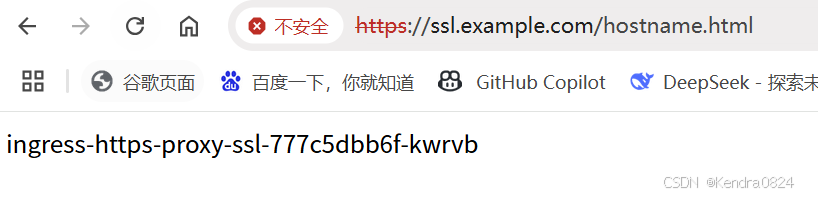
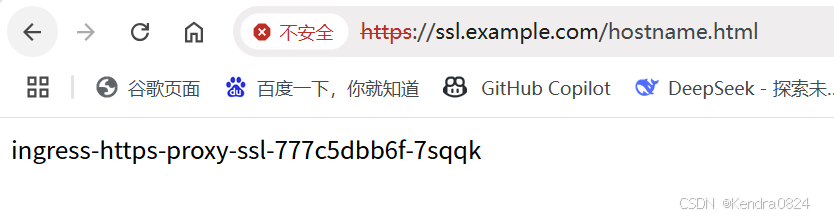
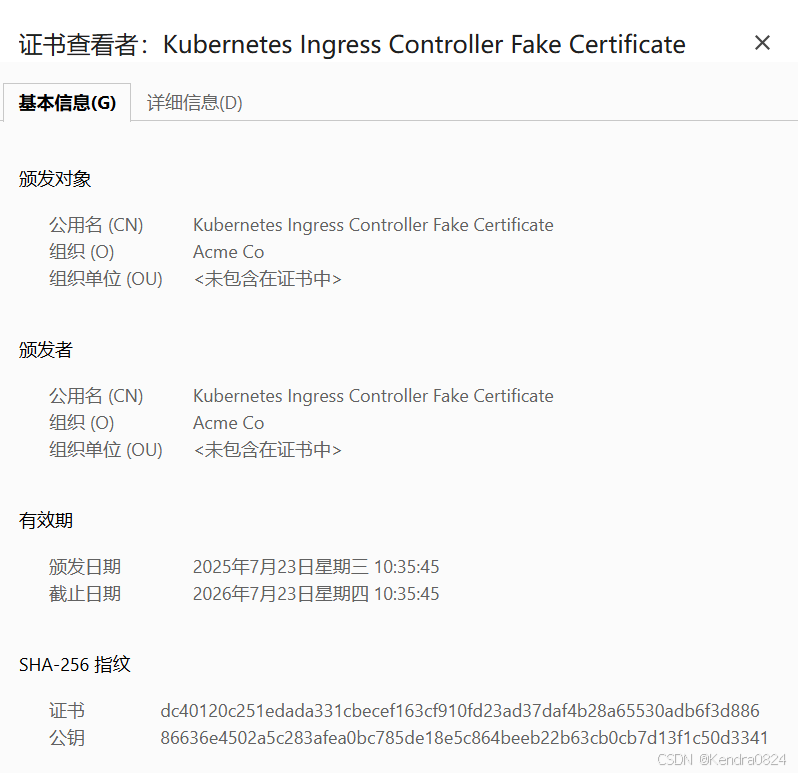
3. BasicAuth 代理
- 创建 http 认证文件
- dnf install httpd-tools -y #安装生成http认证文件工具
- htpasswd -cb auth lisi 123456 #生成认证文件
- kubectl create secret generic ingress-basic-auth --from-file=auth #将生成好的认证文件封装到 secret 对象中
- kubectl get secret ingress-basic-auth -o yaml #查看认证文件
- 创建 deployment
- 创建 ingress 资源文件
- 配置映射
[root@master 7]# cd ..
[root@master 10]#
[root@master 10]# ls
5.ingress.yaml  6.ingress.yaml  7
# 创建用于存放认证文件的目录
[root@master 10]# mkdir 8
[root@master 10]# cd 8
[root@master 8]# dnf install httpd-tools -y		#安装生成http认证文件工具
[root@master 8]# htpasswd -cb auth lisi 123456	#生成认证文件
Adding password for user lisi
[root@master 8]# cat auth
lisi:$apr1$YPWv/wgq$xy0GutecSN23tsEEEjzUg0
- 封装
将生成好的认证文件封装到 secret 对象中,其中 generic 表示 secret 的类型
[root@master 8]# kubectl create secret generic ingress-basic-auth --from-file=auth
secret/ingress-basic-auth created
[root@master 8]# kubectl get secret
NAME                      TYPE                DATA   AGE
ingress-basic-auth        Opaque              1      8s
ingress-nginx-admission   Opaque              3      90m
ingress-nginx-tls         kubernetes.io/tls   2      24m
[root@master 8]# ls
1.deployment.yaml  auth
[root@master 8]# kubectl get secret ingress-basic-auth -o yaml	#查看认证文件
- 创建 deployment 资源清单文件
[root@master 8]# cat 1.deployment.yaml
apiVersion: apps/v1
kind: Deployment
metadata:
  name: ingress-http-proxy-auth
spec:
  replicas: 2
  selector:
    matchLabels:
      hostname: auth
  template:
    metadata:
      labels:
        hostname: auth
    spec:
      containers:
      - name: nginx
        image: harbor.registry.com/library/myapp:4.0
        imagePullPolicy: IfNotPresent
        ports:
        - containerPort: 80
---
apiVersion: v1
kind: Service
metadata:
  name: ingress-http-proxy-auth
spec:
  ports:
  - port: 80
    targetPort: 80
    protocol: TCP
  selector:
    hostname: auth

[root@master 8]# kubectl apply -f 1.deployment.yaml
deployment.apps/ingress-http-proxy-auth created
service/ingress-http-proxy-auth created
- 创建 ingerss 资源文件
[root@master 8]# cat 2.ingress.yaml
apiVersion: networking.k8s.io/v1
kind: Ingress
metadata:
  name: ingress-with-auth
  annotations:
    nginx.ingress.kubernetes.io/auth-type: basic
    nginx.ingress.kubernetes.io/auth-secret: ingress-basic-auth
    nginx.ingress.kubernetes.io/auth-realm: 'Authentication Required - example'
spec:
  ingressClassName: nginx
  rules:
  - host: auth.example.com
    http:
      paths:
      - path: /
        pathType: ImplementationSpecific
        backend:
          service:
            name: ingress-http-proxy-auth
            port:
              number: 80

[root@master 8]# kubectl apply -f 2.ingress.yaml
ingress.networking.k8s.io/ingress-with-auth created
[root@master 8]# kubectl get  pod,svc,ingress
NAME                                           READY   STATUS    RESTARTS   AGE
pod/ingress-http-proxy-auth-7d47ddf7b6-qbxx7   1/1     Running   0          82s
pod/ingress-http-proxy-auth-7d47ddf7b6-vqpzg   1/1     Running   0          82s
pod/ingress-http-proxy-www1-9f5d54fd7-cc54t    1/1     Running   0          79m
pod/ingress-http-proxy-www1-9f5d54fd7-qmwmr    1/1     Running   0          79m
pod/ingress-http-proxy-www2-77b6dd9975-d297l   1/1     Running   0          34m
pod/ingress-http-proxy-www2-77b6dd9975-sswxf   1/1     Running   0          34m
pod/ingress-https-proxy-ssl-777c5dbb6f-7sqqk   1/1     Running   0          25m
pod/ingress-https-proxy-ssl-777c5dbb6f-kwrvb   1/1     Running   0          25m

NAME                              TYPE        CLUSTER-IP     EXTERNAL-IP   PORT(S)   AGE
service/ingress-http-proxy-auth   ClusterIP   10.10.60.56    <none>        80/TCP    82s
service/ingress-http-proxy-ssl    ClusterIP   10.0.222.126   <none>        80/TCP    17m
service/ingress-http-proxy-www1   ClusterIP   10.0.238.139   <none>        80/TCP    79m
service/ingress-http-proxy-www2   ClusterIP   10.2.64.183    <none>        80/TCP    34m
service/kubernetes                ClusterIP   10.0.0.1       <none>        443/TCP   14d

NAME                                                CLASS   HOSTS              ADDRESS   PORTS     AGE
ingress.networking.k8s.io/ingress-http-proxy-ssl    nginx   ssl.example.com              80, 443   17m
ingress.networking.k8s.io/ingress-http-proxy-www1   nginx   www1.example.com             80        79m
ingress.networking.k8s.io/ingress-http-proxy-www2   nginx   www2.example.com             80        34m
ingress.networking.k8s.io/ingress-with-auth         nginx   auth.example.com             80        45s
- 配置映射
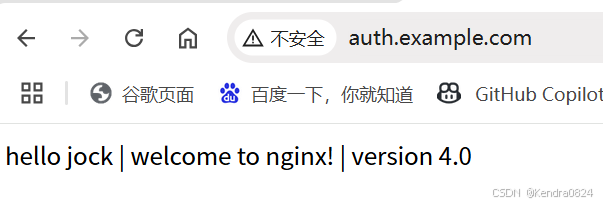
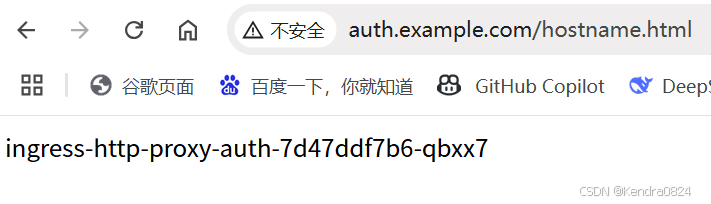
在 c:/windows/system32/driver/etc/hosts 文件中增加映射
192.168.86.12 auth.example.com
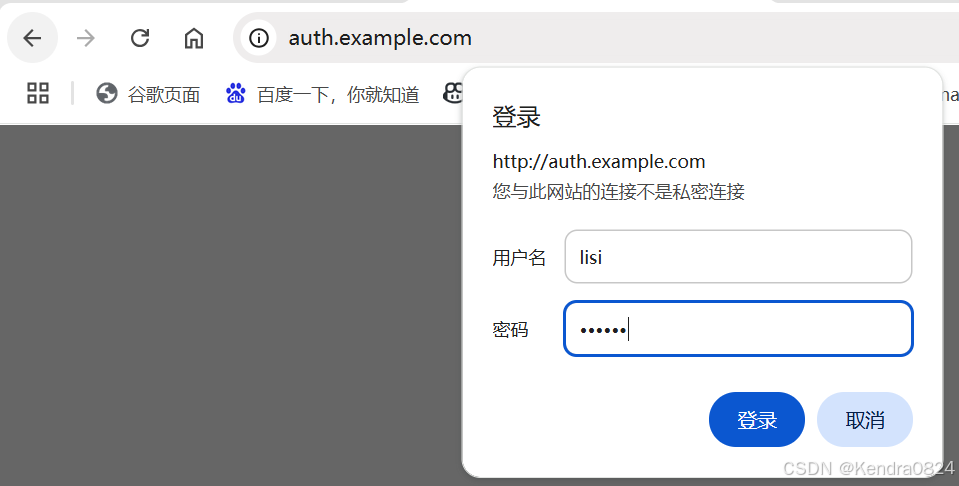
[root@master 8]# kubectl get pod -n ingress
NAME                             READY   STATUS    RESTARTS   AGE
ingress-nginx-controller-chmtg   1/1     Running   0          3h27m
ingress-nginx-controller-slbhj   1/1     Running   0          3h27m
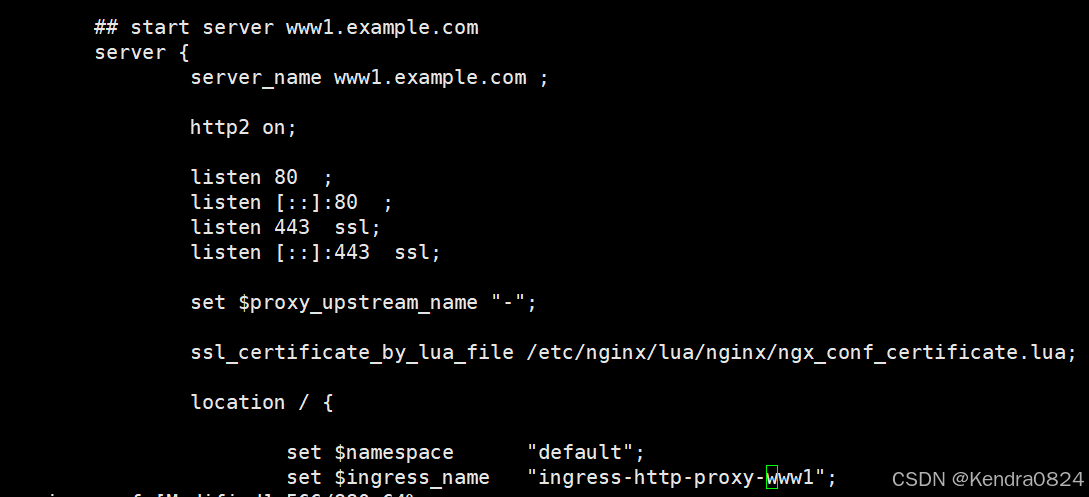
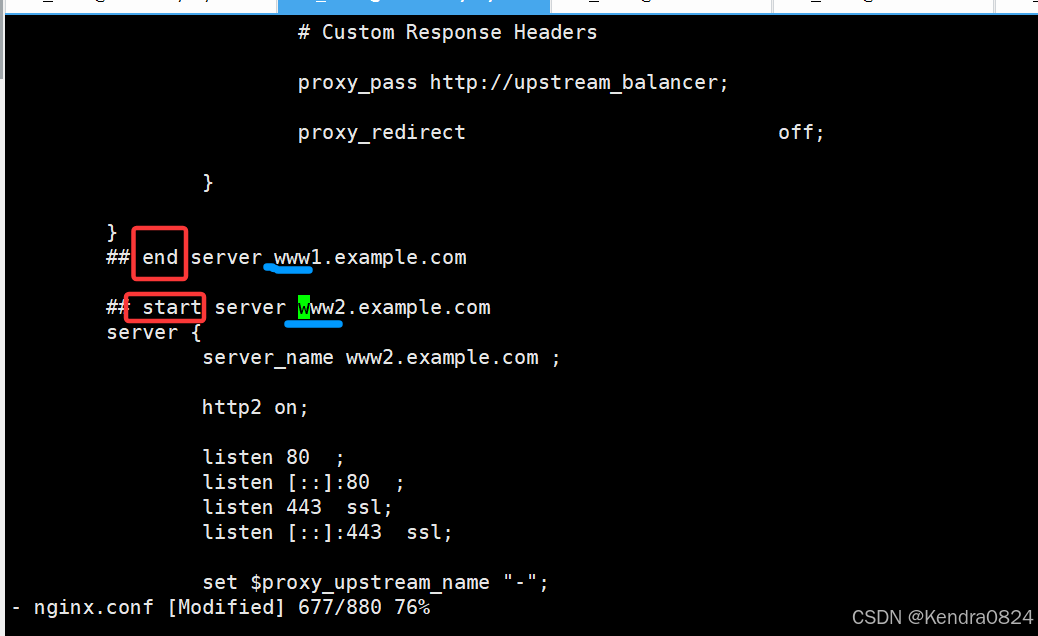
[root@master 8]# kubectl exec -it ingress-nginx-controller-chmtg -n ingress -- /bin/sh
/etc/nginx $ ls
fastcgi.conf            mime.types              owasp-modsecurity-crs
fastcgi.conf.default    mime.types.default      scgi_params
fastcgi_params          modsecurity             scgi_params.default
fastcgi_params.default  modules                 template
koi-utf                 nginx.conf              uwsgi_params
koi-win                 nginx.conf.default      uwsgi_params.default
lua                     opentracing.json        win-utf
/etc/nginx $ cat nginx.conf

# Configuration checksum: 11733921245921608989

..............
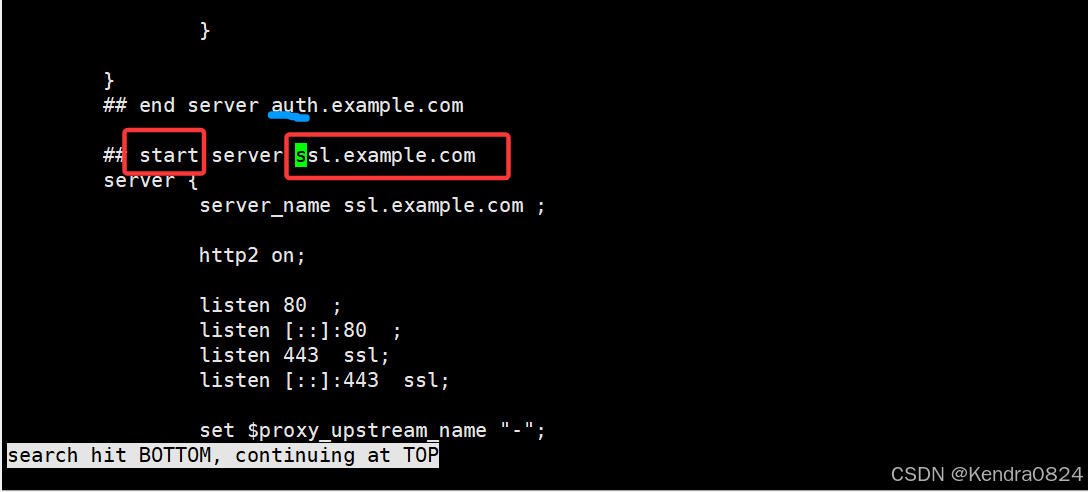
只能通过域名去访问:因为 ingress.yaml 文件中 rules 定义了 host 是域名
4. 域名重定向(redirect)
状态码:301
- 创建资源文件
[root@master 8]# ls
1.deployment.yaml  2.ingress.yaml  auth
[root@master 8]# cd ..
[root@master 10]# ls
5.ingress.yaml  6.ingress.yaml  7  8
[root@master 10]# vim 9.ingress.yaml
[root@master 10]# kubectl apply -f 9.ingress.yaml
ingress.networking.k8s.io/redirect.example.com created
[root@master 10]# kubectl get ingress
NAME                      CLASS   HOSTS                  ADDRESS   PORTS     AGE
ingress-http-proxy-ssl    nginx   ssl.example.com                  80, 443   179m
ingress-http-proxy-www1   nginx   www1.example.com                 80        4h1m
ingress-http-proxy-www2   nginx   www2.example.com                 80        3h16m
ingress-with-auth         nginx   auth.example.com                 80        162m
redirect.example.com      nginx   redirect.example.com             80        9s
[root@master 10]# cat 9.ingress.yaml
apiVersion: networking.k8s.io/v1
kind: Ingress
metadata:
  name: redirect.example.com
  annotations:
    nginx.ingress.kubernetes.io/permanent-redirect: https://www.baidu.com	# 指定重定向的目标
    nginx.ingress.kubernetes.io/permanent-redirect-code: '301'	# 指定重定向代码
spec:
  ingressClassName: nginx
  rules:
    - host: redirect.example.com
      http:
#浏览器访问 https://www.baidu.com 即跳转到了百度首页
5. Rewrite
状态码:200
重写:将一个地址重写为另一个地址
http://rew.example.com/api/
http://rew.example.com/api/hostname.html
- 创建deployment资源文件
[root@master 10]# ls
5.ingress.yaml  6.ingress.yaml  7  8  9.ingress.yaml
[root@master 10]# mkdir 10
[root@master 10]# cd 10
[root@master 10]# ls
1.deployment.yaml
[root@master 10]# cat 1.deployment.yaml
apiVersion: apps/v1
kind: Deployment
metadata:
  name: ingress-http-proxy-auth
spec:
  replicas: 2
  selector:
    matchLabels:
      hostname: auth
  template:
    metadata:
      labels:
        hostname: auth
    spec:
      containers:
      - name: nginx
        image: harbor.registry.com/library/myapp:4.0
        imagePullPolicy: IfNotPresent
        ports:
        - containerPort: 80
---
apiVersion: v1
kind: Service
metadata:
  name: ingress-http-proxy-auth
spec:
  ports:
  - port: 80
    targetPort: 80
    protocol: TCP
  selector:
    hostname: auth
- 创建 ingress 资源文件
[root@master 10]# vim 2.ingress.yaml
[root@master 10]# kubectl apply -f 1.deployment.yaml
deployment.apps/ingress-http-proxy-auth unchanged
service/ingress-http-proxy-auth unchanged
[root@master 10]# kubectl apply -f 2.ingress.yaml
ingress.networking.k8s.io/rew.example.com created
[root@master 10]# cat 2.ingress.yaml
apiVersion: networking.k8s.io/v1
kind: Ingress
metadata:
  name: rew.example.com
  annotations:
    nginx.ingress.kubernetes.io/rewrite-target: /$2	#重定的路径是根下的$2,表示把重写的路径中第二个分组进行替换
spec:
  rules:
    - host: rew.example.com
      http:
        paths:
          - path: /api(/|$)(.*)		##两个括号表示两个分组,/|$ 表示要么是根,要么是末尾,.*则表示所有
            pathType: ImplementationSpecific	##基于当前控制器
            backend:
              service:
                name: ingress-http-proxy-rew
                port:
                  number: 80
##
http://rew.example.com/api/
http://rew.example.com/api/hostname.html
通过:http://rew.example.com/api/、http://rew.example.com/api/hostname.html 访问
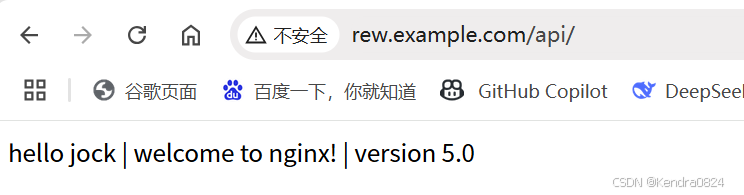
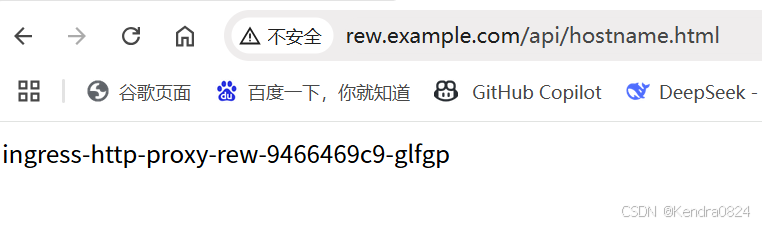
重写rewrite和重定向redirect:
- 重写:
a. 发生在服务端
b. 浏览器地址栏不会发生变化
c. 只发出一次请求 - 重定向
a. 发生在客户端
b. 浏览器地址栏会发生变化
c. 会发现两个请求
6. 默认错误后端
当我们在访问某个网站时,如果某个我们访问的页面不存在或者出现了问题,它会给我们返回一个漂亮 的错误页面,告知我们访问的页面不存在。
在 Ingress 中可以去进行统一配置,但凡是基于 Ingress-nginx 访问,只要出现了对应的错误页面,就可以给它一个默认的页面用于展示错误信息。
- 由于这个配置信息应该是在安装 Ingress-nginx 时配置,因此先卸载安装好的 ingress:
[root@master 10]# helm uninstall ingress-nginx -n ingress
release "ingress-nginx" uninstalled
[root@master 10]# kubectl get pod -n ingress
NAME                             READY   STATUS        RESTARTS   AGE
ingress-nginx-controller-chmtg   1/1     Terminating   0          4h38m
ingress-nginx-controller-slbhj   1/1     Terminating   0          4h38m
[root@master 10]# cd
[root@master ~]# ls
10  ingress-nginx

# 进入到 ingress 安装目录下
[root@master ~]# cd ingress-nginx/
[root@master ingress-nginx]# ls
changelog   ci      README.md         templates  values.yaml
Chart.yaml  OWNERS  README.md.gotmpl  tests
[root@master ingress-nginx]# vim values.yaml
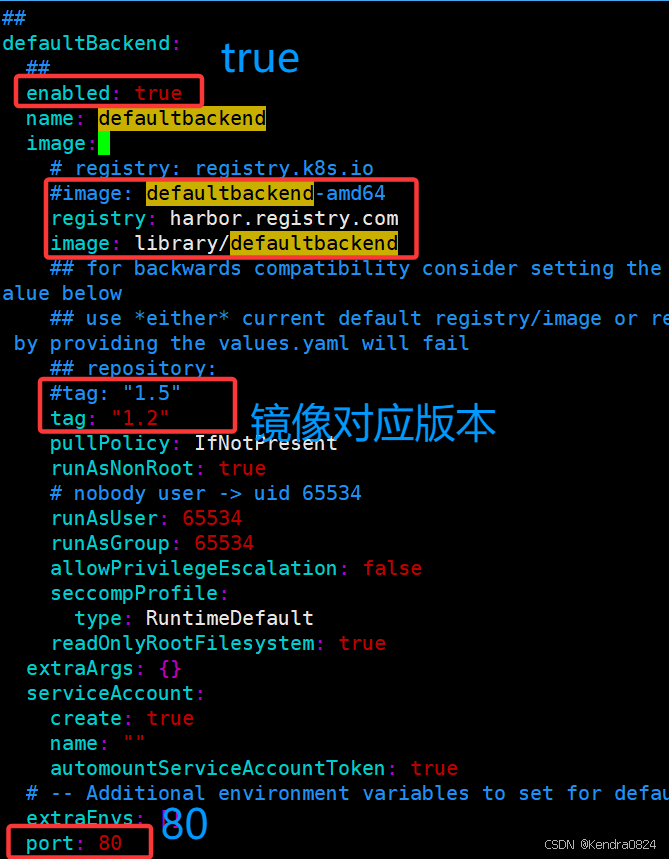
- 重新安装 ingress-nginx
[root@master ingress-nginx]# helm install ingress-nginx -n ingress -f values.yaml .
NAME: ingress-nginx
LAST DEPLOYED: Wed Jul 23 15:27:14 2025
NAMESPACE: ingress
STATUS: deployed
REVISION: 1
TEST SUITE: None
NOTES:
The ingress-nginx controller has been installed.
It may take a few minutes for the load balancer IP to be available.
You can watch the status by running 'kubectl get service --namespace ingress ingress-nginx-controller --output wide --watch'

An example Ingress that makes use of the controller:
  apiVersion: networking.k8s.io/v1
  kind: Ingress
  metadata:
    name: example
    namespace: foo
  spec:
    ingressClassName: nginx
    rules:
      - host: www.example.com
        http:
          paths:
            - pathType: Prefix
              backend:
                service:
                  name: exampleService
                  port:
                    number: 80
              path: /
    # This section is only required if TLS is to be enabled for the Ingress
    tls:
      - hosts:
        - www.example.com
        secretName: example-tls

If TLS is enabled for the Ingress, a Secret containing the certificate and key must also be provided:

  apiVersion: v1
  kind: Secret
  metadata:
    name: example-tls
    namespace: foo
  data:
    tls.crt: <base64 encoded cert>
    tls.key: <base64 encoded key>
  type: kubernetes.io/tls
查看日志
kubectl get pod -n ingress
kubectl logs ingress-nginx-defaultbackend-794b69598-pvdr7 -n ingress
单独申明错误后端
单独的错误页(如果是单独使用默认后端,有一些错误是捕获不到的)
- 编写资源清单文件
- 创建资源对象
- 配置映射
7. 匹配请求头(报安全问题)
Ingress annotations 的 nginx.ingress.kubernetes.io/server-snippet 配置。Snippet 配置是专门用于一些复杂的 Nginx 配置,和 Nginx 配置通用,在这里模拟下移动端与电脑端访问同一个域名转发到不同服务。
-
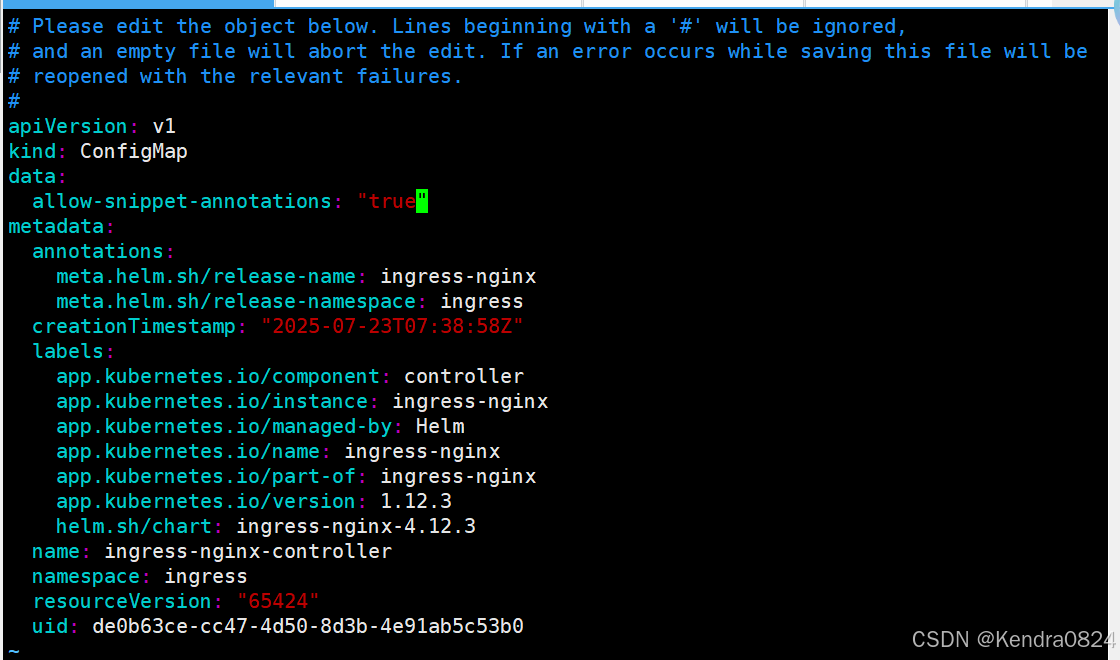
打开Snippet功能(在 Ingress 中 Snippet 功能默认是不允许的,需要单独去开启)
-
kubectl edit cm ingress-nginx-controller -n ingress
-
修改 data:
allow-snippet-annotations: "true"为 true(如果没有就添加)
-
删除 pod 重建加载生效
-
-
创建资源清单文件
-
功能测试
- 在 /etc/hosts 文件中配置映射
- [root@master 10]# echo “192.168.86.12 snippet.example.com” >> /etc/hosts
- 访问 curl snippet.example.com
- 访问没问题,指定一个请求头如 User-Agent 后再测试:
- curl snippet.example.com -H “X-User-Type: beta” -I
在创建资源清单文件报错:
注意:如果在创建时报 Error from server (BadRequest): error when creating “12.snippet.yaml”: admission webhook “validate.nginx.ingress.kubernetes.io” denied the request: annotation group ConfigurationSnippet contains risky annotation based on ingress configuration 错误,可执行如下命令来临时禁用 Webhook,但不推荐 kubectl delete validatingwebhookconfiguration ingress-nginx admission
8. 配置黑白名单
- 配置黑名单:
- 配置白名单:
9. 速率限制
[root@master ~]# cd 10
[root@master 10]# ls
10               13.black.yaml       15.white.yaml   6.ingress.yaml  8
12.snippet.yaml  14.deployment.yaml  5.ingress.yaml  7               9.ingress.yaml
[root@master 10]# cat 16.speed.yaml
apiVersion: apps/v1
kind: Deployment
metadata:
  labels:
    app: speed
  name: speed-deploy
spec:
  replicas: 1
  selector:
    matchLabels:
      app: speed
  template:
    metadata:
      labels:
        app: speed
    spec:
      containers:
      - image: harbor.registry.com/library/myapp:1.0
        name: myapp
---
apiVersion: v1
kind: Service
metadata:
  labels:
    app: speed
  name: speed-svc
spec:
  ports:
  - name: 80-80
    port: 80
    protocol: TCP
    targetPort: 80
  selector:
    app: speed
  type: ClusterIP
---
apiVersion: networking.k8s.io/v1
kind: Ingress
metadata:
  name: speed.example.com
  namespace: default
spec:
  rules:
  - host: speed.example.com
    http:
      paths:
      - pathType: Prefix
        path: /
        backend:
          service:
            name: speed-svc
            port:
              number: 80
[root@master 10]# kubectl apply -f 16.speed.yaml
deployment.apps/speed-deploy created
service/speed-svc created
ingress.networking.k8s.io/speed.example.com created
[root@master 10]# kubectl get pod
NAME                            READY   STATUS    RESTARTS   AGE
speed-deploy-756446c556-6zffl   1/1     Running   0          5s
[root@master 10]# kubectl get svc
NAME         TYPE        CLUSTER-IP   EXTERNAL-IP   PORT(S)   AGE
kubernetes   ClusterIP   10.0.0.1     <none>        443/TCP   107s
speed-svc    ClusterIP   10.9.65.71   <none>        80/TCP    24s
[root@master 10]# kubectl get ingress
NAME                CLASS   HOSTS               ADDRESS   PORTS   AGE
speed.example.com   nginx   speed.example.com             80      3m50s
- 三台主机做映射
echo "192.168.86.12 speed.example.com" >> /etc/hosts
[root@master 10]# curl speed.example.com
hello jock | welcome to nginx! | version 1.0
[root@node1 ~]# curl speed.example.com
hello jock | welcome to nginx! | version 1.0
[root@node2 ~]# curl speed.example.com
hello jock | welcome to nginx! | version 1.0
[root@node2 ~]# curl speed.example.com/hostname.html
speed-deploy-756446c556-6zffl
- 为了测试速率,安装一个httpd-tools工具
[root@master 10]# dnf install httpd-tools -y

# 压力测试:
[root@master 10]# ab -c 10 -n 100 http://speed.example.com/ | grep requests
Complete requests:      100
Failed requests:        0
Time per request:       0.425 [ms] (mean, across all concurrent requests)
Percentage of the requests served within a certain time (ms)
-c 10:指定并发数量为 10
-n 100:指定请求总量为 100
- 限速测试:
[root@master 10]# cat 17.speedlimit.yaml
apiVersion: networking.k8s.io/v1
kind: Ingress
metadata:
  name: speed.example.com
  namespace: default
  annotations:
    nginx.ingress.kubernetes.io/limit-connections: "1"
spec:
  rules:
  - host: speed.example.com
    http:
      paths:
      - pathType: Prefix
        path: /
        backend:
          service:
            name: speed-svc
            port:
              number: 80
[root@master 10]# kubectl apply -f 17.speedlimit.yaml
ingress.networking.k8s.io/speed.example.com configured
[root@master 10]# ab -c 10 -n 100 http://speed.example.com/ | grep requests
Complete requests:      100
Failed requests:        79
Time per request:       0.340 [ms] (mean, across all concurrent requests)
Percentage of the requests served within a certain time (ms)
总共请求100个,失败了79个。原因是当并发请求超过1个时,其他多余的请求就会失败
10. 灰度或金丝雀发布
灰度发布就是让其中一部分进行新版演示,也叫渗透发布
- 创建 v1 版本的 ingress
[root@master 10]# cat 18.deployment.yaml
apiVersion: apps/v1
kind: Deployment
metadata:
  labels:
    app: v1
  name: v1-deploy
spec:
  replicas: 10
  selector:
    matchLabels:
      app: v1
  template:
    metadata:
      labels:
        app: v1
    spec:
      containers:
      - image: harbor.registry.com/library/myapp:1.0
        name: myapp
---
apiVersion: v1
kind: Service
metadata:
  labels:
    app: v1
  name: v1-svc
spec:
  ports:
  - name: 80-80
    port: 80
    protocol: TCP
    targetPort: 80
  selector:
    app: v1
  type: ClusterIP
---
apiVersion: networking.k8s.io/v1
kind: Ingress
metadata:
  name: v1.example.com
  namespace: default
spec:
  rules:
  - host: svc.example.com
    http:
      paths:
      - pathType: Prefix
        path: /
        backend:
          service:
            name: v1-svc
            port:
              number: 80
[root@master 10]# kubectl apply -f 18.deployment.yaml
deployment.apps/v1-deploy created
service/v1-svc created
ingress.networking.k8s.io/v1.example.com created
[root@master 10]# kubectl get pod
NAME                            READY   STATUS    RESTARTS   AGE
speed-deploy-756446c556-6zffl   1/1     Running   0          20m
v1-deploy-bbc74c7f8-2nhs5       1/1     Running   0          4s
v1-deploy-bbc74c7f8-4rw6b       1/1     Running   0          4s
v1-deploy-bbc74c7f8-6qlrn       1/1     Running   0          4s
v1-deploy-bbc74c7f8-7bnpr       1/1     Running   0          4s
v1-deploy-bbc74c7f8-9k4wh       1/1     Running   0          4s
v1-deploy-bbc74c7f8-dd2vf       1/1     Running   0          4s
v1-deploy-bbc74c7f8-g9p9c       1/1     Running   0          4s
v1-deploy-bbc74c7f8-k766q       1/1     Running   0          4s
v1-deploy-bbc74c7f8-rj45c       1/1     Running   0          4s
v1-deploy-bbc74c7f8-rthv8       1/1     Running   0          4s
配置域名解析
[root@master 10]# kubectl get ingress
NAME                CLASS   HOSTS               ADDRESS   PORTS   AGE
speed.example.com   nginx   speed.example.com             80      21m
v1.example.com      nginx   svc.example.com               80      47s
[root@master 10]# echo "192.168.86.12 svc.example.com" >> /etc/hosts
[root@node1 ~]# echo "192.168.86.12 svc.example.com" >> /etc/hosts
[root@node2 ~]# echo "192.168.86.12 svc.example.com" >> /etc/hosts

[root@master 10]# curl svc.example.com/hostname.html
v1-deploy-bbc74c7f8-dd2vf
[root@master 10]# curl svc.example.com/hostname.html
v1-deploy-bbc74c7f8-4rw6b
[root@master 10]# curl svc.example.com/hostname.html
v1-deploy-bbc74c7f8-g9p9c
[root@master 10]# curl svc.example.com/hostname.html
v1-deploy-bbc74c7f8-2nhs5
[root@master 10]# kubectl get svc
NAME         TYPE        CLUSTER-IP     EXTERNAL-IP   PORT(S)   AGE
kubernetes   ClusterIP   10.0.0.1       <none>        443/TCP   25m
speed-svc    ClusterIP   10.9.65.71     <none>        80/TCP    24m
v1-svc       ClusterIP   10.12.164.85   <none>        80/TCP    3m42s
[root@node1 ~]# curl svc.example.com
hello jock | welcome to nginx! | version 1.0
[root@node1 ~]# curl svc.example.com/hostname.html
v1-deploy-bbc74c7f8-k766q
[root@node1 ~]# curl 10.12.164.85
hello jock | welcome to nginx! | version 1.0
[root@node1 ~]# curl 10.12.164.85/hostname.html
v1-deploy-bbc74c7f8-4rw6b
[root@node1 ~]# curl 10.12.164.85/hostname.html
v1-deploy-bbc74c7f8-9k4wh
[root@node1 ~]# curl 10.12.164.85/hostname.html
v1-deploy-bbc74c7f8-rj45c
- 升级版本
v1 改为 v2
镜像版本改为2
开启灰度发布
权重
[root@master 10]# kubectl apply -f 19.deployment.yaml
deployment.apps/v2-deploy created
service/v2-svc created
ingress.networking.k8s.io/v2.example.com created
[root@master 10]# kubectl get pod
NAME                            READY   STATUS    RESTARTS   AGE
speed-deploy-756446c556-6zffl   1/1     Running   0          26m
v1-deploy-bbc74c7f8-2nhs5       1/1     Running   0          6m10s
v1-deploy-bbc74c7f8-4rw6b       1/1     Running   0          6m10s
v1-deploy-bbc74c7f8-6qlrn       1/1     Running   0          6m10s
v1-deploy-bbc74c7f8-7bnpr       1/1     Running   0          6m10s
v1-deploy-bbc74c7f8-9k4wh       1/1     Running   0          6m10s
v1-deploy-bbc74c7f8-dd2vf       1/1     Running   0          6m10s
v1-deploy-bbc74c7f8-g9p9c       1/1     Running   0          6m10s
v1-deploy-bbc74c7f8-k766q       1/1     Running   0          6m10s
v1-deploy-bbc74c7f8-rj45c       1/1     Running   0          6m10s
v1-deploy-bbc74c7f8-rthv8       1/1     Running   0          6m10s
v2-deploy-6787fc596b-8v2qr      1/1     Running   0          4s
v2-deploy-6787fc596b-9ksh9      1/1     Running   0          4s
v2-deploy-6787fc596b-fh4jf      1/1     Running   0          4s
v2-deploy-6787fc596b-gmzdq      1/1     Running   0          4s
v2-deploy-6787fc596b-k9r6n      1/1     Running   0          4s
v2-deploy-6787fc596b-mvdz8      1/1     Running   0          4s
v2-deploy-6787fc596b-nm89t      1/1     Running   0          4s
v2-deploy-6787fc596b-pjtd5      1/1     Running   0          4s
v2-deploy-6787fc596b-rrdn5      1/1     Running   0          4s
v2-deploy-6787fc596b-wpg2v      1/1     Running   0          4s
[root@master 10]# kubectl get svc
NAME         TYPE        CLUSTER-IP     EXTERNAL-IP   PORT(S)   AGE
kubernetes   ClusterIP   10.0.0.1       <none>        443/TCP   28m
speed-svc    ClusterIP   10.9.65.71     <none>        80/TCP    27m
v1-svc       ClusterIP   10.12.164.85   <none>        80/TCP    6m33s
v2-svc       ClusterIP   10.1.206.236   <none>        80/TCP    26s
[root@master 10]# curl 10.1.206.236
hello jock | welcome to nginx! | version 2.0
可以写一个脚本来运行
[root@master 10]# for i in {1..100}; do curl svc.example.com >> sum; done
  % Total    % Received % Xferd  Average Speed   Time    Time     Time  Current
                                 Dload  Upload   Total   Spent    Left  Speed
100    45  100    45    0     0  15000      0 --:--:-- --:--:-- --:--:-- 15000
  % Total    % Received % Xferd  Average Speed   Time    Time     Time  Current
                                 Dload  Upload   Total   Spent    Left  Speed
100    45  100    45    0     0   2647      0 --:--:-- --:--:-- --:--:--  2647
  % Total    % Received % Xferd  Average Speed   Time    Time     Time  Current
                                 Dload  Upload   Total   Spent    Left  Speed
100    45  100    45    0     0  15000      0 --:--:-- --:--:-- --:--:-- 15000
...................................
  % Total    % Received % Xferd  Average Speed   Time    Time     Time  Current
                                 Dload  Upload   Total   Spent    Left  Speed
100    45  100    45    0     0  22500      0 --:--:-- --:--:-- --:--:-- 22500
  % Total    % Received % Xferd  Average Speed   Time    Time     Time  Current
                                 Dload  Upload   Total   Spent    Left  Speed
100    45  100    45    0     0  11250      0 --:--:-- --:--:-- --:--:-- 11250
[root@master 10]# cat sum | sort | uniq -c
     90 hello jock | welcome to nginx! | version 1.0
     10 hello jock | welcome to nginx! | version 2.0
[root@master 10]# kubectl edit ingress v2.example.com
调整发布的权重
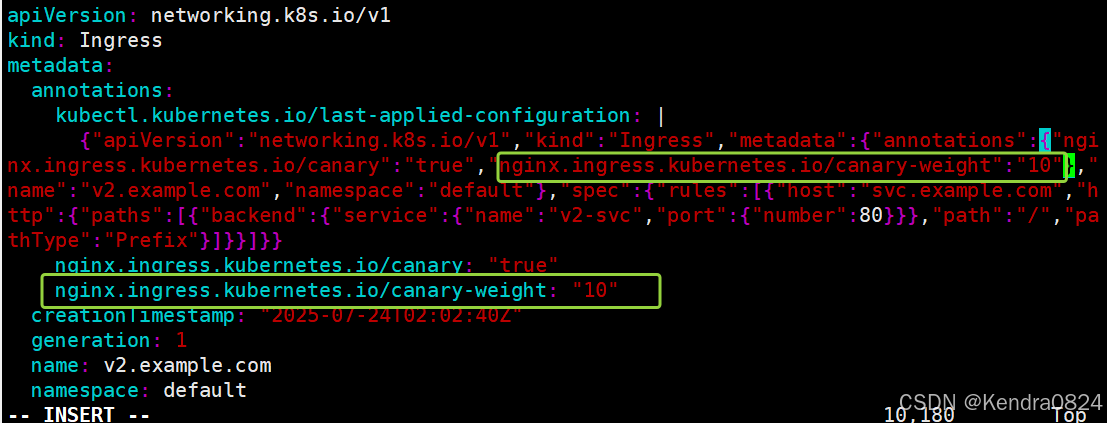
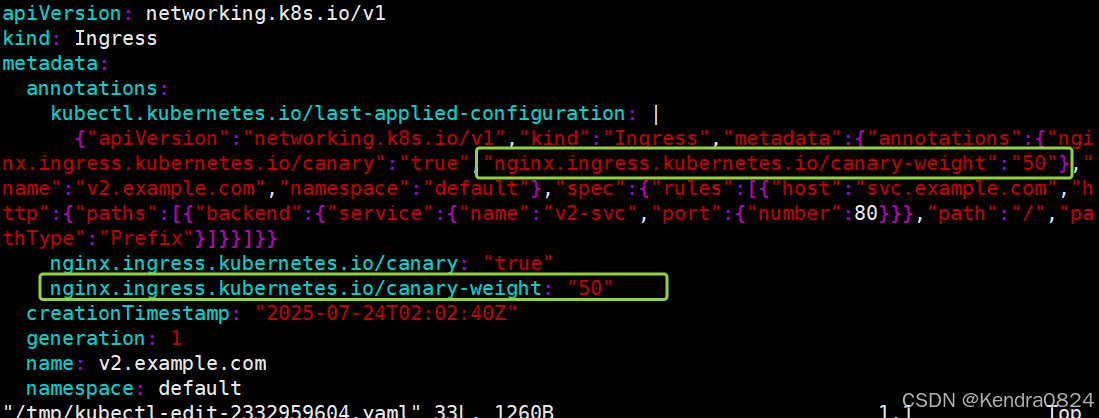
[root@master 10]# kubectl edit ingress v2.example.com

[root@master 10]# for i in {1..100}; do curl svc.example.com >> sum; done
100    45  100    45    0     0  15000      0 --:--:-- --:--:-- --:--:-- 22500
[root@master 10]# cat sum | sort | uniq -c
    141 hello jock | welcome to nginx! | version 1.0
     59 hello jock | welcome to nginx! | version 2.0
11. 代理后端 https 协议
后端代理:后端直接采用 https协议
[root@master 10]# kubectl delete svc,pod,deployment,ingress --all
[root@master 10]# cat 20.https.yaml
apiVersion: apps/v1
kind: Deployment
metadata:
  labels:
    app: proxyhttps
  name: proxyhttps-deploy
spec:
  replicas: 1
  selector:
    matchLabels:
      app: proxyhttps
  template:
    metadata:
      labels:
        app: proxyhttps
    spec:
      containers:
      - image: harbor.registry.com/library/https-server:1.0
        name: myapp
---
apiVersion: v1
kind: Service
metadata:
  labels:
    app: proxyhttps
  name: proxyhttps-svc
spec:
  ports:
  - name: 443-443
    port: 443
    protocol: TCP
    targetPort: 443
  selector:
    app: proxyhttps
  type: ClusterIP
---
apiVersion: networking.k8s.io/v1
kind: Ingress
metadata:
  name: proxyhttps.example.com
  namespace: default
  annotations:
    nginx.ingress.kubernetes.io/backend-protocol: "HTTPS"
spec:
  rules:
  - host: proxyhttps.example.com
    http:
      paths:
      - pathType: ImplementationSpecific
        path: /
        backend:
          service:
            name: proxyhttps-svc
            port:
              number: 443
[root@master 10]# kubectl apply -f 20.https.yaml
deployment.apps/proxyhttps-deploy created
service/proxyhttps-svc created
ingress.networking.k8s.io/proxyhttps.example.com created
[root@master 10]# kubectl get pod
NAME                                 READY   STATUS    RESTARTS   AGE
proxyhttps-deploy-5cb7f78f6b-rncdr   1/1     Running   0          5s
[root@master 10]# kubectl get ingress
NAME                     CLASS   HOSTS                    ADDRESS   PORTS   AGE
proxyhttps.example.com   nginx   proxyhttps.example.com             80      9s
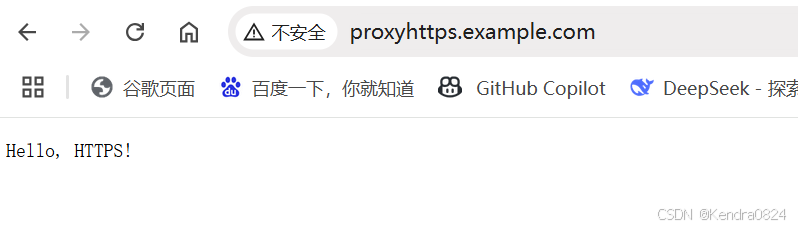
- 在 windows 中去配置映射
通过http方式去访问和https方式都可以去访问
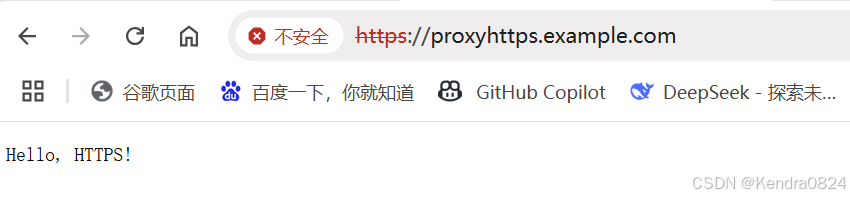
12. 四层代理
四层:传输层
- TCP四层负载代理
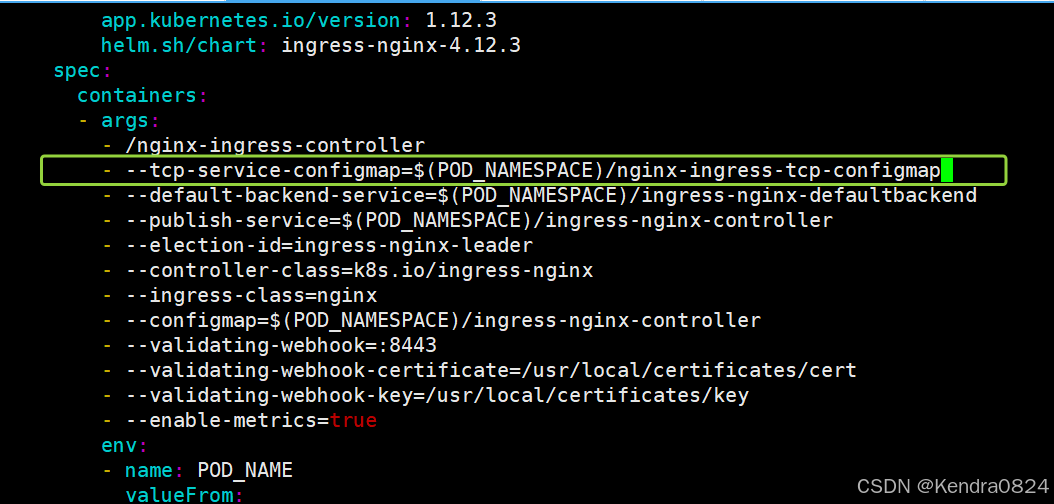
[root@master 10]# kubectl edit daemonset -n ingress ingress-nginx-controller
daemonset.apps/ingress-nginx-controller edited
[root@master 10]# cat 21.cm.yaml
apiVersion: v1
kind: ConfigMap
metadata:
  name: nginx-ingress-tcp-configmap
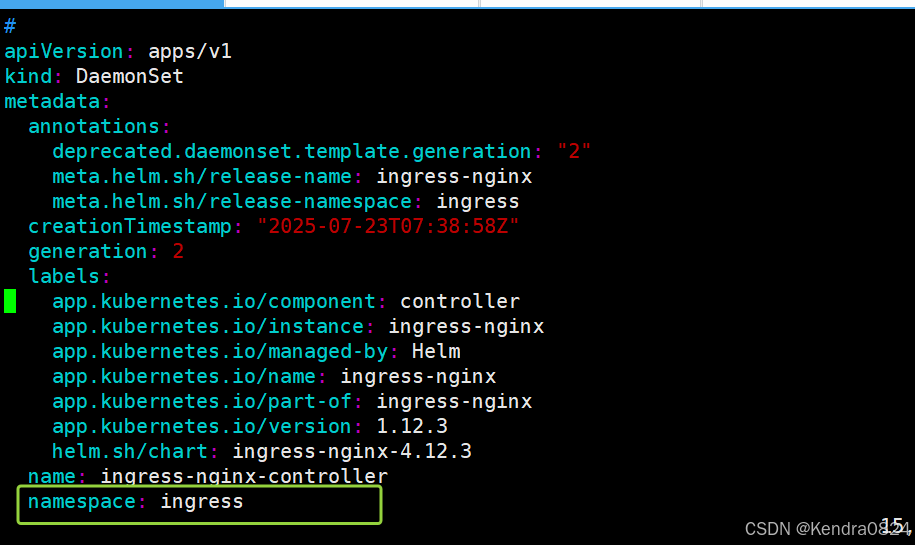
  namespace: ingress
data:
  "9000": "default/proxyhttps-svc:443"
[root@master 10]# kubectl apply -f 21.cm.yaml
configmap/nginx-ingeress-tcp-configmap created
[root@master 10]# kubectl get cm -n ingress
NAME                          DATA   AGE
ingress-nginx-controller      0      4m27s
kube-root-ca.crt              1      25h
nginx-ingress-tcp-configmap   1      12m

[root@master 10]# kubectl get pod
NAME                                 READY   STATUS    RESTARTS   AGE
proxyhttps-deploy-5cb7f78f6b-rncdr   1/1     Running   0          27m
[root@master 10]# kubectl get ingress
NAME                     CLASS   HOSTS                    ADDRESS   PORTS   AGE
proxyhttps.example.com   nginx   proxyhttps.example.com             80      27m
[root@master 10]# kubectl get pod -n ingress
NAME                                            READY   STATUS             RESTARTS   AGE
ingress-nginx-controller-mr64d                  1/1     Running            0          48s
ingress-nginx-controller-tts7f                  1/1     Running            0          71s
ingress-nginx-defaultbackend-66c8787989-sfhnq   0/1     ImagePullBackOff   0          18m

[root@master 10]#  kubectl exec -it ingress-nginx-controller-mr64d -n ingress -- /bin/sh
/etc/nginx $ ls
fastcgi.conf            mime.types              owasp-modsecurity-crs
fastcgi.conf.default    mime.types.default      scgi_params
fastcgi_params          modsecurity             scgi_params.default
fastcgi_params.default  modules                 template
koi-utf                 nginx.conf              uwsgi_params
koi-win                 nginx.conf.default      uwsgi_params.default
lua                     opentracing.json        win-utf
/etc/nginx $ cat nginx.conf
namespace名字空间都是 Ingress
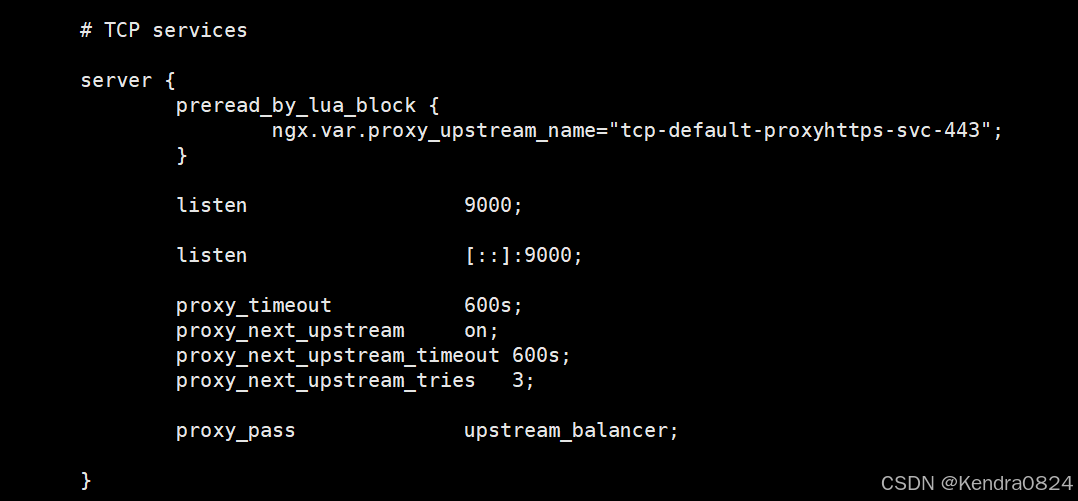
-
UDP四层负载代理
实现 UDP 四层负载均衡,修改 ingress 控制器并添加 udp-services-configmap 启动 参数:
[root@master 10]# kubectl edit ds -n ingress ingress-nginx-controller
daemonset.apps/ingress-nginx-controller edited

 - --udp-services-configmap=$(POD_NAMESPACE)/nginx-ingress-udp-configmap
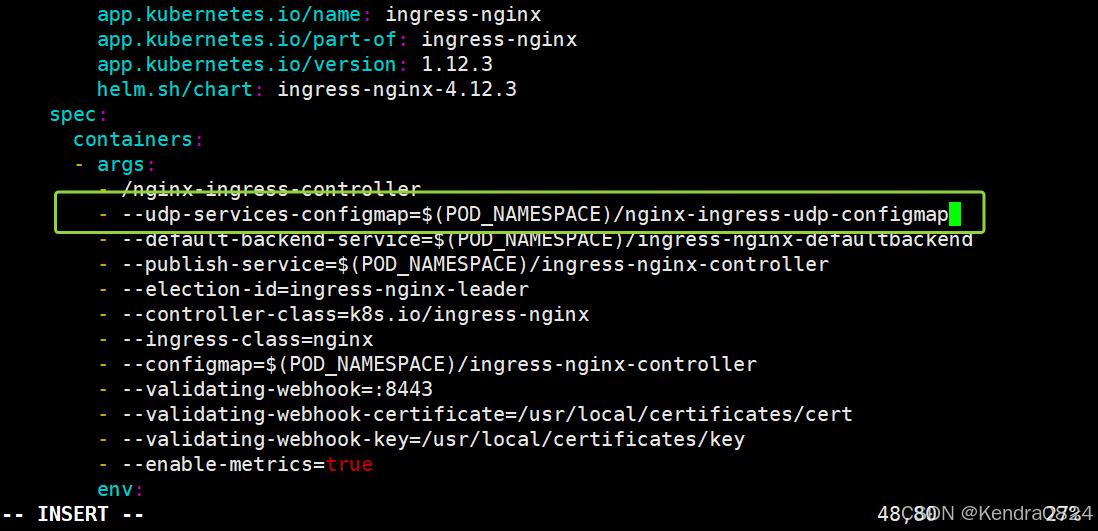
[root@master 10]# cat 22.udp.yaml
apiVersion: v1
kind: ConfigMap
metadata:
  name: nginx-ingress-udp-configmap
  namespace: ingress
data:
  "53": "kube-system/kube-dns:53"
[root@master 10]# kubectl apply -f 22.udp.yaml
configmap/nginx-ingress-udp-configmap created
[root@master 10]# kubectl get pod -n ingress
NAME                                            READY   STATUS             RESTARTS   AGE
ingress-nginx-controller-gnxcj                  1/1     Running            0          22s
ingress-nginx-controller-qrls9                  1/1     Terminating        0          14m
ingress-nginx-defaultbackend-66c8787989-sfhnq   0/1     ImagePullBackOff   0          14m
[root@master 10]# kubectl exec -it ingress-nginx-controller-gnxcj -n ingress -- /bin/sh
/etc/nginx $ cat nginx.conf
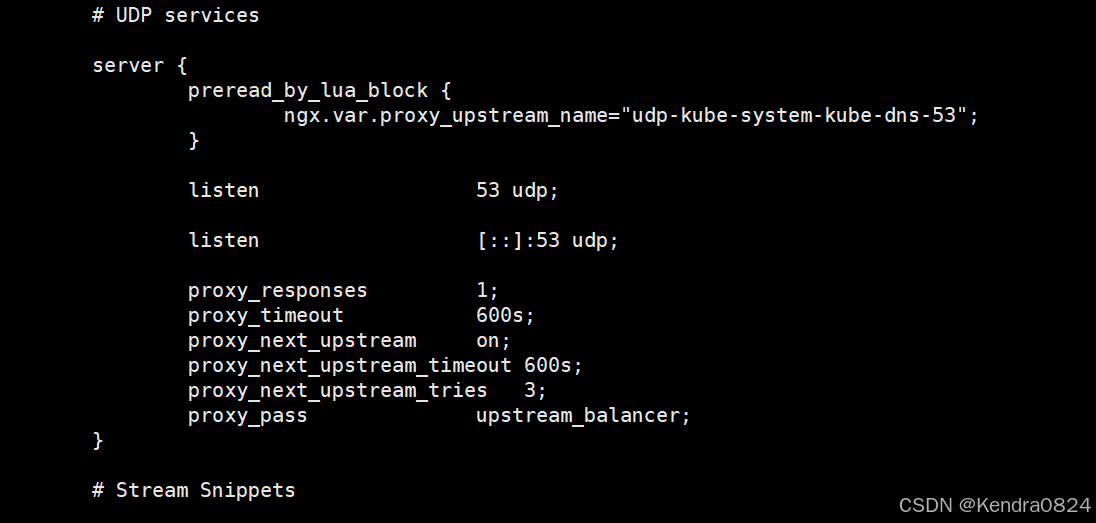
13. 链路追踪
链路追踪就是可以让我们看到每一个代理的 service,它对应的我们访问的这么一个延迟,包括我们当前所需要的一些信息,访问的一些信息。
通过这些信息可以去判断我们当前整个访问链路到底哪一块出现了问题。官方推荐的链路追踪插件为 Zipkin 或者 Jaeger
- 选用 Jaeger,要使用链路追踪,我们需要开启此功能
-
从官下载资源部署文件 wget https://raw.githubusercontent.com/jaegertracing/jaeger-kubernetes/master/all-in one/jaeger-all-in-one-template.yml
-
修改.yaml文件:apiVersion: apps/v1
-
添加:
selector:
matchLabels:
app: jaeger
-
通过这个资源文件创建容器:kubectl apply -f jaeger-all-in-one-template.yml
-
kubectl get pod
kubectl get pod -n
kubectl get svc -n ingress
-
修改ingress控制器,来开启链路追踪功能、指定链路追踪的控制器在哪里
kubectl edit cm ingress-nginx-controller -n ingress
- enable-opentracing: “true” # 开启链路追踪
- jaeger-collector-host: jaeger-agent.ingress.svc.cluster.local # 链路追踪的svc名称
-
删除两个 Pod,快速生效修改
-
浏览器访问
kubectl get pod,svc -n ingress
http://192.168.86.11:32624 访问到 jaeger
-
多刷新几次页面让它去捕获 service。当捕获到 service 后,我们选择它,然后点击下方的 find 按钮,就可以看到链路追踪图
-
点击某个点就可以进行查看,也可以对所耗时间进行排序,从而可根据时间的长短去进行判断,进行排错
-
wget https://raw.githubusercontent.com/jaegertracing/jaeger-kubernetes/master/all-in one/jaeger-all-in-one-template.yml

- apiVersion: apps/v1   # 修改了此处
  kind: Deployment
  metadata:
    name: jaeger
    namespace: ingress		#每一个资源对象都要加相同的名字空间
    labels:
      app: jaeger
      app.kubernetes.io/name: jaeger
      app.kubernetes.io/component: all-in-one
spec:
  replicas: 1
  selector: 		# 添加了此处
    matchLabels:
      app: jaeger

码道开发者社区,聚焦华为云码道 CodeArts 代码智能体,沉淀 Agent、Skill、鸿蒙开发实战内容,供开发者查阅资料、交流技术、分享工程实践
更多推荐



 24
24 0
0- 0


 已为社区贡献2条内容

所有评论(0)