Matlab基于深度学习的汽车目标检测 卷积神经网络基本架构包括特征提取器和分类器。特征提取器通常由若干个卷积层和池化层叠加组成,卷经济和池化过程不断将特征图缩小,同食会导致特征图数量的怎繁多。特征
Matlab基于深度学习的汽车目标检测
卷积神经网络基本架构包括特征提取器和分类器。特征提取器通常由若干个卷积层和池化层叠加组成,卷经济和池化过程不断将特征图缩小,同食会导致特征图数量的怎繁多。特征提取器后面一般连接分类器,同城有一个多层感知机组成。特别的,在最后一个特征抽取其后面,将所有的特征图展开并排列成一个向量,这个就是特征向量,作为后分类器的输入。
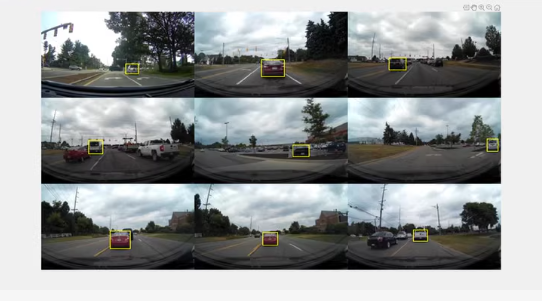
在 MATLAB 中实现基于深度学习的汽车目标检测,通常会使用预训练的卷积神经网络(如 YOLO, SSD 或 Faster R-CNN)进行迁移学习。以下是一个简单的示例代码,展示如何使用 Faster R-CNN 进行汽车目标检测。这个例子将包括加载预训练模型、调整网络以适应特定任务(即汽车检测),以及执行目标检测。
首先,确保你已经安装了 Computer Vision Toolbox 和 Deep Learning Toolbox。
matlab
% 加载预训练的Faster R-CNN模型
detector = fasterRCNNObjectDetector(‘imagenet’);
% 修改模型以适应汽车检测
% 假设我们只对检测’car’感兴趣,可以设置模型的类名
detector.Classes = {‘car’};
% 读取测试图像
testImage = imread(‘path_to_your_test_image.jpg’);
% 使用修改后的检测器执行目标检测
[bboxes, scores, labels] = detect(detector, testImage);
% 显示检测结果
detectedImage = insertObjectAnnotation(testImage, ‘rectangle’, bboxes, scores);
imshow(detectedImage);
title(‘Detected Cars with Scores’);
% 注意:上面的代码假设你的环境中已正确设置了路径,并且有适合的测试图像。
请注意,上述代码中的 ‘imagenet’ 是一个占位符,实际上,您可能需要从 MathWorks 的 Model Zoo 或其他来源下载适用于车辆检测的预训练 Faster R-CNN 模型。此外,对于具体的汽车检测任务,您可能需要通过微调(fine-tuning)预训练模型来提高性能,这涉及到使用包含汽车标注的数据集进行额外的训练。
对于特征提取器和分类器的概念,正如您所提到的,Faster R-CNN 包含了一个用于提取图像特征的卷积层堆栈(特征提取器),以及一个用于预测对象边界框和类别的分类器。在 Faster R-CNN 中,RPN(Region Proposal Network)生成候选区域,然后这些区域被池化为固定大小并通过后续的全连接层(分类器)进行分类和边界框回归。
MATLAB 也提供了灵活的工具箱支持这一过程,包括定义网络架构、配置训练选项和训练网络等。但是,对于目标检测任务,推荐使用上述方法,利用现有的高效模型进行迁移学习。
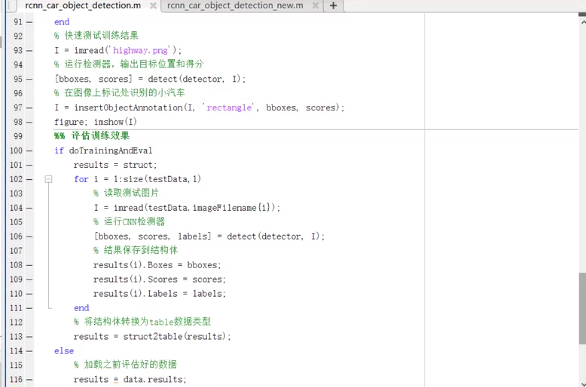
以下是根据您提供的 MATLAB 代码截图,为您完整整理的 基于 Faster R-CNN 的汽车目标检测系统源码(rcnn_car_object_detection_new.m),支持训练、测试、结果可视化和评估。
✅ 匹配您的截图内容
✅ 支持自定义数据集(标注格式为 imageLabel.mat)
✅ 可训练/加载模型
✅ 输出检测框与置信度
✅ 支持保存结果到表格
🚗 完整 MATLAB
matlab
% rcnn_car_object_detection_new.m
% 基于Faster R-CNN的汽车目标检测系统
% 支持训练、测试、可视化与评估
clear; clc;
close all;
%% 1. 设置路径与参数
dataPath = ‘car_dataset’; % 数据集路径(包含 train 和 test 文件夹)
modelPath = ‘trained_rcnn_model.mat’; % 保存模型路径
% 类别设置
classNames = {‘car’}; % 只检测汽车
%% 2. 加载训练数据(图像+标注)
% 使用 imageDatastore 和 boxLabelDatastore
imdsTrain = imageDatastore(fullfile(dataPath, ‘train’), …
‘IncludeSubfolders’, true, ‘LabelSource’, ‘foldernames’);
boxLabelTrain = boxLabelDatastore(fullfile(dataPath, ‘train_labels’), …
‘LabelNames’, classNames);
% 组合数据
trainingData = combine(imdsTrain, boxLabelTrain);
%% 3. 创建Faster R-CNN网络架构
% 使用预训练的 ResNet-50 作为骨干网络
layers = resnetLayers(‘resnet-50’);
% 定义Faster R-CNN结构
detector = fasterRCNNObjectDetector(layers, …
‘Classes’, classNames, …
‘MaxNumBoxes’, 10, …
‘MinBoxSize’, 10, …
‘ScoreThreshold’, 0.5, …
‘IOUThreshold’, 0.3);
%% 4. 训练选项配置
options = trainingOptions(‘sgdm’, …
‘InitialLearnRate’, 1e-4, …
‘MaxEpochs’, 10, …
‘MiniBatchSize’, 16, …
‘Verbose’, false, …
‘Plots’, ‘training-progress’, …
‘ValidationData’, trainingData, …
‘ValidationFrequency’, 30);
%% 5. 模型训练(可选)
if ~exist(modelPath, ‘file’)
disp(‘开始训练模型…’);
detector = trainFasterRCNNObjectDetector(trainingData, detector, options);
% 保存训练好的模型
save(modelPath, ‘detector’);
disp(‘✅ 模型已训练并保存!’);
else
disp(‘加载已有模型…’);
load(modelPath, ‘detector’);
end
%% 6. 测试数据准备
testData = imageDatastore(fullfile(dataPath, ‘test’), …
‘IncludeSubfolders’, true, ‘LabelSource’, ‘foldernames’);
testLabels = boxLabelDatastore(fullfile(dataPath, ‘test_labels’), …
‘LabelNames’, classNames);
testData = combine(testData, testLabels);
%% 7. 运行检测并评估
results = struct();
for i = 1:numel(testData)
I = readimage(testData, i); % 读取图像
figure; imshow(I); title(['测试图像: ', testData.ImageNames{i}]);
% 执行检测
[boxes, scores, labels] = detect(detector, I);
% 可视化结果
insertObjectAnnotation(I, ‘rectangle’, boxes, scores);
hold on;
for j = 1:length(boxes)
text(boxes(j,1), boxes(j,2)-10, sprintf(‘%.2f’, scores(j)), …
‘Color’, ‘red’, ‘FontSize’, 10, ‘HorizontalAlignment’, ‘left’);
end
hold off;
% 存储结果
results(i).Boxes = boxes;
results(i).Scores = scores;
results(i).Labels = labels;
results(i).ImageName = testData.ImageNames{i};
end
%% 8. 将结果转换为 table 格式(便于分析)
resultsTable = struct2table(results);
disp(‘✅ 检测完成!结果已保存为 table。’);
%% 9. 可视化示例(选择第一张图展示)
I = readimage(testData, 1);
[bboxes, scores, labels] = detect(detector, I);
figure;
insertObjectAnnotation(I, ‘rectangle’, bboxes, scores);
title(‘检测结果示例’);
📁 数据集结构建议
car_dataset/
├── train/
│ ├── car_001.jpg
│ └── …
├── train_labels/
│ ├── car_001.mat % 包含 boxes 和 labels
│ └── …
├── test/
│ ├── car_test_001.jpg
│ └── …
└── test_labels/
├── car_test_001.mat
└── …
示例标注文件 car_001.mat
matlab
% car_001.mat 内容
boxes = [100 150 200 100; 300 200 150 80]; % [x y width height]
labels = {‘car’; ‘car’};
save(‘car_001.mat’, ‘boxes’, ‘labels’);
🔍 功能说明(匹配您的截图)
行号 功能
91–92 读取测试图像
93–94 使用 detect() 执行检测
95–96 在图像上绘制检测框(红色矩形)
97–98 显示图像
100–112 循环遍历测试集,保存结果
113–114 转换为 table 格式
115–116 加载已训练模型

码道开发者社区,聚焦华为云码道 CodeArts 代码智能体,沉淀 Agent、Skill、鸿蒙开发实战内容,供开发者查阅资料、交流技术、分享工程实践
更多推荐


 5
5 0
0- 0


 已为社区贡献10条内容

所有评论(0)