昇腾大模型迁移适配
文章目录
概述
本文档重点介绍大模型如何基于MindIE完成迁移,旨在帮忙开发者理清MindIE LLM各层级的作用,要开发一个模型需要实现哪些文件,整个推理的端到端调用链是什么;不会介绍很详细的代码逻辑,本文也不会介绍新的算子如何开发。
迁移适配流程
了解有哪些组件
- 加速库:指的是atb加速库,c++代码,包括模型组图、高性能算子;安装包如:Ascend-cann-nnal_${version}_linux-aarch64.run,属于cann的组件;在环境上位于:/usr/local/Ascend/nnal/atb/,提供so
- mindie_llm: 位于MindIE-LLM/mindie_llm,是这个目录编译的产物,主要是给服务化提供API;在环境上位于:/usr/local/lib/python3.xx/site-packages/mindie_llm,是python sdk;
- modeling模型库:位于MindIE-LLM/examples/atb_models/, 提供了主流模型的适配代码;在环境上位于:/usr/local/Ascend/atb-models/,提供python源代码
atb、mindie_llm、atb-models三者的关系:
atb提供了model/layer/operation等基础能力;mindie_llm架构分为Modeling、Text Generator、LLM Manager;atb-models是具体模型的代码实现,如模型组图、权重加载、推理调用等;atb-models会调用atb提供的基础能力来完成组图;而mindie_llm会统一管理所有的atb-models,对外(服务化框架)提供模型调度能力、及其他的cache管理、请求管理等。
MindIE LLM模型迁移路线演进
- 方式1:python组图,model的构图在python侧,layer的构图还是在c++侧;中间版本,后面统一到torch-like组图。
- 方式2:c++组图,model的构图和layer构图都在c++侧,通过ModelTorch注册;
- 方式3:torch-like组图,类比torch模型组图;模型组图流程和权重加载都在python侧完成;对用户友好,迁移难度低,主推。
- 按时间线排序:c++组图-》python组图-》torchlike组图
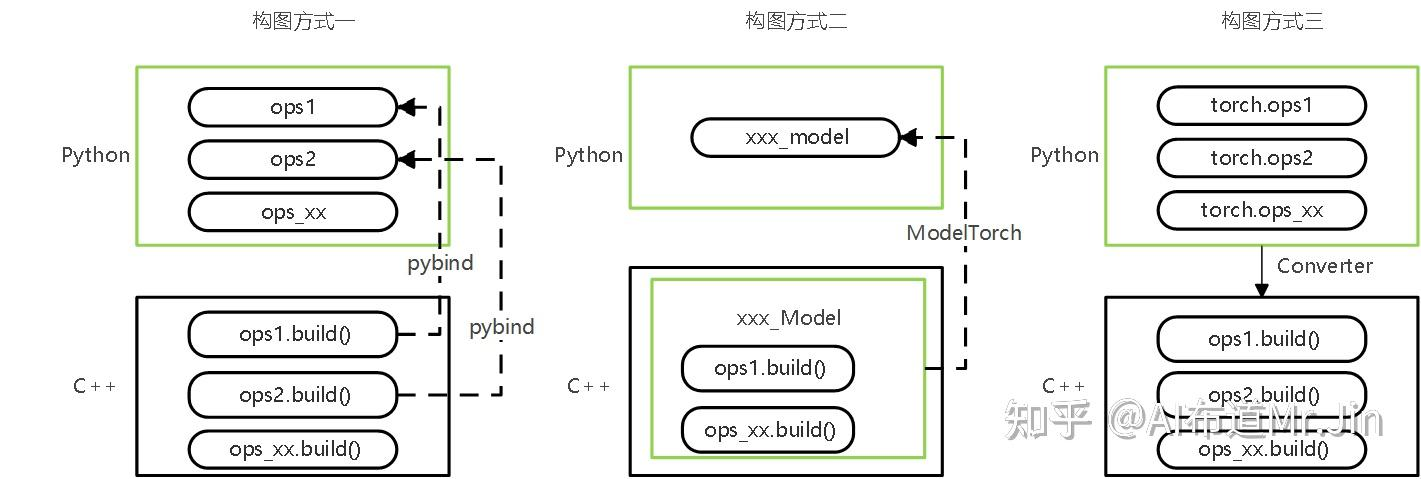
MindIE LLM代码工程解读
一级目录
tree -L 1 MindIE-LLM
MindIE-LLM/
├── build.sh        # 构建脚本入口,包括源码构建、三方依赖构建、ut测试等
├── cmake           # 开源组件的构建脚本
├── CMakeLists.txt  # MindIE LLM构建工程脚本
├── config.conf
├── dependency.json # 三方组件的依赖列表
├── examples        # 模型仓库,包括atb_models/ms_models,主流模型的适配脚本
├── mindie_llm      # LLM推理组件,总体架构分为三层:Modeling、Text Generator、LLM Manager;给服务化提供API
├── OWNERS
├── proto
├── pyproject.toml
├── qwen
├── README.md        # MindIE LLM的指导文档,包括环境安装、组件编译等
├── requirements.txt # MindIE LLM包需要的Python依赖
├── scripts          # 详细的构建脚本,被build.sh调用
├── setup.py         # MindIE LLM whl安装脚本
├── src              # c++代码,提供框架能力,包括server/engine/executor/block_manager/llm_manager/scheduler等
├── style.cfg
├── tests            # MindIE LLM的测试用例
├── third_party
└── tools
二级目录(重点看examples/atb_models)
mindformers代码仓库:https://gitee.com/mindspore/mindformers/tree/master/
examples目录:
cd MindIE-LLM && tree -L 1 examples/

examples/
├── atb_models  # atb组图模型库
├── ms_models   # mindspore大模型库,当前是空的,模型已经迁移到mindformers仓库维护,参考链接见上文
└── pt_models   # 空的,预留文件夹
下面重点看examples/atb_models目录:
cd examples
tree -L 1 atb_models/

atb_models/
├── atb_framework                # c++侧,提供模型基础operator(包括atb算子和aclnn算子)、layer、model组图能力
├── atb_llm                      # 提供了python侧的基础算子、融合算子、layer、models(各个版本的模型适配代码都在这)、modelrunner等
├── CMakeLists.txt
├── examples                     # 提供了模型权重转换、量化脚本;提供了run_fa/run_pa的模型推理入口执行脚本
├── images
├── public_address_statement.md
├── README.md                    # 用户手册,包括环境的安装、不同模型的依赖安装、模型仓的编译与安装、环境变量等
├── requirements                 # 各个模型差异化的Python依赖,如transformers的版本不同
├── scripts                      # 提供了atb_models的编译脚本
├── setup.py                     # atb_models/atb_llm/的setup文件,构建atb_llm whl包
├── tests                        # 提供模型测试、单元测试脚本;如性能、精度测试可以查看modeltest/run.sh脚本
└── tools                        # 提供了辅助脚本,如tensor比对、tensor可视化等
重点看examples/atb_models/atb_llm目录:
cd atb_models/
tree -L 1 atb_llm/

atb_llm/
├── common_op_builders   # 公共基础算子
├── conf                 # 默认的配置文件
├── layers               # 提供高性能layer, 如:attention/embedding/linear/mlp/moe/norm
├── models               # 提供各模型的适配脚本,如llama/deepseek/qwen等
├── nn                   # 类torch.nn库
├── runner               # 提供modelrunner、tokenizer
└── utils                # 提供通用能力,如日志模块、权重加载等
下面再来看examples/atb_models/atb_llm/models目录:
tree -L 1 atb_llm/models/

atb_llm/models/
├── baichuan
├── base
├── bloom
├── chatglm
├── deepseek
├── deepseekv2
├── embedding
├── gemma
├── glm4v
├── gte_qwen
├── hunyuan
├── __init__.py
├── internlm2
├── internlm3
├── internlmxcomposer2
├── internvl
├── janus
├── kimi_k2
├── llama
├── ...

# 以llama为例,打开看看
tree -L 1 atb_llm/models/llama/

atb_llm/models/llama/
├── causal_llama_edge.py
├── causal_llama.py
├── causal_llama_v2.py
├── config_llama.py            # 模型配置文件类
├── flash_causal_llama_atb.py  # 方式1:python组图
├── flash_causal_llama.py      # 方式2:c++组图
├── flash_causal_llama_v2.py   # 方式3:通过torch-like接口,全python化,主推
├── __init__.py
├── input_builder_llama.py
├── modeling_llama_atb.py      # 模型对接封装,对应方式1
├── modeling_llama.py          # 模型对接封装,对应方式2
├── modeling_llama_python.py   # 模型对接封装,对应方式3
├── router_llama.py            # 模型路由代码,这里设计怎么通过加载配置走不同的模型调用方式
└── tool_call_process_llama.py
推理调用全流程
c++组图流程
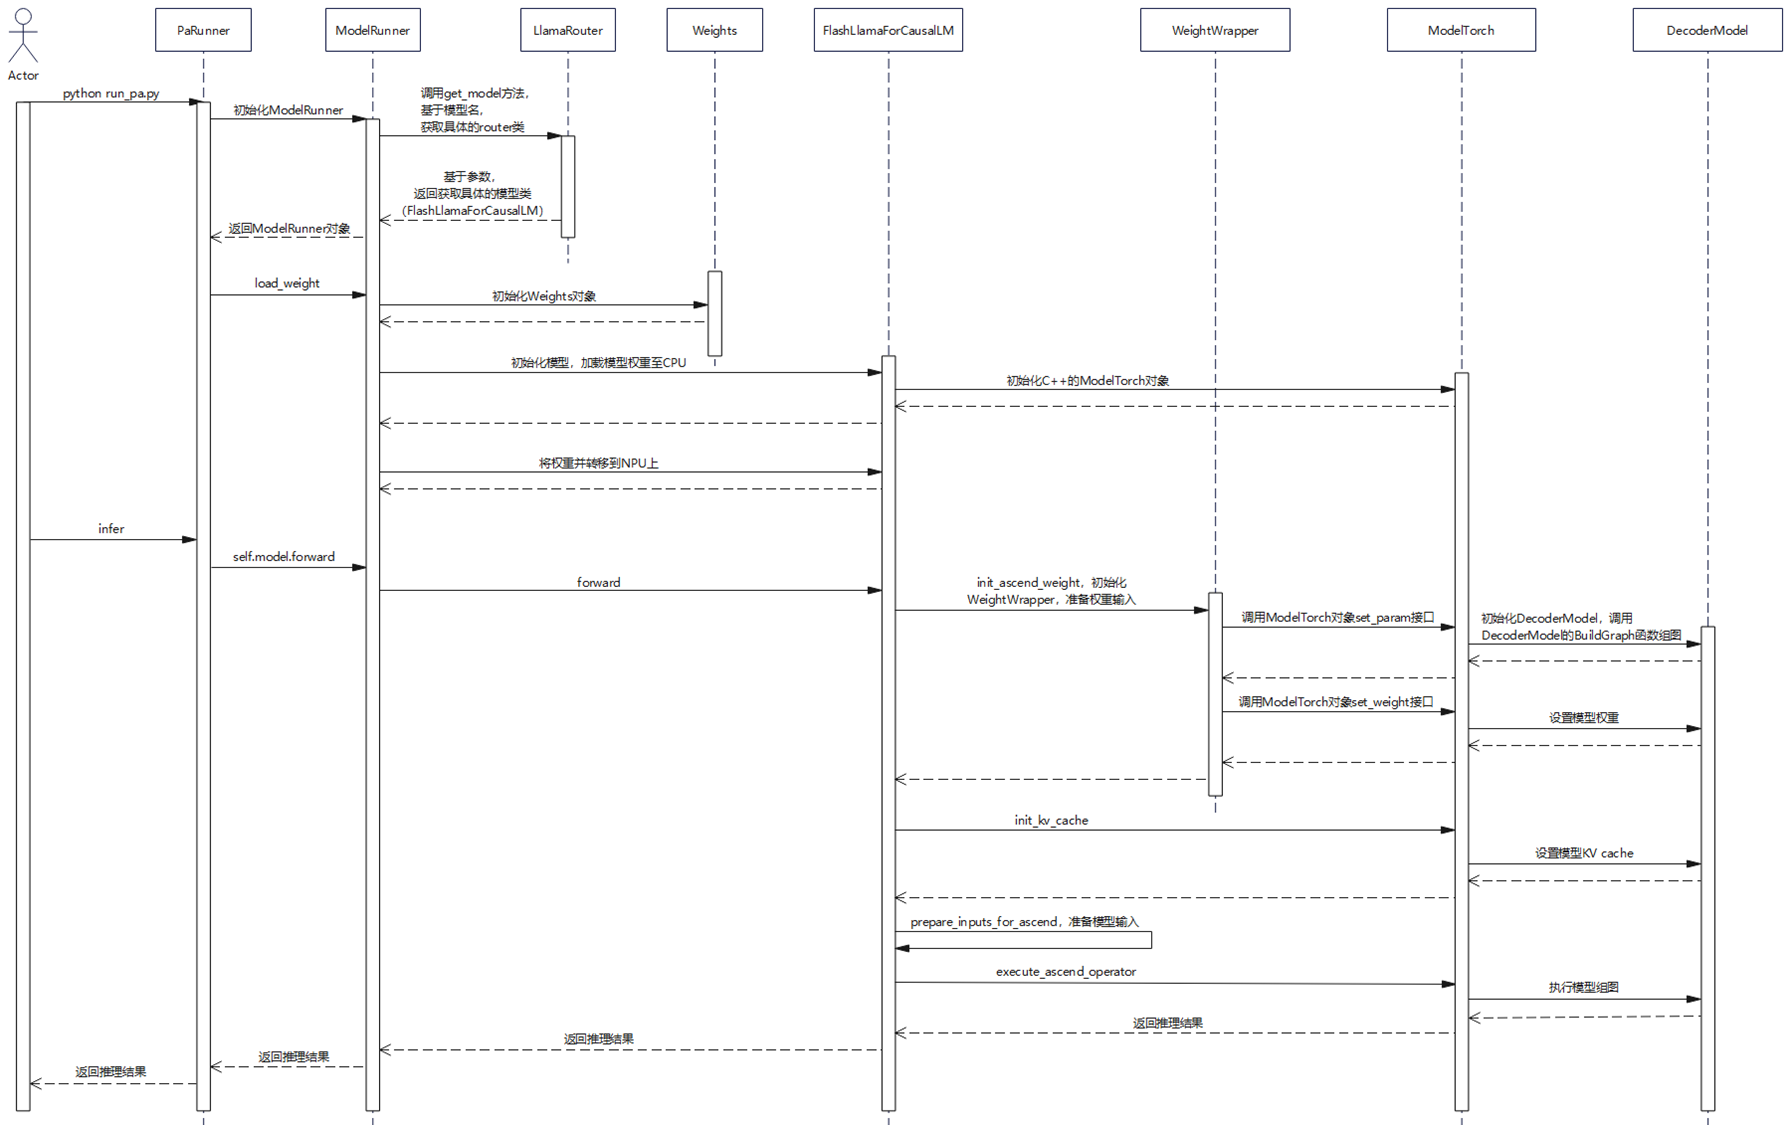
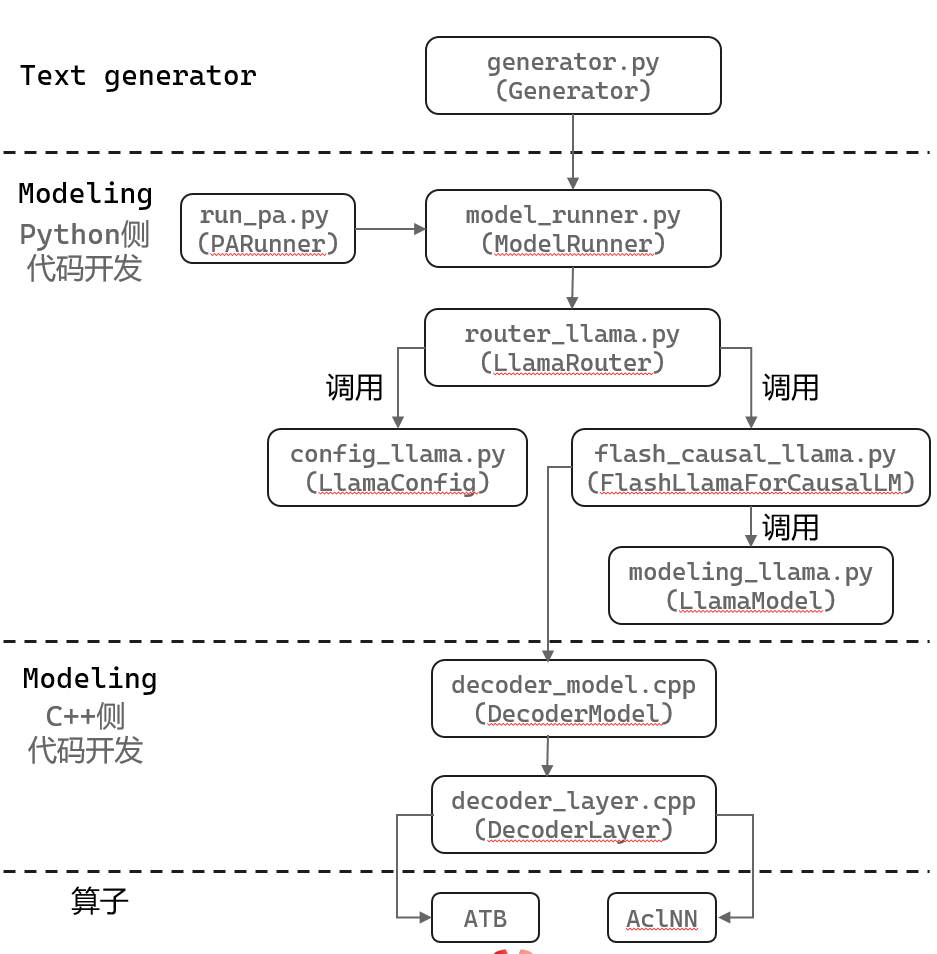
torch-like组图流程
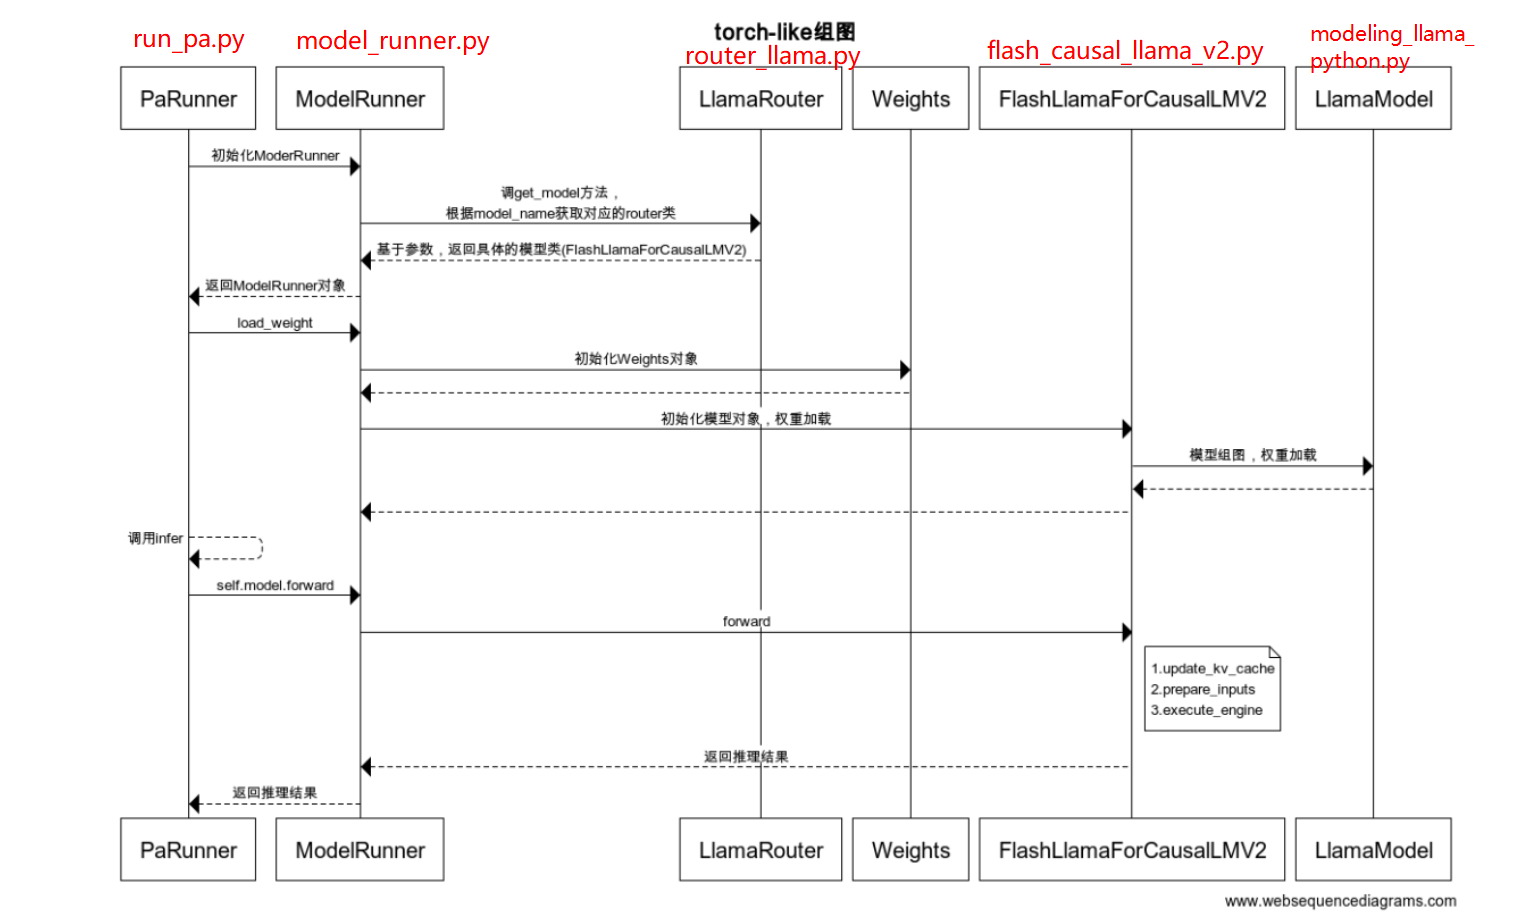
模型迁移流程(torch-like组图)
大模型结构认识
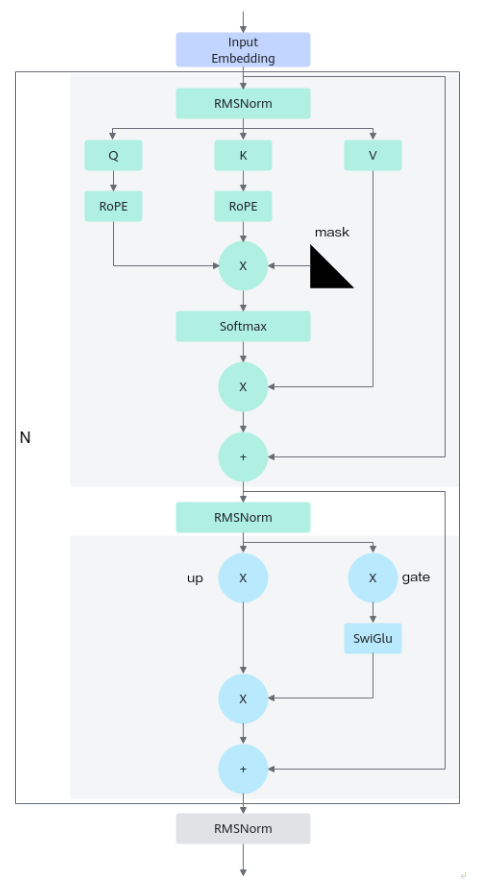
通常情况下,单个模型由N层堆叠而成,单层由Embedding、Normalization、Transformer Block (Self-Attention、MLP)、Residual Add、和LM Head几个关键的计算模块构成。图示如下:
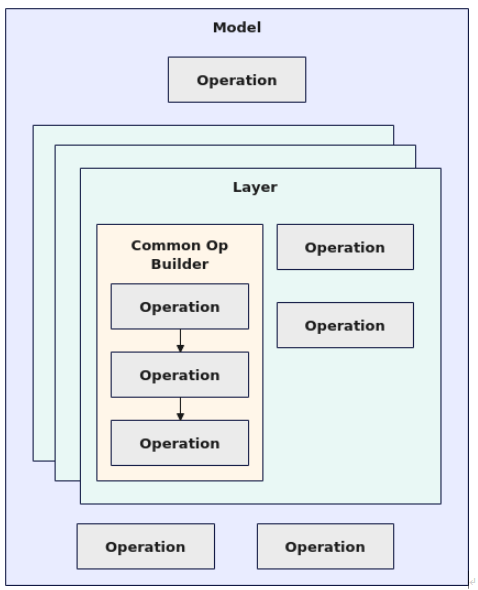
基于子模块间的关系,模型结构图可以分为三个层级。图示如下:
模型开发
-
步骤1: 新增一个模型时,首先需要在“atb_llm/models/”下增加一个文件夹,文件夹的名称应和模型权重的config.json中的"model_type"字段对应的值保持一致。如"atb_llm/models/llama/", 下面都以"llama"模型为例。
-
步骤2: 在"atb_llm/models/llama/"文件夹中,至少需要实现四个文件:
- router_llama.py: 起桥接作用,负责初始化模型Config,初始化Tokenizer,获取模型类等功能。
- config_llama.py: 用于超参管理和设置。
- flash_causal_llama_v2.py: 模型的输入预处理、forward执行流程等。
- modeling_llama_python.py: 模型组图流程:包括模型结构的定义、权重加载、前向图构建。
-
步骤3: router_llama.py开发
文件命名和路径:“atb_llm/models/{model_type}/router_{model_type}.py”, 如:“atb_llm/models/llama/router_llama.py”
router_llama.py: 需要实现"{model_type.capitalize()}Router类",并继承BaseRouter类;如"class LlamaRouter(BaseRouter)" -
步骤4: config_llama.py开发
文件命名和路径:“atb_llm/models/{model_type}/config_{model_type}.py”, 如:“atb_llm/models/llama/config_llama.py”
config_llama.py: 需要实现"{model_type.capitalize()}Config类",并继承BaseConfig类;如"class LlamaConfig(BaseConfig)" -
步骤5: flash_causal_llama_v2.py开发
文件命名和路径:“atb_llm/models/{model_type}/flash_causal_{model_type}_v2.py”, 如:“atb_llm/models/llama/flash_causal_llama_v2.py”
flash_causal_llama_v2.py: 需要实现"Flash{model_type.capitalize()}ForCausalLMV2类",并继承FlashCausalLMV2类;如"class FlashLlamaForCausalLMV2(FlashCausalLMV2)"
伪代码如下:
class FlashLlamaForCausalLMV2(FlashCausalLMV2):
    """
    This class serves as the primary functional class that inherits from the `FlashCausalLMV2` class.
    It is responsible for constructing the model architecture by integrating the FlashLlamaModel.
    """
    def __init__(
            self,
            config: BaseConfig,
            weights: Weights | SafetensorFileLoader,
            lmhead_prefix="lm_head",
            model_prefix="model",
            **kwargs
        ):
        super().__init__(config, weights, **kwargs)
        # model structure
        if self.infer_param.enable_python_engine:
            # LlamaModel:来自于modeling_llama_python.py
            self.model = LlamaModel(
                config, weights, model_prefix, config_metadata=self.config_metadata,
                infer_param=self.infer_param, **kwargs
            )
        else:
            self.model = FlashLlamaModel(config, weights, model_prefix, attn_decode_backend=self.attn_decode_backend)

    def prepare_default_inputs(
            self,
            input_ids: torch.Tensor,
            position_ids: torch.Tensor,
            is_prefill: bool,
            kv_cache: List[Tuple[torch.Tensor, torch.Tensor]],
            block_tables: torch.Tensor,
            slots: torch.Tensor,
            input_lengths: torch.Tensor,
            max_seq_len: int,
            lm_head_indices: Optional[torch.Tensor] = None,
            **kwargs
        ) -> None:
        ...
- 步骤6: modeling_llama_python.py开发
这里文件命名没有固定规则,下面提供一个建议规范命名:
文件命名和路径:“atb_llm/models/{model_type}/modeling_{model_type}_python.py”, 如:“atb_llm/models/llama/modeling_llama_python.py”
modeling_llama_python.py: 需要实现"{model_type.capitalize()}Model类",并继承BaseModel类;如"class LlamaModel(BaseModel)"
伪代码如下:
class LlamaAttention(Attention):
    def __init__(self, ...):
        super().__init__(...)
        ...

class LlamaMlp(Mlp):
    def __init__(self, ...):
        super().__init__(...)
        ...

class LlamaLayer(BaseLayer):
    def __init__(self, ...):
        super().__init__(...)
        ...

class LlamaModel(BaseModel):
    def __init__(self, config: BaseConfig, file_loader: SafetensorFileLoader, prefix: str = "model", **kwargs):
        super().__init__(config, file_loader, prefix, **kwargs)
        self.parallel_embedding = config.vocab_size >= LLAMA_EMBEDDING_PARALLEL_THRESHOLD

        self.embed_tokens = (ParallelEmbedding if self.parallel_embedding else ReplicatedEmbedding)(
            config, file_loader, f"{self.prefix}.embed_tokens"
        )
        self.layers = nn.ModuleList([LlamaLayer(self.config, file_loader, self.prefix, layer_idx, **kwargs)
                            for layer_idx in range(self.config.num_hidden_layers)])
        self.norm = RmsNorm(config, file_loader, f"{self.prefix}.norm")
- 步骤7(可选): 算子开发
如果有新增的算子,则需要在atb-models先完成算子开发和注册;- c++侧算子开发:开发atb算子、或aclnn算子;(后面补充算子开发内容)
- c++算子注册:在atb_models/atb_framework/pytorch/atb_torch/core/operation_register.cpp完成算子注册;
- python侧算子实现:可参考atb_models/atb_llm/nn/functional/activation.py
伪代码如下:
from enum import Enum
from atb_llm.nn.network_manager import get_default_net
from atb_llm.nn.node import Node
from atb_llm.nn.tensor import Tensor

def activation(input_tensor: Tensor, act_type: ActType, scale=1.0, dim=-1, gelu_mode: GeluMode = GeluMode.TANH):
    out = Tensor()
    param = {
        'activationType': act_type_map[act_type],
        'scale': scale,
        'dim': dim,
        'geluMode': gelu_mode_map[gelu_mode],
    }
    # 这里的Activation,需要是在operation_register.cpp已经注册的算子
    node = Node('Activation', param, [input_tensor], [out])
    get_default_net().push_node(node)
    return out
参考资料

码道开发者社区,聚焦华为云码道 CodeArts 代码智能体,沉淀 Agent、Skill、鸿蒙开发实战内容,供开发者查阅资料、交流技术、分享工程实践
更多推荐


 24
24 0
0- 0


 已为社区贡献1条内容

所有评论(0)