个人用云计算学习笔记 --7(Linux 文件归档和备份、系统间复制文档、项目实战:Rsync + Sersync 实现文件实时同步)
Linux 文件归档和备份(19. Linux 文件归档和备份)
归档和压缩文件对于创建备份和通过网络传输数据非常有用。
用于创建和使用备份存档的最古老和最常用的命令之一是 tar 命令。
tar可以将大量文件集合到一个文件(存档)中,还可以使用 gzip,bzip2或xz压缩来压缩存档。
tar 包管理
基本语法
tar [选项] [归档文件名] [源文件/目录]  # 打包/压缩
tar [选项] [归档文件名] [目标目录]      # 解包/解压
常用选项(核心参数)
| 选项 | 含义 |
|---|---|
-c | 创建新的归档文件(打包) |
-x | 从归档文件中提取文件(解包) |
-t | 列出归档文件中的内容(查看) |
-f | 指定归档文件的名称(必须放在选项最后,紧跟文件名) |
-v | 显示操作过程(verbose,详细输出) |
-z | 用 gzip 压缩 / 解压(生成 .tar.gz 格式) |
-j | 用 bzip2 压缩 / 解压(生成 .tar.bz2 格式) |
-J | 用 xz 压缩 / 解压(生成 .tar.xz 格式,压缩率更高) |
-C | 解包时指定目标目录(Change directory) |
-P | 保留绝对路径(默认会去掉根目录 /,避免覆盖系统文件) |
--exclude | 打包时排除指定文件 / 目录 |
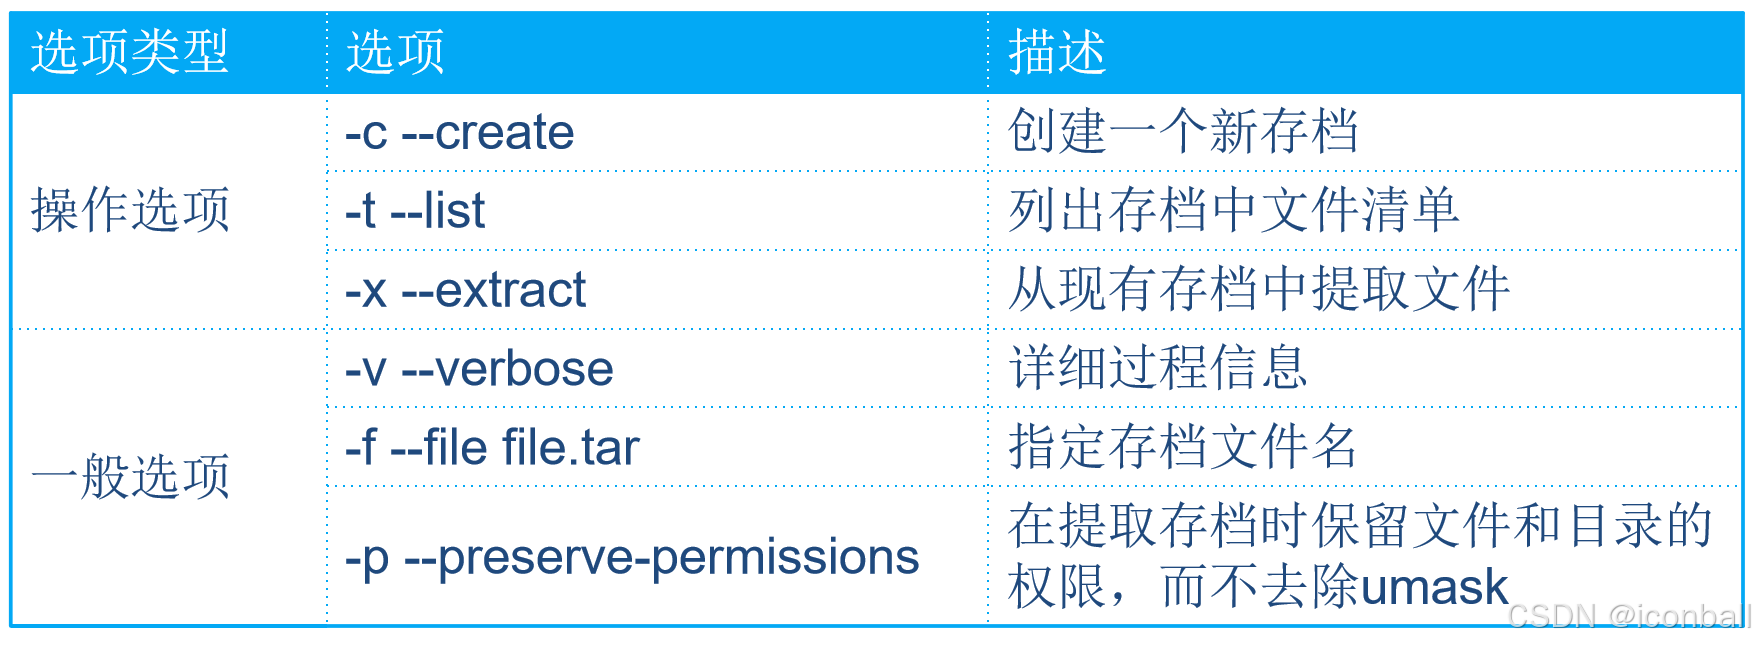
创建一个 tar 包
将 file1.txt、dir1/ 打包为 archive.tar:
tar -cvf archive.tar file1.txt dir1/
-c创建归档,-v显示过程,-f指定文件名。
## 没有权限读取的文件,当然无法打包
[laoma@client ~ 11:29:35]$ tar -cf etc.tar /etc
tar: 从成员名中删除开头的“/”
tar: /etc/crypttab:无法 open: 权限不够
tar: /etc/grub.d:无法 open: 权限不够
tar: /etc/pki/CA/private:无法 open: 权限不够
...
# root 用户可以打包所有文件
[root@client ~ 11:29:54]# tar -cf etc.tar /etc
tar: 从成员名中删除开头的“/”
[root@client ~ 11:30:48]# ls -l etc*
-rw-r--r-- 1 root root 30095360 9月  16 11:28 etc.tar
# 再次打包,如果存在相同的tar包,不会提示是否覆盖
[root@client ~ 11:30:51]# tar -cf etc.tar /etc
tar: 从成员名中删除开头的“/”
# 通过添加日期,确保每天打包的文件名不一致
[root@client ~ 11:32:24]# tar -cf etc-$(date +%Y%m%d).tar /etc
提取 tar 包中文件
# 提取所有文件
[root@centos7 ~]# tar -xf etc-20240726.tar
# 查看其中一个子目录
[root@client ~ 11:33:50]# tree -L 1 etc/yum
etc/yum
├── fssnap.d
├── pluginconf.d
├── protected.d
├── vars
└── version-groups.conf

4 directories, 1 file

# 提取部分文件
[root@client ~ 11:33:52]# tar -t -f etc-20250916.tar |grep etc/host
etc/host.conf
etc/hosts
etc/hosts.allow
etc/hosts.deny
etc/hostname
[root@centos7 ~]# tar -xf etc-20240726.tar $(tar -t -f etc-20240726.tar|grep etc/host)
[root@centos7 ~]# tree etc
etc
├── host.conf
├── hostname
└── hosts

0 directories, 3 files
tar 包压缩管理
# 确保相关压缩工具已经安装了
[root@centos7 ~]# yum install gzip bzip2 xz
# gzip压缩
[root@client ~ 13:49:10]# time tar -czf etc.tar.gz /etc
tar: 从成员名中删除开头的“/”
real	0m0.703s
user	0m0.638s
sys	0m0.064s

# bzip2 压缩
[root@client ~ 13:49:32]# time tar -czf etc.tar.bz2 /etc
tar: 从成员名中删除开头的“/”
real	0m0.685s
user	0m0.645s
sys	0m0.038s

# xz 压缩
[root@client ~ 13:49:48]# time tar -czf etc.tar.xz /etc
tar: 从成员名中删除开头的“/”
real	0m0.680s
user	0m0.642s
sys	0m0.037s

[root@client ~ 13:49:55]# ls -lh etc.tar.*
-rw-r--r-- 1 root root 10M 9月  16 13:49 etc.tar.bz2
-rw-r--r-- 1 root root 10M 9月  16 13:49 etc.tar.gz
-rw-r--r-- 1 root root 10M 9月  16 13:49 etc.tar.xz
# 查看压缩的 tar 包不需要指定压缩选项
[root@client ~ 13:50:22]# tar -tf etc.tar.gz
系统间复制文档(20. 系统间复制文档)
windows 和 Linux 之间传输
xftp工具
一款FTP/SFTP 客户端工具,主要用于在本地计算机与远程服务器之间进行文件传输和管理。
在两个窗口之间拖动文件进行上传和下载。
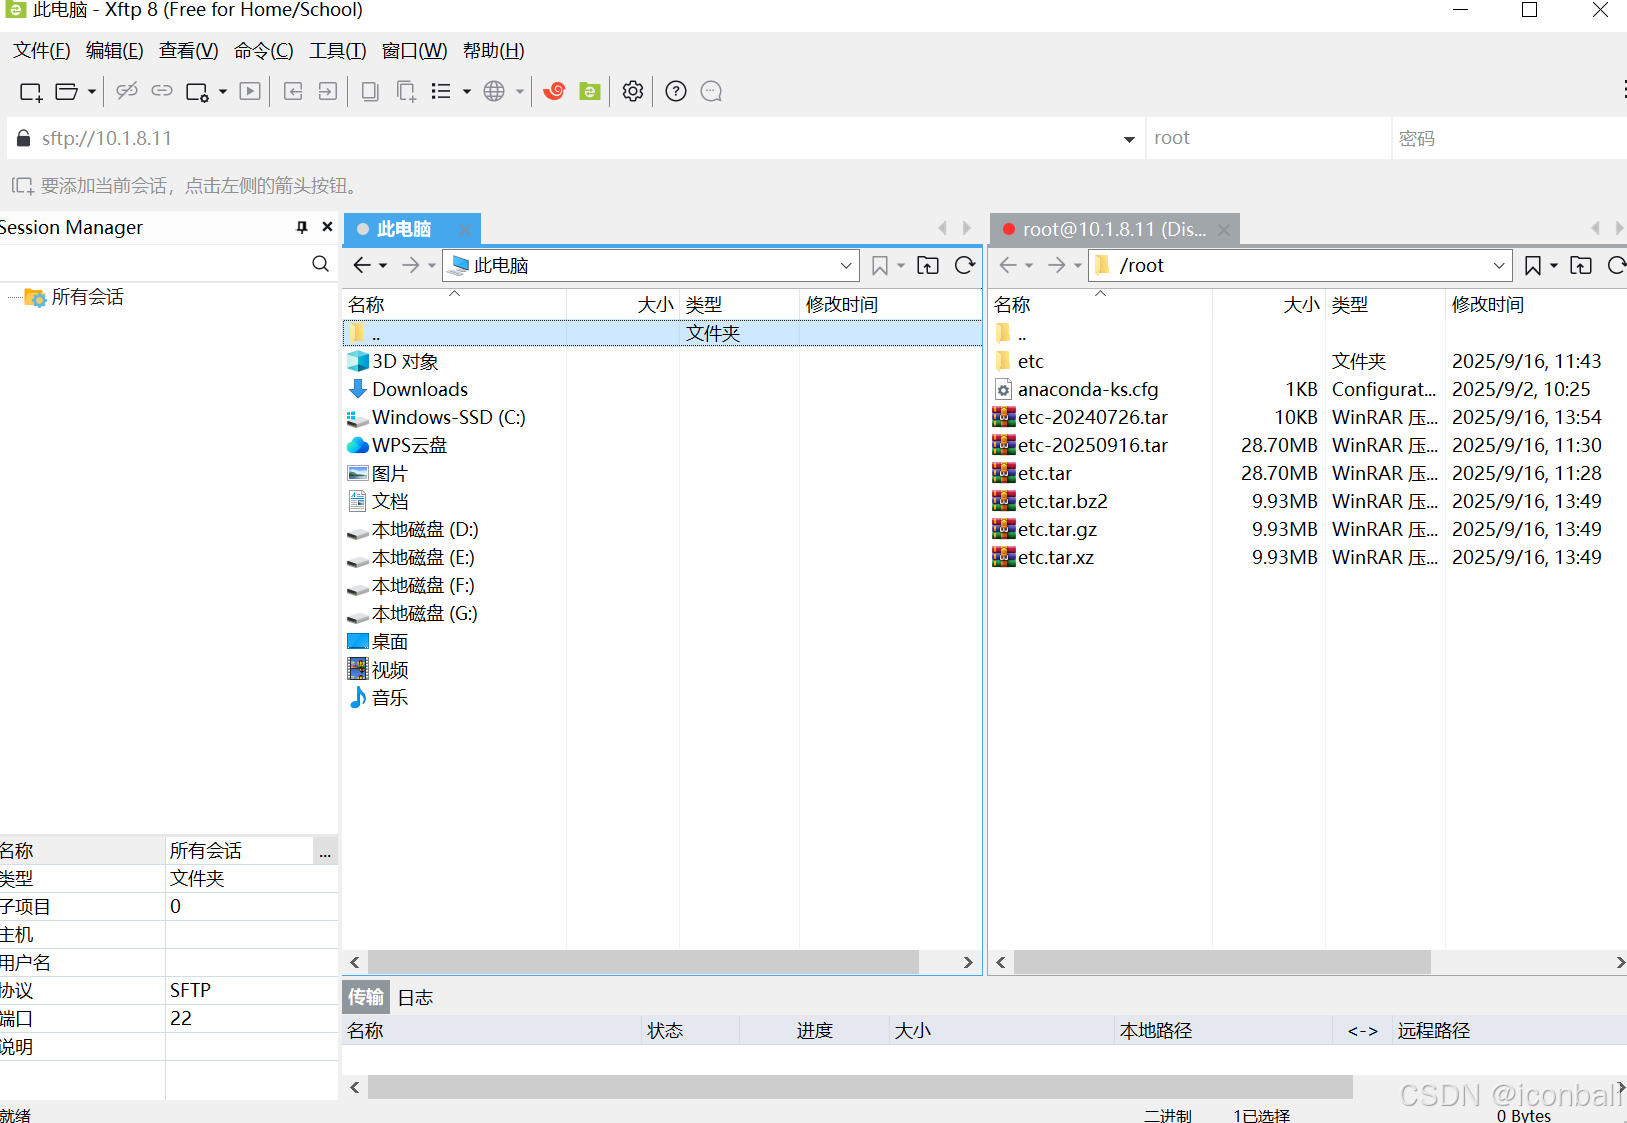
xshell 工具
Linux服务器安装 lrzsz 软件包。该方式传输速度比ftp慢。
[root@centos7 ~]# yum install -y lrzsz
上传:直接将文件拖拽到命令行窗口即可。
拉取:使用 sz 工具,并指定保存位置。
Linux 之间传输
scp 命令
scp,全名secure copy,也就是安全复制,是基于ssh协议,也就是说Linux服务器要开启ssh服务。
基本语法
# 本地文件复制到远程
scp [选项] 本地文件路径 远程用户@远程主机IP:远程目标路径

# 远程文件复制到本地
scp [选项] 远程用户@远程主机IP:远程文件路径 本地目标路径

# 复制目录(需加 -r 选项)
scp -r [选项] 本地目录 远程用户@远程主机IP:远程目标路径
scp -r [选项] 远程用户@远程主机IP:远程目录 本地目标路径
常用选项
-r:递归复制整个目录(包括子目录和文件)。-P(大写):指定远程主机的 SSH 端口(默认端口为 22,若远程端口非默认需指定)。-p:保留文件的修改时间、访问时间和权限。-v:显示详细的传输过程(用于调试)。-i:指定 SSH 密钥文件(用于密钥认证,无需输入密码)。
[root@client ~]# scp root@server:/root/etc-20240726.tar .
etc-20240726.tar                    100%   30MB 188.5MB/s   00:00
[root@client ~]# ls etc*
etc-20240726.tar
#命令解析:
#scp:是用于在不同主机之间进行安全文件传输的命令
#root@server:表示远程服务器的登录信息,root 是登录用户名,server 是服务器地址(可以是 IP 地址或域名)
#/root/etc-20240726.tar:是远程服务器上要下载的文件路径
#.:表示下载到本地当前所在目录

# 复制多个文件
[root@client ~]# scp root@server:/root/{etc-20240726.tar,etc.tar}  .
etc-20240726.tar                    100%   30MB 192.6MB/s   00:00
etc.tar                             100%   30MB 214.3MB/s   00:00

# 复制目录,使用 -r 选项
[root@client ~]# scp root@server:/etc/selinux/  .
scp: /etc/selinux: not a regular file
[root@client ~]# scp -r root@server:/etc/selinux/  .
semanage.conf                       100% 2647     2.3MB/s   00:00
config                              100%  548   435.5KB/s   00:00
file_contexts                       100%  404KB 108.9MB/s   00:00
...

# 上传,如果路径没有写,表示相对用户家目录。这里是上传到root用户家目录/root
[root@client ~]# scp etc.tar root@server:
etc.tar                             100%   30MB 185.9MB/s   00:00
[root@client ~]# scp etc.tar etc-20240726.tar root@server:
etc.tar                             100%   30MB 193.2MB/s   00:00
etc-20240726.tar                    100%   30MB 194.3MB/s   00:00
[root@client ~]# scp -r selinux/ root@server:
semanage.conf                       100% 2647     4.1MB/s   00:00
config                              100%  548   997.2KB/s   00:00
file_contexts                       100%  404KB 103.9MB/s   00:00
...
scp 命令缺点:不管目的位置是否有文件,总是再复制一次,可以理解为全量备份。缺少比对功能。
rsync 命令
rsync 是一个强大的文件同步工具,用于在本地和远程系统之间高效地复制和同步文件。它的核心优势是增量传输—— 只传输文件的变化部分,而非整个文件,大大提高了同步效率。
前提:客户端和服务端都要提前安装好 rsync 软件包。
# 安装 rsync
[root@centos7 ~]# yum install -y rsync
shell 模式
shell 模式是基于 ssh 服务传送。
语法:
rsync [选项]… 源路径 目标路径
rsync [选项]… 源路径 [用户名@](服务器/ip地址):目标路径
rsync [选项]… [用户名@](服务器/ip地址):源路径 目标路径
常用选项:
常用选项:
- -n 参数执行一次空运行,与真实执行显示结果一致,但是没有做任何改变。
- -v 显示执行过程中详细输出。
- -a 代表“archive mode”,复合选项等价于启用参数:-r -l -p -t -g -o -D
- -r 递归同步整个文件夹
- -l 同步软连接
- -p 保留权限
- -t 保留时间戳
- -g 保留所属组
- -o 保留所有者
- -D 同步设备文件
说明:
- -A,同步时保留ACLs内容。
- -X 同步时保留selinux内容。-a,不同步acl selinux内容。
补充
rsync -n选项的作用是模拟运行(dry run),它会显示rsync命令在实际执行时会进行的操作,但不会真正修改文件或执行同步。
这是一个非常实用的测试选项,主要用途包括:
- 验证同步命令的正确性,避免误操作(比如错误删除文件)
- 预览同步过程中会传输、创建或删除哪些文件
- 检查
--delete选项的影响(防止误删重要文件)
- SELinux(Security-Enhanced Linux)是一种强制访问控制(MAC)安全机制,集成在 Linux 内核中,用于增强系统安全性。它通过为系统资源(文件、进程、网络端口等)和主体(进程)定义严格的安全策略,限制进程只能访问其必要的资源,从而减少系统被攻击的风险。
- ACL 是对 Linux 传统 DAC(自主访问控制) 机制的扩展。传统 DAC 仅通过文件的 “所有者、所属组、其他用户” 三类权限(r/w/x)控制访问,而 ACL 允许为单个用户或多个用户 / 组设置更精细的权限,解决了传统权限粒度不足的问题。
# 准备文件
[root@client ~]# mkdir Pictures
[root@client ~]# touch Pictures/snap{1..5}.jpg

# 首次同步
[root@client ~ 14:47:30]# rsync -av Pictures root@server:
root@server's password:
sending incremental file list
Pictures/
Pictures/snap1.jpg
Pictures/snap2.jpg
Pictures/snap3.jpg
Pictures/snap4.jpg
Pictures/snap5.jpg

sent 345 bytes  received 115 bytes  83.64 bytes/sec
total size is 0  speedup is 0.00

# 再次同步,确认增量传输的特性
[root@client ~ 14:49:12]# rsync -av Pictures root@server:
root@server's password:
sending incremental file list

sent 147 bytes  received 17 bytes  65.60 bytes/sec
total size is 0  speedup is 0.00

# 更新部分文件时间戳,再同步
[root@client ~]# touch Pictures/snap{1,2}*
[root@client ~]# rsync -av Pictures root@server:
sending incremental file list
Pictures/snap1.jpg
Pictures/snap2.jpg

sent 237 bytes  received 55 bytes  194.67 bytes/sec
total size is 0  speedup is 0.00

# 删除 SRC 中文件,默认不会同步删除DEST中文件 SRC源路径 DEST目标路径
[root@client ~]# rm -f Pictures/snap5.jpg
[root@client ~]# rsync -av Pictures root@server:
sending incremental file list
Pictures/

sent 145 bytes  received 20 bytes  330.00 bytes/sec
total size is 0  speedup is 0.00

# 使用选项 --delete 同步删除 DEST 中文件
[root@client ~]# rsync -av Pictures root@server: --delete
sending incremental file list
deleting Pictures/snap5.jpg

sent 146 bytes  received 39 bytes  370.00 bytes/sec
total size is 0  speedup is 0.00
将目标文件拉取到本地,操作过程一致。
同步注意事项:
- 文件访问时间等属性、读写等权限、文件内容等有任何变动,都会被认为修改。
- 目标目录下如果文件比源目录还新,则不会同步。
- 源路径的最后是否有斜杠有不同的含义:
- 有斜杠,只是复制目录中的文件。
- 没有斜杠的话,不但要复制目录中的文件,还要复制目录本身。
*项目实战:Rsync + Sersync 实现文件实时同步
客户端中数据发生变化,同步到backup端(备份服务器)。
实验需求
实时监控 webapp.laoma.cloud主机中文件变化,并同步到 backup.laoma.cloud。
-
Rsync:提供备份服务,部署在backup端。
-
Sersync:负责监控数据目录变化,并调用rsync进行同步,部署在webapp端。
文件配置如图:
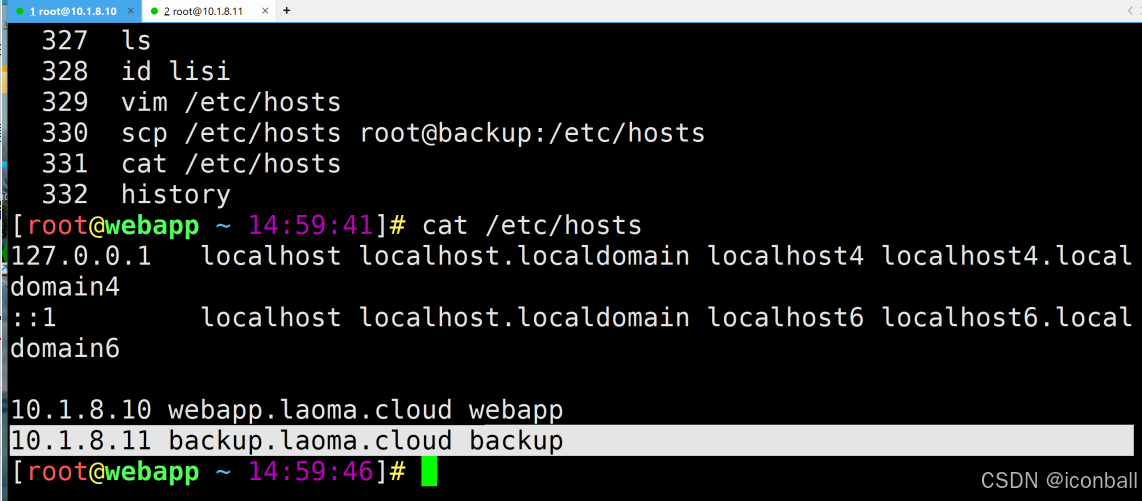
部署 Rsync 服务
安装软件包
[root@backup ~]# yum install -y rsync
配置 rsync
本次实验使用验证用户同步。
# 准备同步目录,该目录任何用户都可以读写。
[root@backup ~]# mkdir -m 777 /backup

# 配置rsync,不验证用户,直接同步
[root@backup ~]# vim /etc/rsyncd.conf
# 设置uid和gid,指定运行rsync服务的用户和组
uid=root
gid=root

# 添加如下配置
#备份块名称
[backup]
# 描述信息
comment = backup

# 备份路径
path = /backup

# 设置可写
read only = no

# 指定用户名
auth users = rsync

# 指定用户密码文件
secrets file = /etc/rsyncd.secrets
更多 rsyncd.conf 配置参考 rsyncd.conf(5)。
# 创建用户凭据文件
[root@backup ~]# echo 'rsync:redhat' > /etc/rsyncd.secrets
[root@backup ~]# chmod 400 /etc/rsyncd.secrets

# 启用并启动rsyncd服务
[root@backup ~]# systemctl enable rsyncd --now

# 配置防火墙,若显示未打开防火墙则跳过
#启动防火墙:systemctl start firewalld
[root@backup ~]# firewall-cmd --add-service=rsyncd
[root@backup ~]# firewall-cmd --add-service=rsyncd --permanent

# 关闭 selinux
[root@backup ~]# setenforce 0
客户端配置和测试
# 准备密码文件
[root@webapp ~]# echo redhat > rsyncd.secrets
[root@webapp ~]# chmod 400 rsyncd.secrets

# 传输测试
[root@webapp ~]# rsync -av --password-file=./rsyncd.secrets /etc/hostname rsync@backup::backup
sending incremental file list
hostname

sent 107 bytes  received 35 bytes  284.00 bytes/sec
total size is 17  speedup is 012
#rsync:同步工具主命令
#-av:选项组合
#-a:归档模式(递归同步并保留文件属性)
#-v:详细输出模式(显示同步过程)
#--password-file=./rsyncd.secrets:指定存放 rsync 服务密码的文件路径(避免手动输入密码,适合脚本自动化)
#/etc/hostname:本地要同步的源文件(这里是主机名配置文件)
#rsync@server::backup:远程目标位置
#rsync:远程 rsync 服务的认证用户名
#backup:远程服务器的主机名或 IP 地址
#::backup:远程 rsync 服务配置的共享模块名(backup 是模块名,对应服务器上的特定目录)模块区在配置文件中配置。

# 验证结果
[root@backup ~]# ls /backup/
hostname
部署 Sersync 服务
Sersync 服务介绍
sersync 使用c++编写,类似于inotify,同样用于监控,但它克服了inotify的缺点。
inotify 最大的不足是会产生重复事件,或者同一个目录下多个文件的操作会产生多个事件,例如,当监控目录中有5个文件时,删除目录时会产生6个监控事件,从而导致重复调用rsync命令。比如:vim文件时,inotify会监控到临时文件的事件,但这些事件相对于rsync来说是不应该被监控的。
sersync 优点:
- sersync 同步效率更高,它会对linux系统文件系统产生的临时文件和重复的文件操作进行过滤,节省了运行时耗和网络资源。
- sersync配置很简单,其中提供了静态编译好的二进制文件和xml配置文件,直接使用即可。
- sersync使用多线程进行同步,尤其在同步较大文件时,能够保证多个服务器实时保持同步状态。
- sersync有出错处理机制,通过失败队列对出错的文件重新同步,如果仍旧失败,则按设定时长对同步失败的文件重新同步。
- sersync自带crontab功能,只需在xml配置文件中开启,按要求隔一段时间整体同步一次。
- sersync 可以二次开发。
sersync项目地址:https://code.google.com/archive/p/sersync/
sersync下载地址:https://code.google.com/archive/p/sersync/downloads
安装软件包
# 下载软件
[root@webapp ~]# wget https://storage.googleapis.com/google-code-archive-downloads/v2/code.google.com/sersync/sersync2.5.4_64bit_binary_stable_final.tar.gz

# 解压文件
[root@webapp ~]# tar xf sersync2.5.4_64bit_binary_stable_final.tar.gz
[root@webapp ~]# ls GNU-Linux-x86/
confxml.xml  sersync2
文件说明:
- sersync2,是二进制程序。
- confxml.xml,是sersync2程序的配置文件。
配置 Sersync
配置文件说明
[root@webapp ~]# cat GNU-Linux-x86/confxml.xml
<?xml version="1.0" encoding="ISO-8859-1"?>
<head version="2.5">
    <!-- hostip与port是针对插件的保留字段,对于同步功能没有任何作用,保留默认即可。  -->
    <host hostip="localhost" port="8008"></host>

    <!-- 是否开启debug模式 -->
    <debug start="false"/>

    <!-- 如果是xfs文件系统,则需要设置为true才能同步,rehat/REEL/CentOS/Fedora新版本默认都是xfs文件系统,可使用df -Th命令查看 -->
    <fileSystem xfs="true"/>

    <!-- 过滤器,设置为true则会对里面的exclude对应的正则匹配到的文件进行过滤,即不同步 -->
    <filter start="true">
        <!-- <exclude expression="(.*)\.svn"></exclude> -->
        <!-- <exclude expression="(.*)\.gz"></exclude> -->
        <!-- <exclude expression="^info/*"></exclude> -->
        <!-- <exclude expression="^static/*"></exclude> -->
        <exclude expression="^cache/*"></exclude>
    </filter>

    <!-- inotify是linux的内核功能,这里用于设置创建/删除/修改/移动文件时,是否视为文件改变(进而进行同步) -->
    <inotify>
        <!-- 删除一个文件是否视为文件改变(很明显我们要设置为true) -->
        <delete start="false"/>
        <!-- 创建一个文件夹是否视为文件改变(很明显我们要设置为true) -->
        <createFolder start="true"/>
        <!-- 创建一个文件是否触发文件改变事件(这里要设置false,因为创建一个文件除了有createFile事件还会有closeWrite事件,我们只要把closeWrite事件设置为true即可监控到创建          一个文件) -->
        <createFile start="false"/>
        <!-- 创建文件或修改文件后再关闭会触发该事件,比如vim打开一个文件,修改后用(:wq)保存,则会触发该事件,当然创建新文件一样会触发 -->
        <closeWrite start="true"/>
        <!-- 从别的地方移到被监控目录是否视为文件改变,毫无疑问要设置为true -->
        <moveFrom start="true"/>
        <!-- 被监控目录中的某个文件被移动到其他地方算不算文件改变?毫无疑问要设置为true -->
        <moveTo start="true"/>
        <!-- 文件属性改变了,是否视为文件改变?这个我们可以认为文件没有改,所以设置false -->
        <attrib start="false"/>
        <!-- 文件内容被修改了是否视为文件改变?感觉文件改变肯定要设置为true,但其实不用,因为这个改变有可能是vim(:w)保存,还没有关闭文件,所以保存的时候没必要同步,而关闭的时候会触发closeWrite,所以修改的文件也是通过closeWrite来同步的 -->
        <modify start="false"/>
    </inotify>

    <!-- servsync的模块 -->
    <sersync>
        <!-- 指定要监控(即同步)的本地目录 -->
        <localpath watch="/data">
            <!-- ip指定同步到远程的哪个服务器,name填写远程服务器中rsync配置文件中的自定义模块名称(即中括号括起来的那个名称) -->
            <remote ip="10.1.8.10" name="laoma"/>
            <!-- 如果你要同步到多台服务器,继续填写即可,每个服务器一个remote标签 -->
            <!--<remote ip="192.168.8.40" name="tongbu"/>-->
        </localpath>

        <!-- rsync模块配置 -->
        <rsync>
            <!-- 公共参数,即我们手动执行rsync的时候要带的选项就填在这里,servsync会自动组装 -->
            <commonParams params="-azP"/>
            <!-- 密码文件及指定用户名(用户名就是rsync服务器端配置文件中的"auth user =" 指定的用户名) -->
            <auth start="true" users="rsync" passwordfile="/etc/rsyncd.secrets"/>
            <!-- 如果你rsync服务器不是默认端口873,那么就要在这里指定具体的端口,当然是默认的你也可以指定一下 -->
            <userDefinedPort start="false" port="873"/>
            <!-- rsync超时时间 -->
            <timeout start="false" time="100"/><!-- timeout=100 -->
            <!-- 是否使用ssh方式传输 -->
            <ssh start="false"/>
        </rsync>
        <!-- 对于失败的传输,会进行重新传送,再次失败就会写入rsync_fail_log,然后每隔一段时间(timeToExecute进行设置,单位sec)执行该脚本再次重新传送,然后清空该脚本。可以          通过path来设置日志路径。 -->
        <failLog path="/tmp/rsync_fail_log.sh" timeToExecute="60"/><!--default every 60mins execute once-->

        <!-- 定期整体同步功能,schedule表示crontab执行间隔,单位是min -->
        <crontab start="false" schedule="600"><!--600mins-->
            <!-- 同步过滤器,要开启请把start设置为true,用于 整体同步时,排除一些文件或目录,比如缓存目录可以不需要同步 -->
            <crontabfilter start="false">
                <exclude expression="*.php"></exclude>
                <exclude expression="info/*"></exclude>
            </crontabfilter>
        </crontab>
        <!-- 同步完成后,执行一个插件,name表示执行哪些插件,而这个插件必须在后边用plugin标签定义 -->
        <plugin start="false" name="command"/>
    </sersync>

    <!-- 定义一个command插件(command插件类型的一种,另外的类型有socket,refreshCDN,http(目前由于兼容性问题,http插件暂时不能用)) -->
    <plugin name="command">
        <!-- command插件其实就是“.sh”结尾的shell脚本文件,prefix和subffix用于拼成一条执行shell命令的命令 -->
        <param prefix="/bin/sh" suffix="" ignoreError="true"/>  <!--prefix /data/wwwroot/mmm.sh suffix-->
        <!-- 该脚本做操作时要过滤的文件正则 -->
        <filter start="false">
            <include expression="(.*)\.php"/>
            <include expression="(.*)\.sh"/>
        </filter>
    </plugin>

    <!-- 定义一个socket插件,注意插件定义了但没有调用的话,是不会被执行的 -->
    <plugin name="socket">
        <localpath watch="/data">
            <deshost ip="192.168.138.20" port="8009"/>
        </localpath>
    </plugin>

    <!-- 定义一个refreshCDN插件,主要用于同步数据到cdn -->
    <plugin name="refreshCDN">
        <localpath watch="/data0/htdocs/cms.xoyo.com/site/">
            <cdninfo domainname="ccms.chinacache.com" port="80" username="xxxx" passwd="xxxx"/>
            <sendurl base="http://pic.xoyo.com/cms"/>
            <regexurl regex="false" match="cms.xoyo.com/site([/a-zA-Z0-9]*).xoyo.com/images"/>
        </localpath>
    </plugin>
</head>
配置文件示例
本次实验使用的示例文件。
[root@webapp ~]# vim confxml.xml
<?xml version="1.0" encoding="ISO-8859-1"?>
<head version="2.5">
    <host hostip="localhost" port="8008"></host>
    <debug start="false"/>
    <fileSystem xfs="true"/>
    <filter start="true">
        <exclude expression="^cache/*"></exclude>
    </filter>
    <inotify>
        <delete start="true"/>
        <createFolder start="true"/>
        <createFile start="false"/>
        <closeWrite start="true"/>
        <moveFrom start="true"/>
        <moveTo start="true"/>
        <attrib start="true"/>
        <modify start="true"/>
    </inotify>
    <sersync>
        <localpath watch="/app_data">
            <remote ip="10.1.8.10" name="backup"/>
        </localpath>
        <rsync>
            <commonParams params="-azP"/>
            <auth start="true" users="rsync" passwordfile="/root/rsyncd.secrets"/>
            <userDefinedPort start="false" port="873"/>
            <timeout start="false" time="100"/>
            <ssh start="false"/>
        </rsync>
        <failLog path="/tmp/rsync_fail_log.sh" timeToExecute="60"/>
        <crontab start="false" schedule="600"><!--600mins-->
            <crontabfilter start="false">
                <exclude expression="*.php"></exclude>
                <exclude expression="info/*"></exclude>
            </crontabfilter>
        </crontab>
        <plugin start="false" name="command"/>
    </sersync>
    <plugin name="command">
        <param prefix="/bin/sh" suffix="" ignoreError="true"/>
        <filter start="false">
            <include expression="(.*)\.php"/>
            <include expression="(.*)\.sh"/>
        </filter>
    </plugin>
</head>
运行 Sersync
# 准备同步目录
[root@webapp ~]# mkdir /app_data

# 复制程序到$PATH中
[root@webapp ~]# cp GNU-Linux-x86/sersync2 /usr/local/bin/

[root@webapp ~]# sersync2 -h
set the system param
execute:echo 50000000 > /proc/sys/fs/inotify/max_user_watches
execute:echo 327679 > /proc/sys/fs/inotify/max_queued_events
parse the command param
_______________________________________________________
参数-d:启用守护进程模式
参数-r:在监控前,将监控目录与远程主机用rsync命令推送一遍
参数-n: 指定开启守护线程的数量,默认为10个
参数-o:指定配置文件,默认使用confxml.xml文件
参数-m:单独启用其他模块,使用 -m refreshCDN 开启刷新CDN模块
参数-m:单独启用其他模块,使用 -m socket 开启socket模块
参数-m:单独启用其他模块,使用 -m http 开启http模块
不加-m参数,则默认执行同步程序________________________________________________________________

# 运行 Sersync
[root@webapp ~]# sersync2 -o ./confxml.xml -d
set the system param
execute:echo 50000000 > /proc/sys/fs/inotify/max_user_watches
execute:echo 327679 > /proc/sys/fs/inotify/max_queued_events
parse the command param
option: -o 	config xml name:  confxml.xml
option: -d 	run as a daemon
daemon thread num: 10
parse xml config file
host ip : localhost	host port: 8008
now the filter work ,if you set the crontab,you have to set crontab filter
WARNING XFS FILE SYSTEM WORK
daemon start,sersync run behind the console
use rsync password-file :
user is	rsync
passwordfile is 	/root/rsyncd.secrets
config xml parse success
please set /etc/rsyncd.conf max connections=0 Manually
sersync working thread 12  = 1(primary thread) + 1(fail retry thread) + 10(daemon sub threads)
Max threads numbers is: 22 = 12(Thread pool nums) + 10(Sub threads)
please according your cpu ,use -n param to adjust the cpu rate
run the sersync:
watch path is: /app_data
测试
# server 端监控目录 /backup
[root@backup ~]# watch -n 1 tree /backup

# 客户端创建文件和目录
[root@webapp ~]# echo hello world > /app_data/welcome.txt
[root@webapp ~]# mkdir /app_data/dbdata

# 客户端删除文件
[root@webapp ~]# rm -fr /app_data/*
配置 systemd 管理 Sersync
[root@webapp ~]# cp confxml.xml /etc/sersyncd.conf
[root@webapp ~]# vim /etc/systemd/system/sersyncd.service
[Unit]
Description=SerSync server daemon

[Service]
Type=forking
ExecStart=/usr/local/bin/sersync2 -o /etc/sersyncd.conf -d

[Install]
WantedBy=multi-user.target

[root@webapp ~]# systemctl daemon-reload
[root@webapp ~]# systemctl enable sersyncd.service
adjust the cpu rate
run the sersync:
watch path is: /app_data
#### 测试

```bash
# server 端监控目录 /backup
[root@backup ~]# watch -n 1 tree /backup

# 客户端创建文件和目录
[root@webapp ~]# echo hello world > /app_data/welcome.txt
[root@webapp ~]# mkdir /app_data/dbdata

# 客户端删除文件
[root@webapp ~]# rm -fr /app_data/*
配置 systemd 管理 Sersync
[root@webapp ~]# cp confxml.xml /etc/sersyncd.conf
[root@webapp ~]# vim /etc/systemd/system/sersyncd.service
[Unit]
Description=SerSync server daemon

[Service]
Type=forking
ExecStart=/usr/local/bin/sersync2 -o /etc/sersyncd.conf -d

[Install]
WantedBy=multi-user.target

[root@webapp ~]# systemctl daemon-reload
[root@webapp ~]# systemctl enable sersyncd.service

码道开发者社区,聚焦华为云码道 CodeArts 代码智能体,沉淀 Agent、Skill、鸿蒙开发实战内容,供开发者查阅资料、交流技术、分享工程实践
更多推荐



 25
25 0
0- 0


 已为社区贡献20条内容

所有评论(0)