大数据(二):修改IP和主机名,配置SSH免密登录
·
大数据集群已经修改完了,还剩两个任务,就是把IP修改为老师分配的IP,把主机名修改为文档里要求的主机名。
修改目标是这样的
| IP名 | 主机名 | 资源分配 |
|---|---|---|
| 192.168.174.10 | centos01 | SecondaryNameNode NodeManager DataNode NameNode ResourceManager Jps |
| 192.168.174.11 | centos02 | NodeManager DataNode JPS |
| 192.168.174.12 | centos03 | NodeManager DataNode JPS |
本来计划先改IP再动主机名,现在看来是不行了,只能先动主机名
day0921修改
一 修改IP
[root@centos7-1 system-connections]# vi /etc/sysconfig/network-scripts/ifcfg-ens33
您在 /var/spool/mail/root 中有新邮件
[root@centos7-1 system-connections]#
[root@centos7-1 system-connections]#
[root@centos7-1 system-connections]# ll
总用量 0
[root@centos7-1 system-connections]# ip addr
1: lo: <LOOPBACK,UP,LOWER_UP> mtu 65536 qdisc noqueue state UNKNOWN group default qlen 1000
    link/loopback 00:00:00:00:00:00 brd 00:00:00:00:00:00
    inet 127.0.0.1/8 scope host lo
       valid_lft forever preferred_lft forever
    inet6 ::1/128 scope host
       valid_lft forever preferred_lft forever
2: ens33: <BROADCAST,MULTICAST,UP,LOWER_UP> mtu 1500 qdisc pfifo_fast state UP group default qlen 1000
    link/ether 00:0c:29:73:43:2b brd ff:ff:ff:ff:ff:ff
    inet 192.168.80.131/24 brd 192.168.80.255 scope global noprefixroute ens33
       valid_lft forever preferred_lft forever
    inet6 fe80::2fb2:c311:ef52:18bd/64 scope link noprefixroute
       valid_lft forever preferred_lft forever
[root@centos7-1 system-connections]#
重启网卡
二 存在问题
2.1 加网段失败
改成174段为NAT模式后,就连不上外网了
我本来以为可以加多个NAT进来,结果不是的,gpt说的也是错的
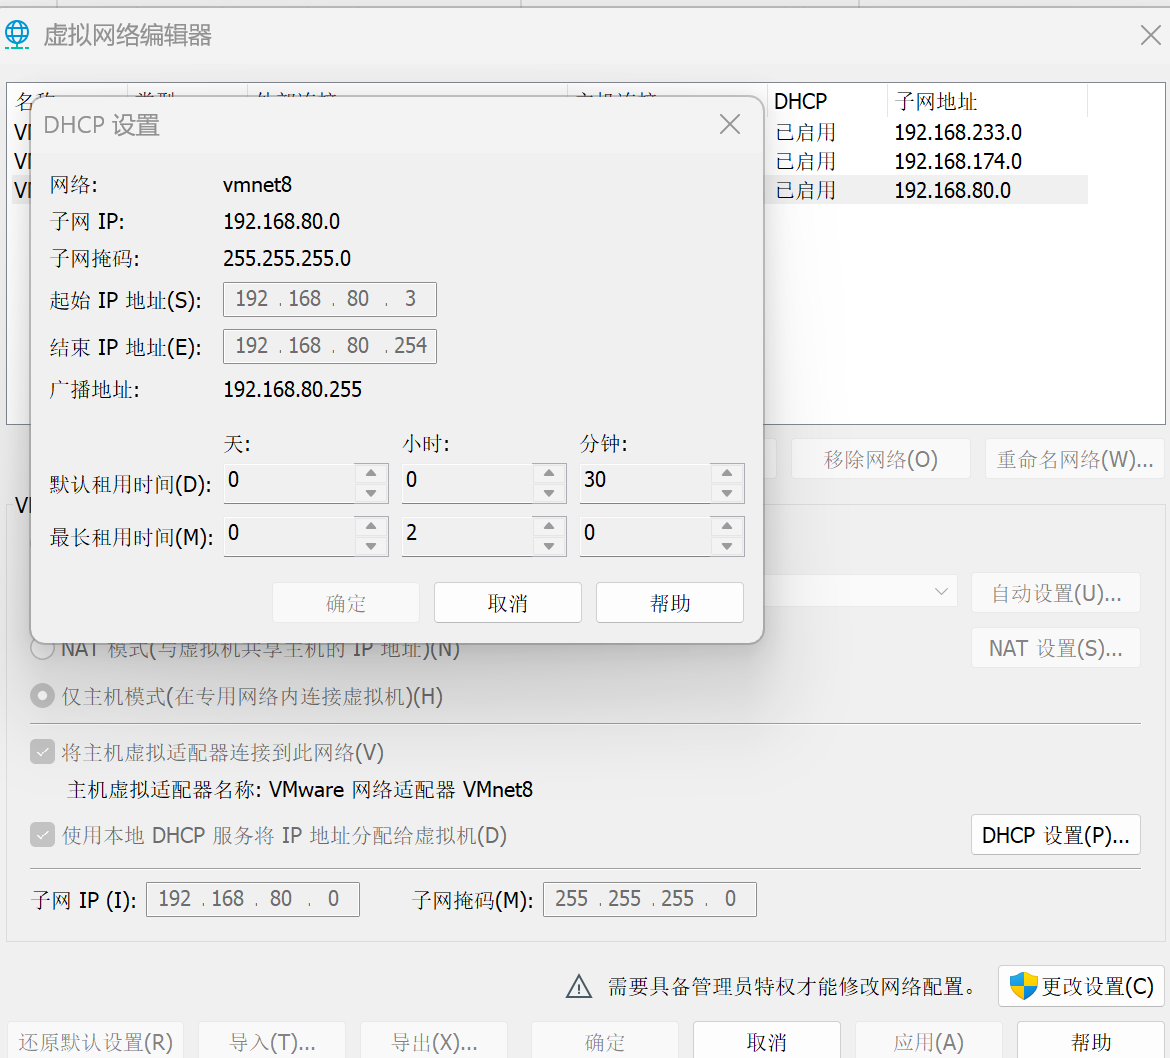
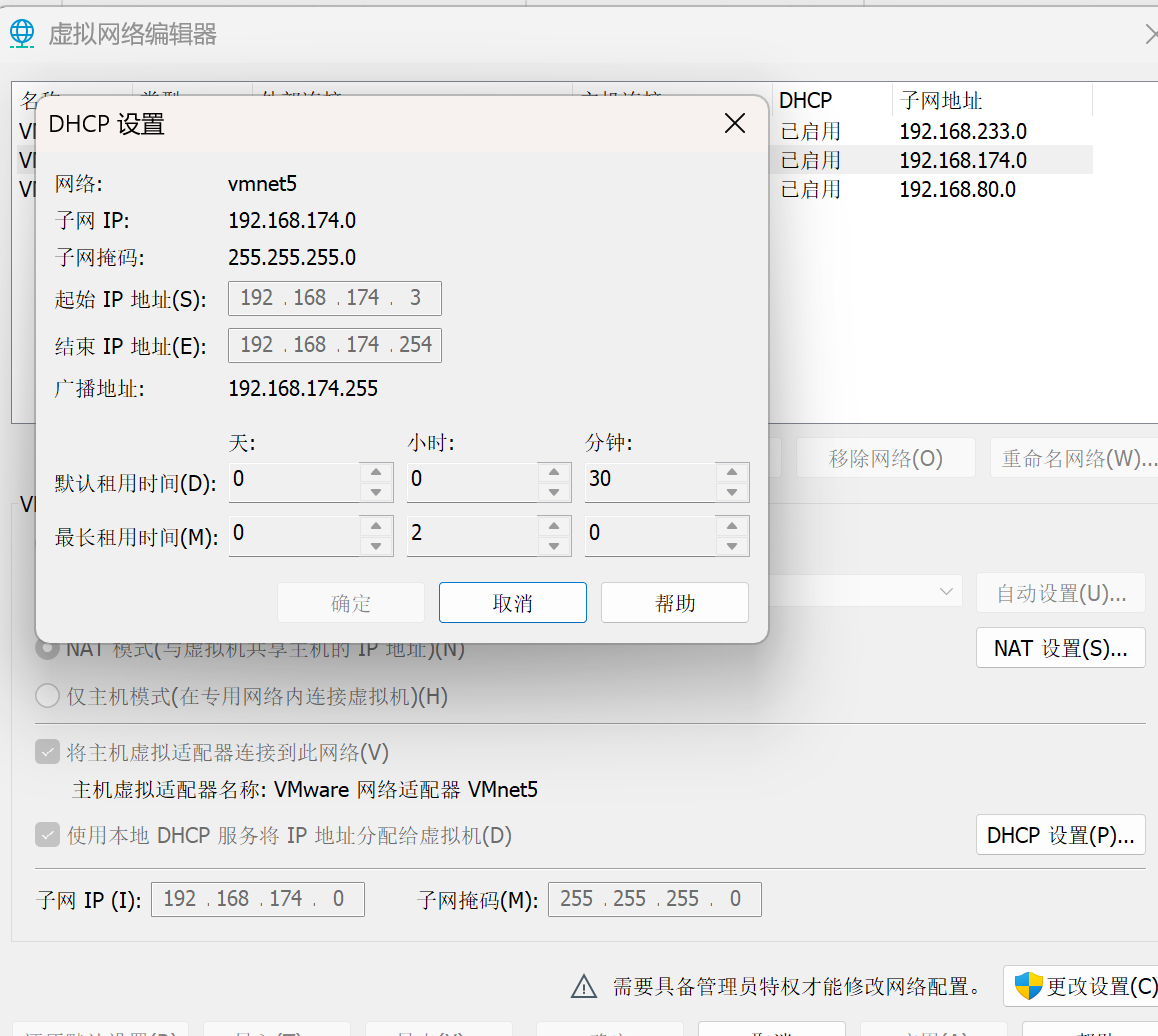
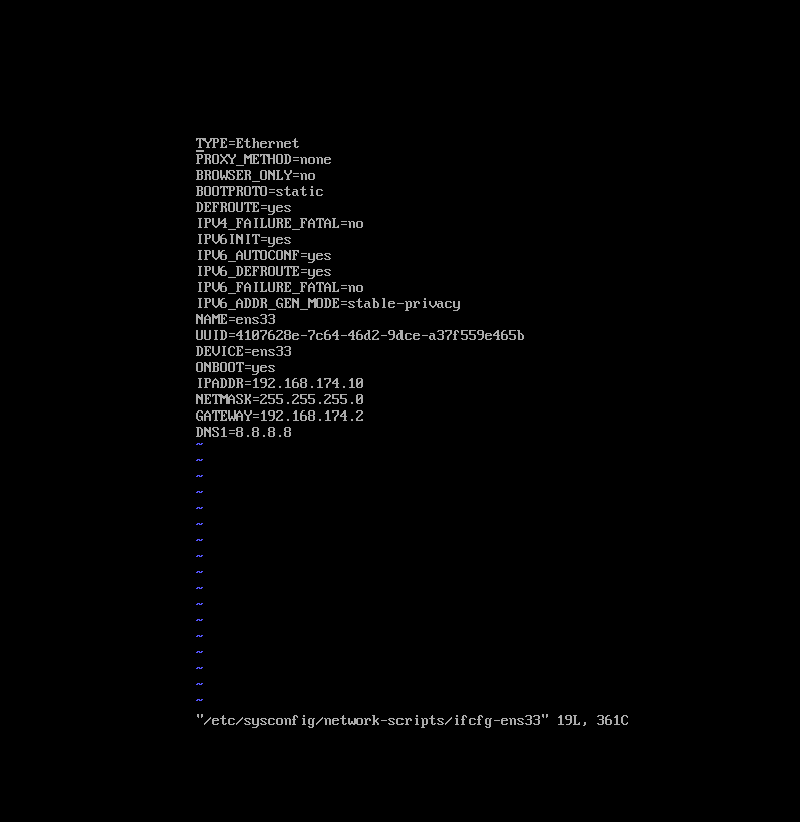
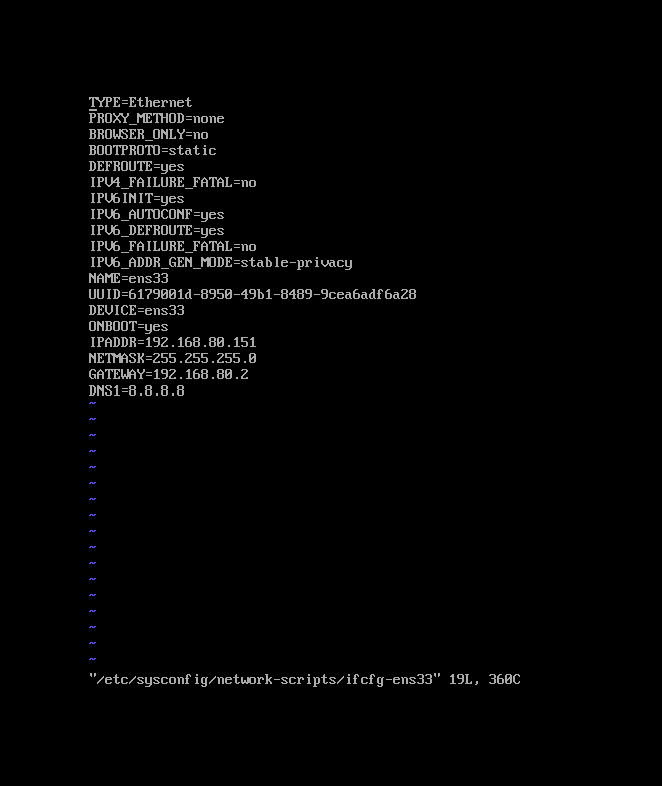
2.2 80和174对比
80段是这样的
174段是这样的
对比网卡配置
三 不清楚原因
还原huiqu
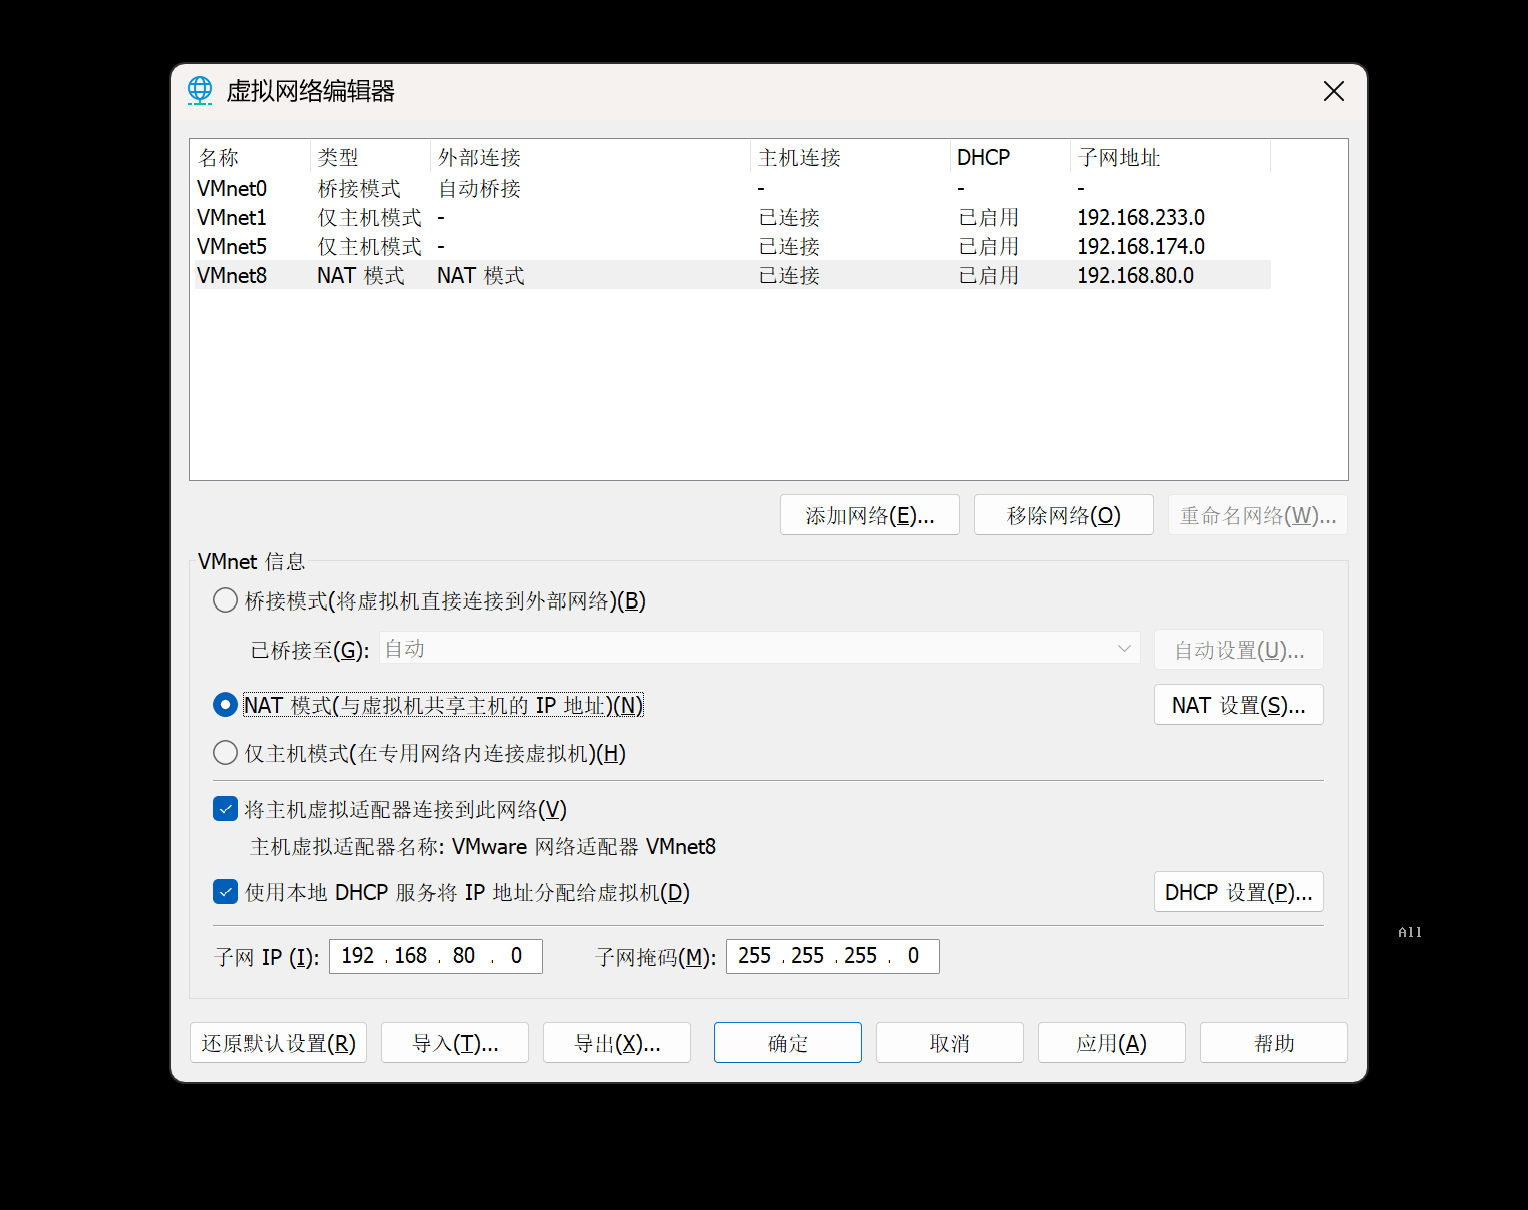
四 移除后连上去了
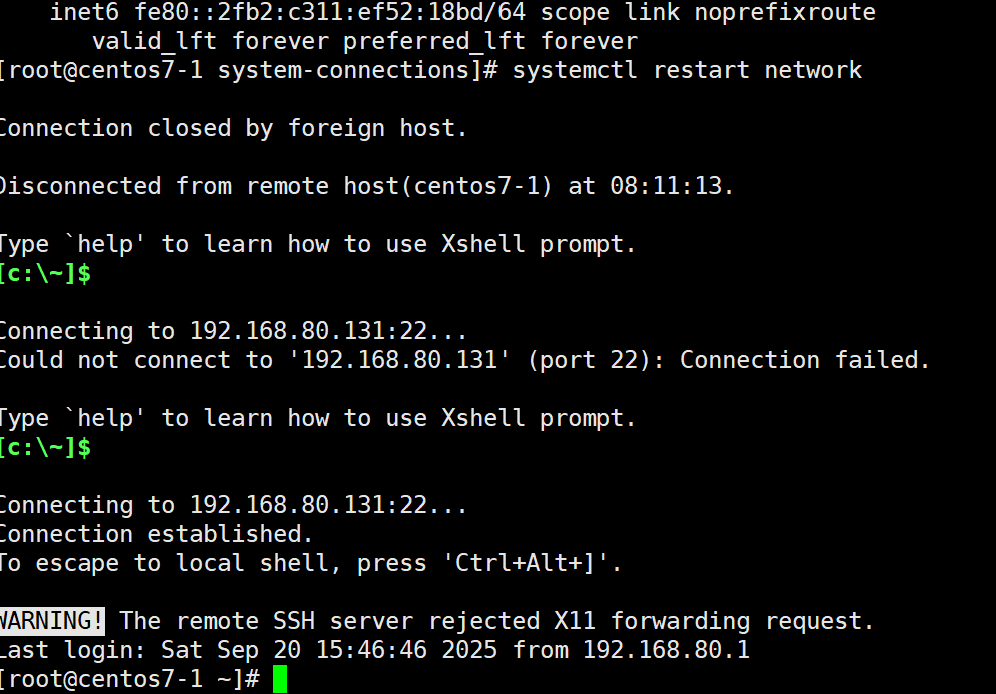
还原这个配置,第一次操作失败,删除掉新增的网卡,浪费了很多时间啊
day0922修改计划
一 修改计划
1.1 首先克隆出131这一台,再根据131这台克隆出两台

          +-----------------+
          |   VM 131 原机    |
          +-----------------+
                    |
                    | 克隆出
                    v
          +-----------------+
          |   VM 132 克隆    |
          +-----------------+
                    |
        -------------------------
        |                       |
        v                       v
+-----------------+     +-----------------+
|   VM 133 克隆    |     |   VM 134 克隆    |
+-----------------+     +-----------------+
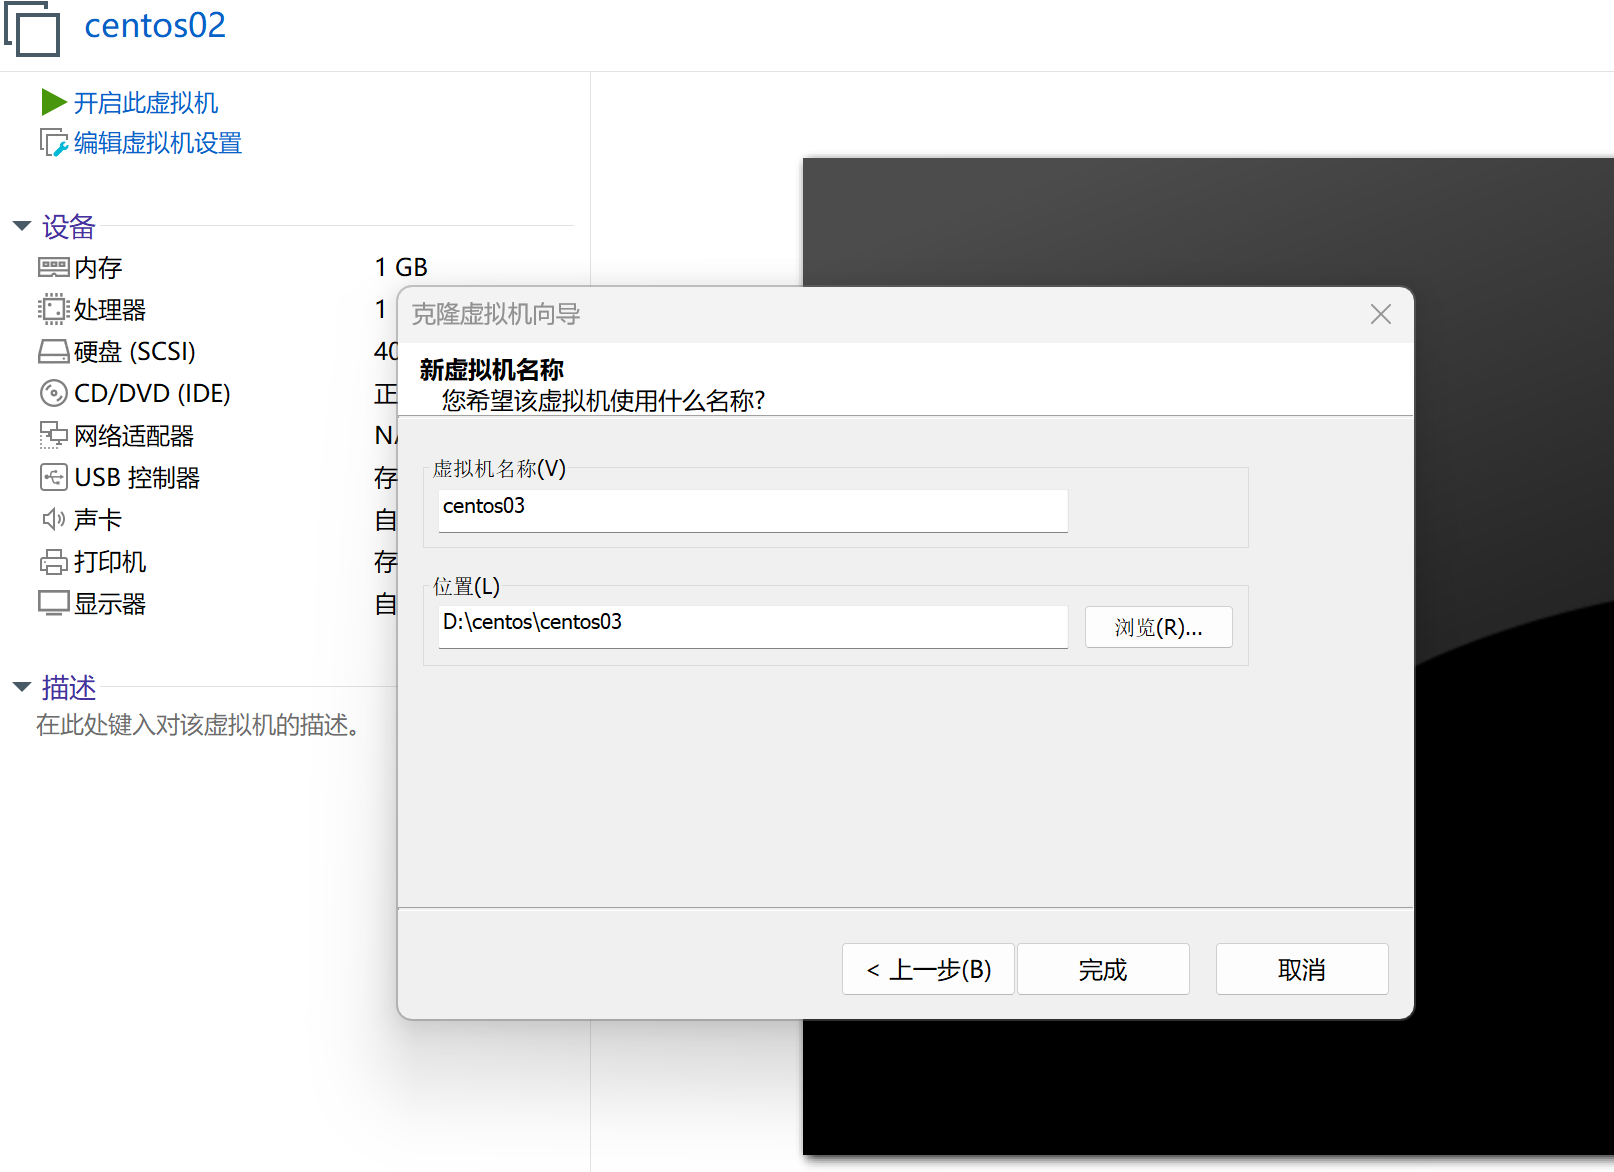
1.2 修改这三台的IP,暂时定位231,232,233
映射关系
| 旧机器 | 新机器 |
|---|---|
| 131 | 231 |
| 132 | 232 |
| 132 | 233 |
| 编辑网卡 |
vim /etc/sysconfig/network-scripts/ifcfg-ens33
重启网卡
systemctl restart network
1.3 修改这三台的主机名,已经定位centos01、centos02、centos03
hostnamectl set-hostname centos01
映射关系
| 旧机器 | 新机器 |
|---|---|
| centos7-1 | centos01 |
| centos7-2 | centos02 |
| centos7-3 | centos03 |
修改完后验证
hostname
1.4 修改主机IP映射
映射关系
| 旧机器 | 新机器 |
|---|---|
| centos7-1 | centos01 |
| centos7-2 | centos02 |
| centos7-3 | centos03 |
在三个节点上执行这个主机间的IP映射关系
vim /etc/hosts
替换掉之前的131和7-1,以此类推
在hosts文件中加入
127.0.0.1   localhost localhost.localdomain localhost4 localhost4.localdomain4
::1         localhost localhost.localdomain localhost6 localhost6.localdomain6
192.168.80.231 centos01
192.168.80.232 centos02
192.168.80.233 centos03
访问一下本地的IP
ping centos01
ping centos02
ping centos03
在cenos01到centos03上分别ping虚机
[root@centos7-1 ~]# ping centos03
PING centos03 (192.168.80.233) 56(84) bytes of data.
64 bytes from centos03 (192.168.80.233): icmp_seq=1 ttl=64 time=0.024 ms
64 bytes from centos03 (192.168.80.233): icmp_seq=2 ttl=64 time=0.042 ms
64 bytes from centos03 (192.168.80.233): icmp_seq=3 ttl=64 time=0.048 ms
64 bytes from centos03 (192.168.80.233): icmp_seq=4 ttl=64 time=0.069 ms
64 bytes from centos03 (192.168.80.233): icmp_seq=5 ttl=64 time=0.045 ms
64 bytes from centos03 (192.168.80.233): icmp_seq=6 ttl=64 time=0.046 ms
64 bytes from centos03 (192.168.80.233): icmp_seq=7 ttl=64 time=0.045 ms
64 bytes from centos03 (192.168.80.233): icmp_seq=8 ttl=64 time=0.042 ms
64 bytes from centos03 (192.168.80.233): icmp_seq=9 ttl=64 time=0.067 ms
64 bytes from centos03 (192.168.80.233): icmp_seq=10 ttl=64 time=0.271 ms
64 bytes from centos03 (192.168.80.233): icmp_seq=11 ttl=64 time=0.303 ms
64 bytes from centos03 (192.168.80.233): icmp_seq=12 ttl=64 time=0.046 ms
如果想网页登录
需要修改windows的host
C:\Windows\System32\drivers\etc
为了能够直接在网页上就可以访问
192.168.168.231 centos01
192.168.168.232 centos02
192.168.168.233 centos03
1.6 修改SSH免密登录
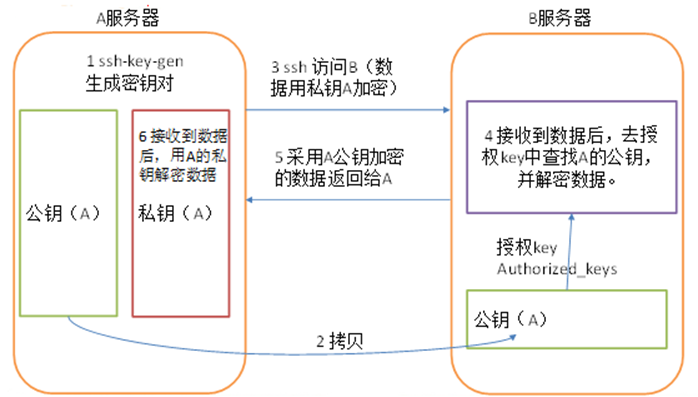
ssh-copy-id命令可以把本地主机的公钥复制并追加到远程主机的authorized_keys文件中,ssh-copy-id命令也会给远程主机的用户主目录(home)和~/.ssh, 和~/.ssh/authorized_keys设置合适的权限。
(1)分别在三个节点中执行以下命令,生成秘钥文件:
cd ~/.ssh/                     # 若没有该目录,请先执行一次ssh localhost
ssh-keygen -t rsa              # 生成秘钥文件,会有提示,都按回车就可以
(2)分别在三个节点中执行以下命令,将公钥信息拷贝并追加到对方节点的授权文件authorized_keys中:
ssh-copy-id centos01
ssh-copy-id centos02
ssh-copy-id centos03
每个都执行一遍
[root@centos7-1 .ssh]# ssh-copy-id centos01
/usr/bin/ssh-copy-id: INFO: Source of key(s) to be installed: "/root/.ssh/id_rsa.pub"
The authenticity of host 'centos01 (192.168.80.231)' can't be established.
ECDSA key fingerprint is SHA256:qyzytSH9MMPtwn6oVmueFHd5kcxxgp/oX7Q8CoOoJcU.
ECDSA key fingerprint is MD5:05:86:b7:c9:80:f6:fe:86:8f:c4:db:46:93:56:46:eb.
Are you sure you want to continue connecting (yes/no)? yes
/usr/bin/ssh-copy-id: INFO: attempting to log in with the new key(s), to filter out any that are already installed
/usr/bin/ssh-copy-id: INFO: 1 key(s) remain to be installed -- if you are prompted now it is to install the new keys
root@centos01's password:

Number of key(s) added: 1

Now try logging into the machine, with:   "ssh 'centos01'"
and check to make sure that only the key(s) you wanted were added.

您在 /var/spool/mail/root 中有新邮件
[root@centos7-1 .ssh]# ssh-copy-id centos02
/usr/bin/ssh-copy-id: INFO: Source of key(s) to be installed: "/root/.ssh/id_rsa.pub"
The authenticity of host 'centos02 (192.168.80.232)' can't be established.
ECDSA key fingerprint is SHA256:qyzytSH9MMPtwn6oVmueFHd5kcxxgp/oX7Q8CoOoJcU.
ECDSA key fingerprint is MD5:05:86:b7:c9:80:f6:fe:86:8f:c4:db:46:93:56:46:eb.
Are you sure you want to continue connecting (yes/no)? yes
/usr/bin/ssh-copy-id: INFO: attempting to log in with the new key(s), to filter out any that are already installed
/usr/bin/ssh-copy-id: INFO: 1 key(s) remain to be installed -- if you are prompted now it is to install the new keys
root@centos02's password:

Number of key(s) added: 1

Now try logging into the machine, with:   "ssh 'centos02'"
and check to make sure that only the key(s) you wanted were added.

[root@centos7-1 .ssh]# ssh-copy-id centos03
/usr/bin/ssh-copy-id: INFO: Source of key(s) to be installed: "/root/.ssh/id_rsa.pub"
The authenticity of host 'centos03 (192.168.80.233)' can't be established.
ECDSA key fingerprint is SHA256:qyzytSH9MMPtwn6oVmueFHd5kcxxgp/oX7Q8CoOoJcU.
ECDSA key fingerprint is MD5:05:86:b7:c9:80:f6:fe:86:8f:c4:db:46:93:56:46:eb.
Are you sure you want to continue connecting (yes/no)? yes
/usr/bin/ssh-copy-id: INFO: attempting to log in with the new key(s), to filter out any that are already installed
/usr/bin/ssh-copy-id: INFO: 1 key(s) remain to be installed -- if you are prompted now it is to install the new keys
root@centos03's password:

Number of key(s) added: 1

Now try logging into the machine, with:   "ssh 'centos03'"
and check to make sure that only the key(s) you wanted were added.

[root@centos7-1 .ssh]#
最后测试SSH无秘钥登录。
[root@centos7-1 .ssh]# ssh-copy-id centos03
/usr/bin/ssh-copy-id: INFO: Source of key(s) to be installed: "/root/.ssh/id_rsa.pub"
The authenticity of host 'centos03 (192.168.80.233)' can't be established.
ECDSA key fingerprint is SHA256:qyzytSH9MMPtwn6oVmueFHd5kcxxgp/oX7Q8CoOoJcU.
ECDSA key fingerprint is MD5:05:86:b7:c9:80:f6:fe:86:8f:c4:db:46:93:56:46:eb.
Are you sure you want to continue connecting (yes/no)? yes
/usr/bin/ssh-copy-id: INFO: attempting to log in with the new key(s), to filter out any that are already installed
/usr/bin/ssh-copy-id: INFO: 1 key(s) remain to be installed -- if you are prompted now it is to install the new keys
root@centos03's password:

Number of key(s) added: 1

Now try logging into the machine, with:   "ssh 'centos03'"
and check to make sure that only the key(s) you wanted were added.

[root@centos7-1 .ssh]#
day0923 修改NAT网卡成功
直接把80段替换成174段,这样就能直接访问上去了

码道开发者社区,聚焦华为云码道 CodeArts 代码智能体,沉淀 Agent、Skill、鸿蒙开发实战内容,供开发者查阅资料、交流技术、分享工程实践
更多推荐



 3
3 0
0- 0


 已为社区贡献12条内容

所有评论(0)