Docker部署 MySQL+Mycat
一、到docker镜像仓库获取镜像信息
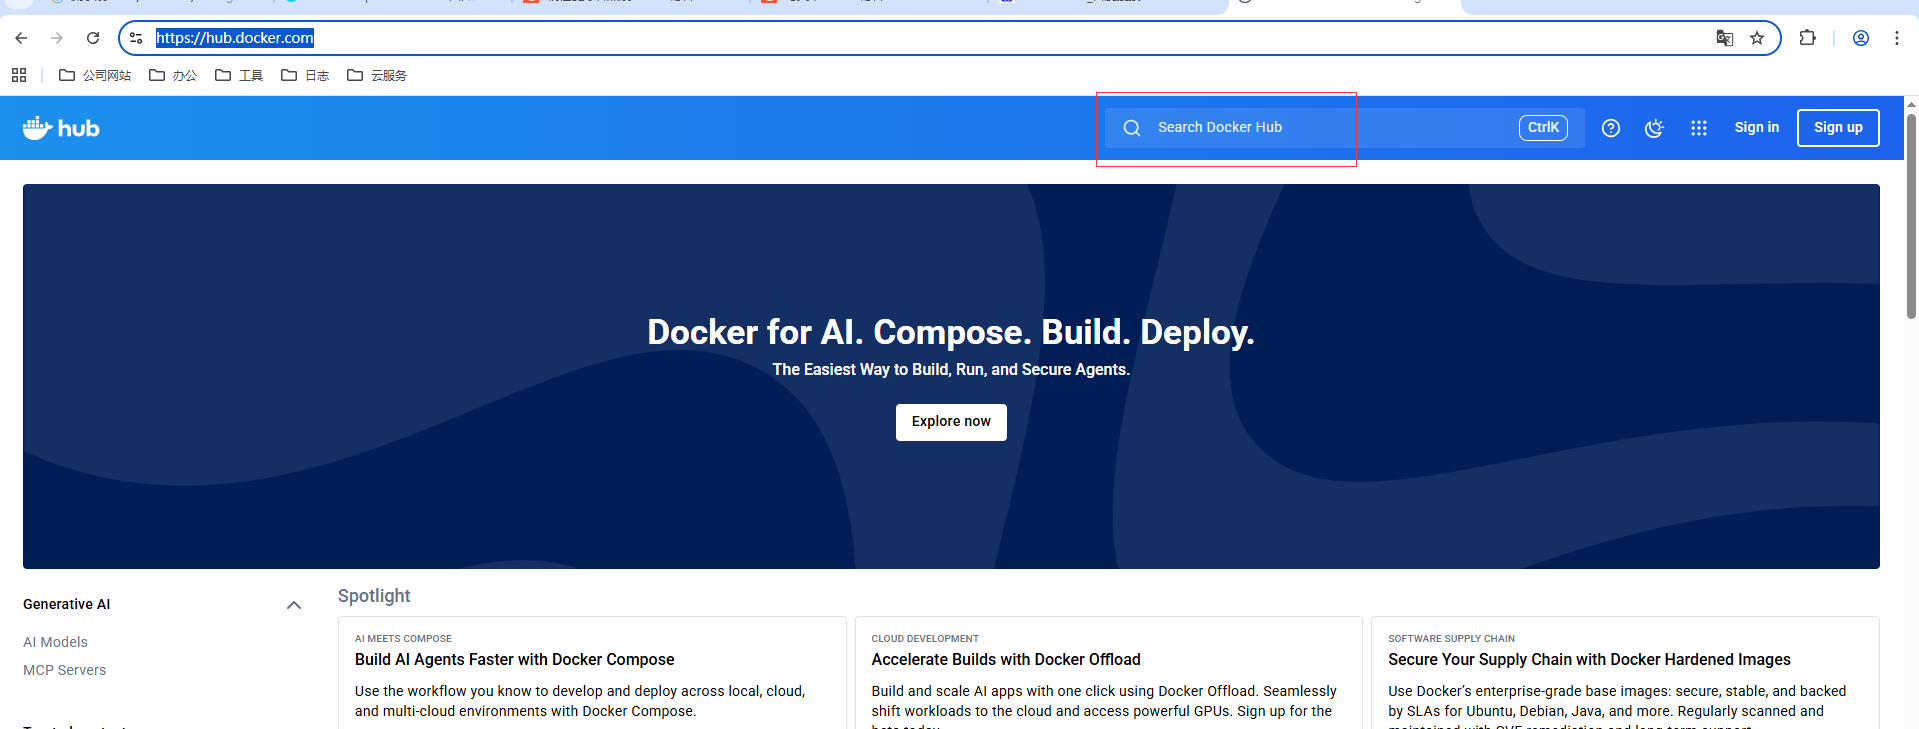
国内打不开,就直接用下面的docker-compose,看看能否下载,能下载也OK。
二、编写docker-compose文件
vim docker-compose.yml
确定3306、8066、9066端口是否被占用,被占用,映射别的端口,不用安装mysql,用别的mysql可以删除,之后通过mycat配置mysql。
version: '3.8'

services:
  mysql:
    image: mysql:5.7.41
    container_name: mysql
    environment:
      MYSQL_ROOT_PASSWORD: jimi@123
      MYSQL_DATABASE: his
    ports:
      - "3306:3306"
    volumes:
      #挂载盘路径自己修改
      - /data/mysql/data:/var/lib/mysql
      - /data/mysql/conf/mysql.cnf:/etc/mysql/conf.d/my.cnf
    networks:
      - mycat-net

  mycat:
    image: manondidi/mycat:latest
    container_name: mycat
    ports:
      - "8066:8066"   # 应用连接端口
      - "9066:9066"   # 管理端口
    environment:
      - "TZ=UTC" # 时区信息,可以自己修改
    privileged: true
    volumes:
     #挂载盘路径自己修改
     - /data/mycat/conf:/usr/local/mycat/conf
     - /data/mycat/logs:/usr/local/mycat/logs
    depends_on:
      - mysql
    networks:
      - mycat-net

networks:
  mycat-net:
    driver: bridge
第一次启动,不要挂载 - /data/mycat/conf:/usr/local/mycat/conf,它会覆盖配置文件导致启动失败;
docker-compose -f docker-compose.yml up -d
第三步、登录容器mycat,把配置信息复制到 /usr/local/mycat/logs/文件夹下面
docker exec -it mycat /bin/bash
cp -r /usr/local/mycat/conf /usr/local/mycat/logs/
退出容器,移动文件到 /data/mycat
cd /data/mycat/logs
mv /data/mycat/logs/conf ./
第四步、登录mysql,修改root可以远程连接,否则连接错误
docker exec -it mysql /bin/bash
#登录mysql
mysql -u root -p
-- 允许 root 用户从任意主机远程连接(不推荐用于生产)
GRANT ALL PRIVILEGES ON *.* TO 'root'@'%' IDENTIFIED BY '你的密码' WITH GRANT OPTION;
#刷新
FLUSH PRIVILEGES;
重启docker-compose
docker-compose -f docker-compose.yml stop
docker-compose -f docker-compose.yml up -d
启动成功,就表示正常部署了mysql+mycat。
第五步、调整mycat配置文件(重要)
cd /data/mycat/conf
主要是5个文件,建议下载到本地修改
server.xml、schema.xml、rule.xml、partition-range-mod.txt、auto-sharding-rang-mod.txt,后面两个文件错误,需要修改,并且它的分片数量必须要小于等于schema.xml中的dataNode数量
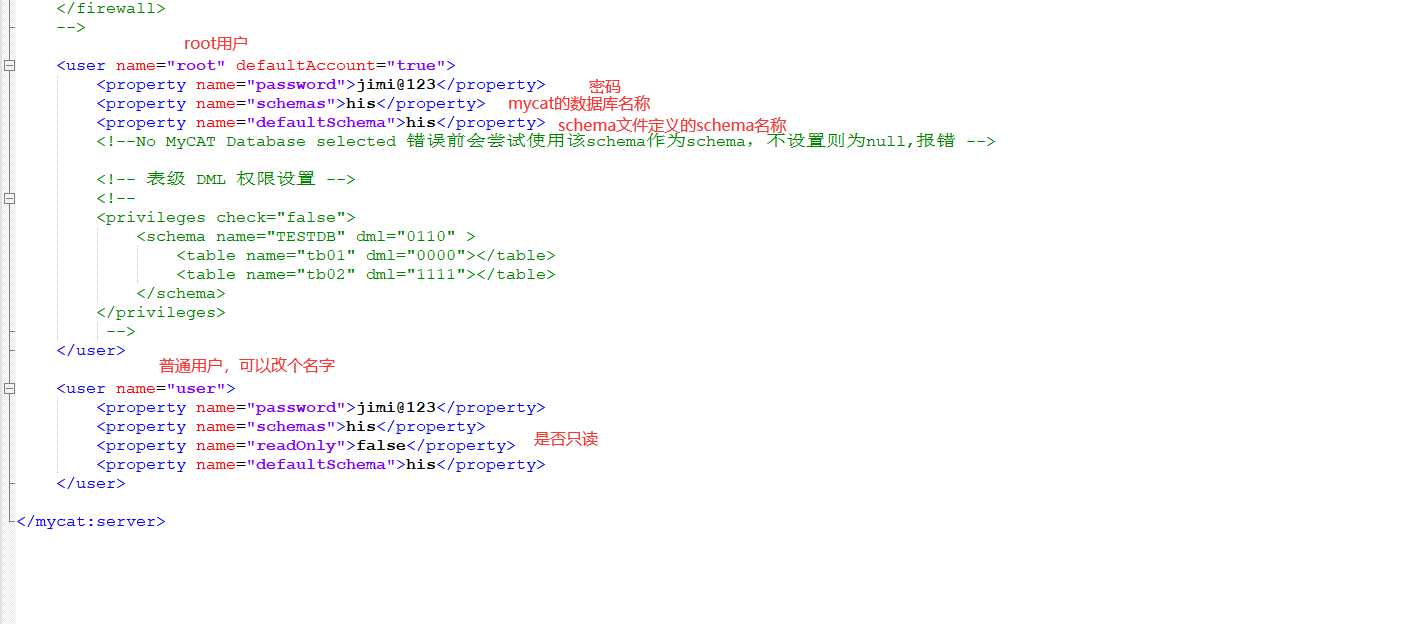
server.xml
主要设置mycat的用户名密码,一个root用户一个普通用户
<?xml version="1.0" encoding="UTF-8"?>
<!-- - - Licensed under the Apache License, Version 2.0 (the "License");
	- you may not use this file except in compliance with the License. - You
	may obtain a copy of the License at - - http://www.apache.org/licenses/LICENSE-2.0
	- - Unless required by applicable law or agreed to in writing, software -
	distributed under the License is distributed on an "AS IS" BASIS, - WITHOUT
	WARRANTIES OR CONDITIONS OF ANY KIND, either express or implied. - See the
	License for the specific language governing permissions and - limitations
	under the License. -->
<!DOCTYPE mycat:server SYSTEM "server.dtd">
<mycat:server xmlns:mycat="http://io.mycat/">
	<system>
	<property name="nonePasswordLogin">0</property> <!-- 0为需要密码登陆、1为不需要密码登陆 ,默认为0,设置为1则需要指定默认账户-->
	<property name="ignoreUnknownCommand">0</property><!-- 0遇上没有实现的报文(Unknown command:),就会报错、1为忽略该报文,返回ok报文。
	在某些mysql客户端存在客户端已经登录的时候还会继续发送登录报文,mycat会报错,该设置可以绕过这个错误-->
	<property name="useHandshakeV10">1</property>
    <property name="removeGraveAccent">1</property>
	<property name="useSqlStat">0</property>  <!-- 1为开启实时统计、0为关闭 -->
	<property name="useGlobleTableCheck">0</property>  <!-- 1为开启全加班一致性检测、0为关闭 -->
	<property name="sqlExecuteTimeout">300</property>  <!-- SQL 执行超时 单位:秒-->
		<property name="sequenceHandlerType">1</property>
	<!--<property name="sequnceHandlerPattern">(?:(\s*next\s+value\s+for\s*MYCATSEQ_(\w+))(,|\)|\s)*)+</property>
	INSERT INTO `travelrecord` (`id`,user_id) VALUES ('next value for MYCATSEQ_GLOBAL',"xxx");
	-->
	<!--必须带有MYCATSEQ_或者 mycatseq_进入序列匹配流程 注意MYCATSEQ_有空格的情况-->
	<property name="sequnceHandlerPattern">(?:(\s*next\s+value\s+for\s*MYCATSEQ_(\w+))(,|\)|\s)*)+</property>
	<property name="subqueryRelationshipCheck">false</property> <!-- 子查询中存在关联查询的情况下,检查关联字段中是否有分片字段 .默认 false -->
	<property name="sequenceHanlderClass">io.mycat.route.sequence.handler.HttpIncrSequenceHandler</property>
      <!--  <property name="useCompression">1</property>--> <!--1为开启mysql压缩协议-->
        <!--  <property name="fakeMySQLVersion">5.6.20</property>--> <!--设置模拟的MySQL版本号-->
	<!-- <property name="processorBufferChunk">40960</property> -->
	<!--
	<property name="processors">1</property>
	<property name="processorExecutor">32</property>
	 -->
        <!--默认为type 0: DirectByteBufferPool | type 1 ByteBufferArena | type 2 NettyBufferPool -->
		<property name="processorBufferPoolType">0</property>
		<!--默认是65535 64K 用于sql解析时最大文本长度 -->
		<!--<property name="maxStringLiteralLength">65535</property>-->
		<!--<property name="sequenceHandlerType">0</property>-->
		<!--<property name="backSocketNoDelay">1</property>-->
		<!--<property name="frontSocketNoDelay">1</property>-->
		<!--<property name="processorExecutor">16</property>-->
		<!--
			<property name="serverPort">8066</property> <property name="managerPort">9066</property>
			<property name="idleTimeout">300000</property> <property name="bindIp">0.0.0.0</property>
			<property name="dataNodeIdleCheckPeriod">300000</property> 5 * 60 * 1000L; //连接空闲检查
			<property name="frontWriteQueueSize">4096</property> <property name="processors">32</property> -->
		<!--分布式事务开关,0为不过滤分布式事务,1为过滤分布式事务(如果分布式事务内只涉及全局表,则不过滤),2为不过滤分布式事务,但是记录分布式事务日志-->
		<property name="handleDistributedTransactions">0</property>

			<!--
			off heap for merge/order/group/limit      1开启   0关闭
		-->
		<property name="useOffHeapForMerge">0</property>

		<!--
			单位为m
		-->
        <property name="memoryPageSize">64k</property>

		<!--
			单位为k
		-->
		<property name="spillsFileBufferSize">1k</property>

		<property name="useStreamOutput">0</property>

		<!--
			单位为m
		-->
		<property name="systemReserveMemorySize">384m</property>


		<!--是否采用zookeeper协调切换  -->
		<property name="useZKSwitch">false</property>

		<!-- XA Recovery Log日志路径 -->
		<!--<property name="XARecoveryLogBaseDir">./</property>-->

		<!-- XA Recovery Log日志名称 -->
		<!--<property name="XARecoveryLogBaseName">tmlog</property>-->
		<!--如果为 true的话 严格遵守隔离级别,不会在仅仅只有select语句的时候在事务中切换连接-->
		<property name="strictTxIsolation">false</property>
		<!--如果为0的话,涉及多个DataNode的catlet任务不会跨线程执行-->
		<property name="parallExecute">0</property>
	</system>

	<!-- 全局SQL防火墙设置 -->
	<!--白名单可以使用通配符%或着*-->
	<!--例如<host host="127.0.0.*" user="root"/>-->
	<!--例如<host host="127.0.*" user="root"/>-->
	<!--例如<host host="127.*" user="root"/>-->
	<!--例如<host host="1*7.*" user="root"/>-->
	<!--这些配置情况下对于127.0.0.1都能以root账户登录-->
	<!--
	<firewall>
	   <whitehost>
	      <host host="1*7.0.0.*" user="root"/>
	   </whitehost>
       <blacklist check="false">
       </blacklist>
	</firewall>
	-->

	<user name="root" defaultAccount="true">
		<property name="password">xxx@123</property>
		<property name="schemas">his</property>
		<property name="defaultSchema">his</property>
		<!--No MyCAT Database selected 错误前会尝试使用该schema作为schema,不设置则为null,报错 -->

		<!-- 表级 DML 权限设置 -->
		<!--
		<privileges check="false">
			<schema name="TESTDB" dml="0110" >
				<table name="tb01" dml="0000"></table>
				<table name="tb02" dml="1111"></table>
			</schema>
		</privileges>
		 -->
	</user>

	<user name="user">
		<property name="password">xxx@123</property>
		<property name="schemas">his</property>
		<property name="readOnly">false</property>
		<property name="defaultSchema">his</property>
	</user>

</mycat:server>
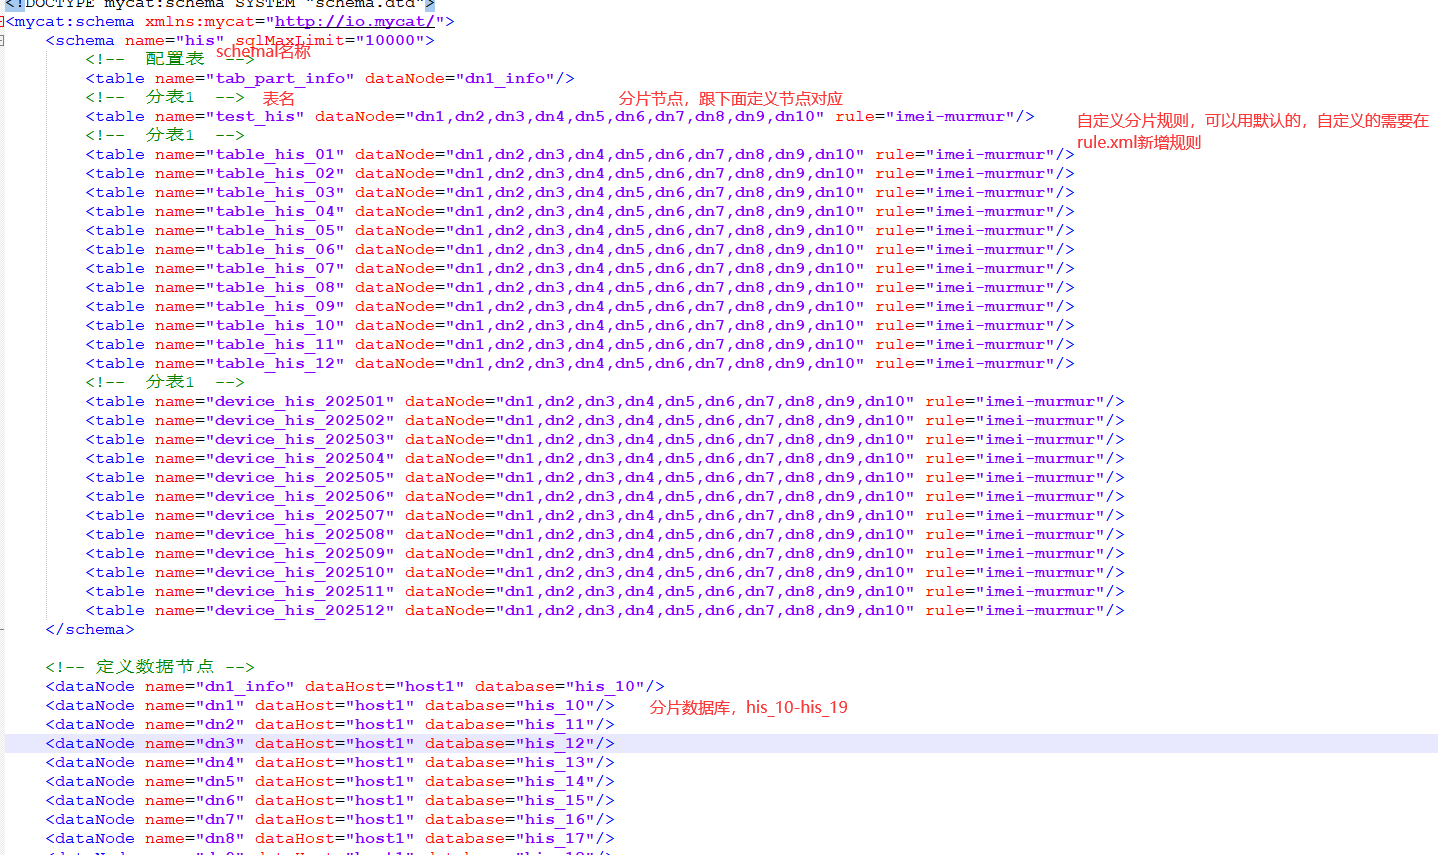
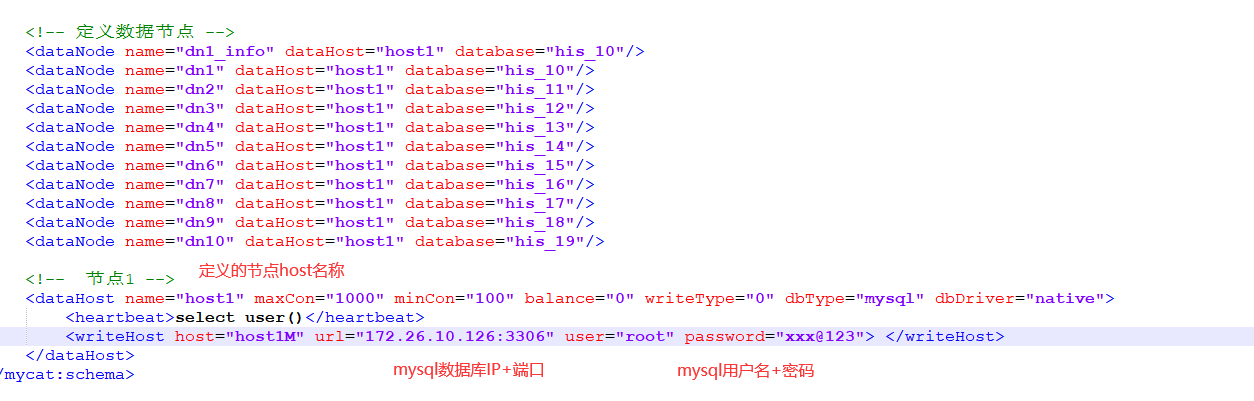
schema.xml
配置分片表信息
<?xml version="1.0"?>
<!DOCTYPE mycat:schema SYSTEM "schema.dtd">
<mycat:schema xmlns:mycat="http://io.mycat/">
	<schema name="his" sqlMaxLimit="10000">
		<!--  配置表  -->
		<table name="tab_part_info" dataNode="dn1_info"/>
		<!--  分表1  -->
		<table name="test_his" dataNode="dn1,dn2,dn3,dn4,dn5,dn6,dn7,dn8,dn9,dn10" rule="imei-murmur"/>
		<!--  分表1  -->
		<table name="table_his_01" dataNode="dn1,dn2,dn3,dn4,dn5,dn6,dn7,dn8,dn9,dn10" rule="imei-murmur"/>
		<table name="table_his_02" dataNode="dn1,dn2,dn3,dn4,dn5,dn6,dn7,dn8,dn9,dn10" rule="imei-murmur"/>
		<table name="table_his_03" dataNode="dn1,dn2,dn3,dn4,dn5,dn6,dn7,dn8,dn9,dn10" rule="imei-murmur"/>
		<table name="table_his_04" dataNode="dn1,dn2,dn3,dn4,dn5,dn6,dn7,dn8,dn9,dn10" rule="imei-murmur"/>
		<table name="table_his_05" dataNode="dn1,dn2,dn3,dn4,dn5,dn6,dn7,dn8,dn9,dn10" rule="imei-murmur"/>
		<table name="table_his_06" dataNode="dn1,dn2,dn3,dn4,dn5,dn6,dn7,dn8,dn9,dn10" rule="imei-murmur"/>
		<table name="table_his_07" dataNode="dn1,dn2,dn3,dn4,dn5,dn6,dn7,dn8,dn9,dn10" rule="imei-murmur"/>
		<table name="table_his_08" dataNode="dn1,dn2,dn3,dn4,dn5,dn6,dn7,dn8,dn9,dn10" rule="imei-murmur"/>
		<table name="table_his_09" dataNode="dn1,dn2,dn3,dn4,dn5,dn6,dn7,dn8,dn9,dn10" rule="imei-murmur"/>
		<table name="table_his_10" dataNode="dn1,dn2,dn3,dn4,dn5,dn6,dn7,dn8,dn9,dn10" rule="imei-murmur"/>
		<table name="table_his_11" dataNode="dn1,dn2,dn3,dn4,dn5,dn6,dn7,dn8,dn9,dn10" rule="imei-murmur"/>
		<table name="table_his_12" dataNode="dn1,dn2,dn3,dn4,dn5,dn6,dn7,dn8,dn9,dn10" rule="imei-murmur"/>
		<!--  分表1  -->
		<table name="device_his_202501" dataNode="dn1,dn2,dn3,dn4,dn5,dn6,dn7,dn8,dn9,dn10" rule="user-id-murmur"/>
		<table name="device_his_202502" dataNode="dn1,dn2,dn3,dn4,dn5,dn6,dn7,dn8,dn9,dn10" rule="user-id-murmur"/>
		<table name="device_his_202503" dataNode="dn1,dn2,dn3,dn4,dn5,dn6,dn7,dn8,dn9,dn10" rule="user-id-murmur"/>
		<table name="device_his_202504" dataNode="dn1,dn2,dn3,dn4,dn5,dn6,dn7,dn8,dn9,dn10" rule="user-id-murmur"/>
		<table name="device_his_202505" dataNode="dn1,dn2,dn3,dn4,dn5,dn6,dn7,dn8,dn9,dn10" rule="user-id-murmur"/>
		<table name="device_his_202506" dataNode="dn1,dn2,dn3,dn4,dn5,dn6,dn7,dn8,dn9,dn10" rule="user-id-murmur"/>
		<table name="device_his_202507" dataNode="dn1,dn2,dn3,dn4,dn5,dn6,dn7,dn8,dn9,dn10" rule="user-id-murmur"/>
		<table name="device_his_202508" dataNode="dn1,dn2,dn3,dn4,dn5,dn6,dn7,dn8,dn9,dn10" rule="user-id-murmur"/>
		<table name="device_his_202509" dataNode="dn1,dn2,dn3,dn4,dn5,dn6,dn7,dn8,dn9,dn10" rule="user-id-murmur"/>
		<table name="device_his_202510" dataNode="dn1,dn2,dn3,dn4,dn5,dn6,dn7,dn8,dn9,dn10" rule="user-id-murmur"/>
		<table name="device_his_202511" dataNode="dn1,dn2,dn3,dn4,dn5,dn6,dn7,dn8,dn9,dn10" rule="user-id-murmur"/>
		<table name="device_his_202512" dataNode="dn1,dn2,dn3,dn4,dn5,dn6,dn7,dn8,dn9,dn10" rule="user-id-murmur"/>
	</schema>

	<!-- 定义数据节点 -->
	<dataNode name="dn1_info" dataHost="host1" database="his_10"/>
    <dataNode name="dn1" dataHost="host1" database="his_10"/>
    <dataNode name="dn2" dataHost="host1" database="his_11"/>
    <dataNode name="dn3" dataHost="host1" database="his_12"/>
    <dataNode name="dn4" dataHost="host1" database="his_13"/>
    <dataNode name="dn5" dataHost="host1" database="his_14"/>
    <dataNode name="dn6" dataHost="host1" database="his_15"/>
    <dataNode name="dn7" dataHost="host1" database="his_16"/>
    <dataNode name="dn8" dataHost="host1" database="his_17"/>
    <dataNode name="dn9" dataHost="host1" database="his_18"/>
    <dataNode name="dn10" dataHost="host1" database="his_19"/>

	<!--  节点1 -->
	<dataHost name="host1" maxCon="1000" minCon="100" balance="0" writeType="0" dbType="mysql" dbDriver="native">
		<heartbeat>select user()</heartbeat>
		<writeHost host="host1M" url="172.26.10.126:3306" user="root" password="xxx@123"> </writeHost>
	</dataHost>
</mycat:schema>
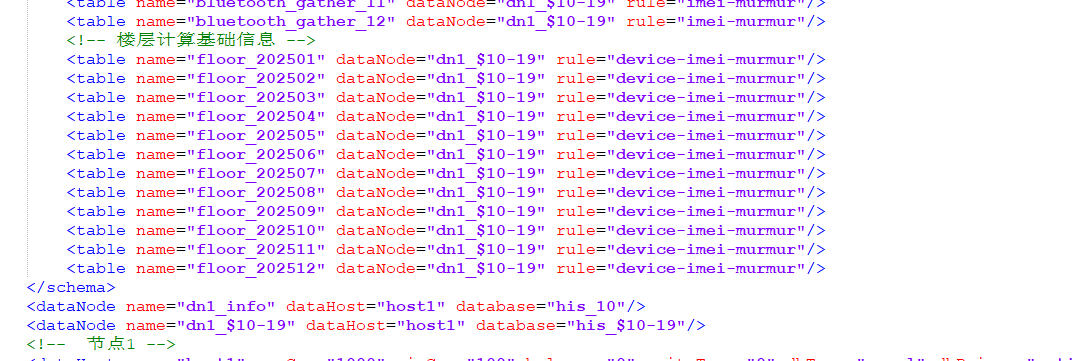
这种配置方式也支持,但建议只用一种方式配置
<!-- 楼层计算基础信息 -->
		<table name="floor_202501" dataNode="dn1_$10-19" rule="device-imei-murmur"/>
        <table name="floor_202502" dataNode="dn1_$10-19" rule="device-imei-murmur"/>
        <table name="floor_202503" dataNode="dn1_$10-19" rule="device-imei-murmur"/>
        <table name="floor_202504" dataNode="dn1_$10-19" rule="device-imei-murmur"/>
        <table name="floor_202505" dataNode="dn1_$10-19" rule="device-imei-murmur"/>
        <table name="floor_202506" dataNode="dn1_$10-19" rule="device-imei-murmur"/>
        <table name="floor_202507" dataNode="dn1_$10-19" rule="device-imei-murmur"/>
        <table name="floor_202508" dataNode="dn1_$10-19" rule="device-imei-murmur"/>
        <table name="floor_202509" dataNode="dn1_$10-19" rule="device-imei-murmur"/>
        <table name="floor_202510" dataNode="dn1_$10-19" rule="device-imei-murmur"/>
        <table name="floor_202511" dataNode="dn1_$10-19" rule="device-imei-murmur"/>
        <table name="floor_202512" dataNode="dn1_$10-19" rule="device-imei-murmur"/>
	</schema>
	<dataNode name="dn1_info" dataHost="host1" database="his_10"/>
	<dataNode name="dn1_$10-19" dataHost="host1" database="his_$10-19"/>
rule.xml
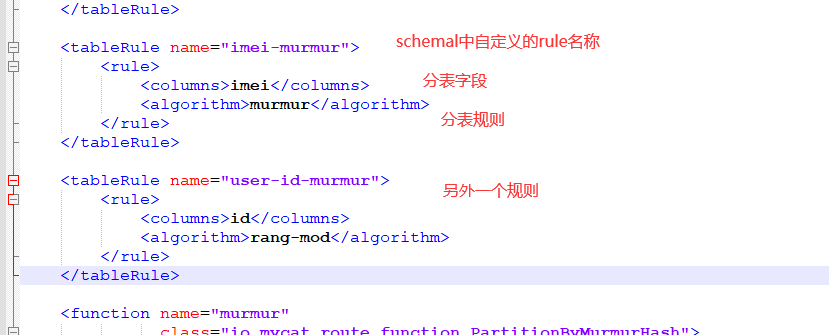
存在自定义规则,需要新增规则,实际上一个库会存不同的表用不同的字段分库,所以是可以添加多个分片规则
<?xml version="1.0" encoding="UTF-8"?>
<!-- - - Licensed under the Apache License, Version 2.0 (the "License");
	- you may not use this file except in compliance with the License. - You
	may obtain a copy of the License at - - http://www.apache.org/licenses/LICENSE-2.0
	- - Unless required by applicable law or agreed to in writing, software -
	distributed under the License is distributed on an "AS IS" BASIS, - WITHOUT
	WARRANTIES OR CONDITIONS OF ANY KIND, either express or implied. - See the
	License for the specific language governing permissions and - limitations
	under the License. -->
<!DOCTYPE mycat:rule SYSTEM "rule.dtd">
<mycat:rule xmlns:mycat="http://io.mycat/">
	<tableRule name="rule1">
		<rule>
			<columns>id</columns>
			<algorithm>func1</algorithm>
		</rule>
	</tableRule>

	<tableRule name="sharding-by-date">
		<rule>
			<columns>createTime</columns>
			<algorithm>partbyday</algorithm>
		</rule>
	</tableRule>

	<tableRule name="rule2">
		<rule>
			<columns>user_id</columns>
			<algorithm>func1</algorithm>
		</rule>
	</tableRule>

	<tableRule name="sharding-by-intfile">
		<rule>
			<columns>sharding_id</columns>
			<algorithm>hash-int</algorithm>
		</rule>
	</tableRule>
	<tableRule name="auto-sharding-long">
		<rule>
			<columns>id</columns>
			<algorithm>rang-long</algorithm>
		</rule>
	</tableRule>
	<tableRule name="mod-long">
		<rule>
			<columns>id</columns>
			<algorithm>mod-long</algorithm>
		</rule>
	</tableRule>
	<tableRule name="sharding-by-murmur">
		<rule>
			<columns>id</columns>
			<algorithm>murmur</algorithm>
		</rule>
	</tableRule>
	<tableRule name="crc32slot">
		<rule>
			<columns>id</columns>
			<algorithm>crc32slot</algorithm>
		</rule>
	</tableRule>
	<tableRule name="sharding-by-month">
		<rule>
			<columns>create_time</columns>
			<algorithm>partbymonth</algorithm>
		</rule>
	</tableRule>
	<tableRule name="latest-month-calldate">
		<rule>
			<columns>calldate</columns>
			<algorithm>latestMonth</algorithm>
		</rule>
	</tableRule>

	<tableRule name="auto-sharding-rang-mod">
		<rule>
			<columns>id</columns>
			<algorithm>rang-mod</algorithm>
		</rule>
	</tableRule>

	<tableRule name="jch">
		<rule>
			<columns>id</columns>
			<algorithm>jump-consistent-hash</algorithm>
		</rule>
	</tableRule>

	<tableRule name="imei-murmur">
		<rule>
			<columns>imei</columns>
			<algorithm>murmur</algorithm>
		</rule>
	</tableRule>

	<tableRule name="user-id-murmur">
		<rule>
			<columns>id</columns>
			<algorithm>rang-mod</algorithm>
		</rule>
	</tableRule>

	<function name="murmur"
			  class="io.mycat.route.function.PartitionByMurmurHash">
		<property name="seed">0</property><!-- 默认是0 -->
		<property name="count">10</property><!-- 要分片的数据库节点数量,必须指定,否则没法分片 -->
		<property name="virtualBucketTimes">160</property><!-- 一个实际的数据库节点被映射为这么多虚拟节点,默认是160倍,也就是虚拟节点数是物理节点数的160倍 -->
		<!-- <property name="weightMapFile">weightMapFile</property> 节点的权重,没有指定权重的节点默认是1。以properties文件的格式填写,以从0开始到count-1的整数值也就是节点索引为key,以节点权重值为值。所有权重值必须是正整数,否则以1代替 -->
		<!-- <property name="bucketMapPath">/etc/mycat/bucketMapPath</property>
			用于测试时观察各物理节点与虚拟节点的分布情况,如果指定了这个属性,会把虚拟节点的murmur hash值与物理节点的映射按行输出到这个文件,没有默认值,如果不指定,就不会输出任何东西 -->
	</function>

	<function name="crc32slot"
			  class="io.mycat.route.function.PartitionByCRC32PreSlot">
		<property name="count">2</property><!-- 要分片的数据库节点数量,必须指定,否则没法分片 -->
	</function>
	<function name="hash-int"
			  class="io.mycat.route.function.PartitionByFileMap">
		<property name="mapFile">partition-hash-int.txt</property>
	</function>
	<function name="rang-long"
			  class="io.mycat.route.function.AutoPartitionByLong">
		<property name="mapFile">autopartition-long.txt</property>
	</function>
	<function name="mod-long" class="io.mycat.route.function.PartitionByMod">
		<!-- how many data nodes -->
		<property name="count">3</property>
	</function>

	<function name="func1" class="io.mycat.route.function.PartitionByLong">
		<property name="partitionCount">8</property>
		<property name="partitionLength">128</property>
	</function>
	<function name="latestMonth"
			  class="io.mycat.route.function.LatestMonthPartion">
		<property name="splitOneDay">24</property>
	</function>
	<function name="partbymonth"
			  class="io.mycat.route.function.PartitionByMonth">
		<property name="dateFormat">yyyy-MM-dd</property>
		<property name="sBeginDate">2025-01-01</property>
	</function>


	<function name="partbyday"
			  class="io.mycat.route.function.PartitionByDate">
		<property name="dateFormat">yyyy-MM-dd</property>
		<property name="sNaturalDay">0</property>
		<property name="sBeginDate">2024-01-01</property>
		<property name="sEndDate">2034-12-31</property>
		<property name="sPartionDay">10</property>
	</function>

	<function name="rang-mod" class="io.mycat.route.function.PartitionByRangeMod">
		<property name="mapFile">partition-range-mod.txt</property>
	</function>

	<function name="jump-consistent-hash" class="io.mycat.route.function.PartitionByJumpConsistentHash">
		<property name="totalBuckets">3</property>
	</function>
</mycat:rule>
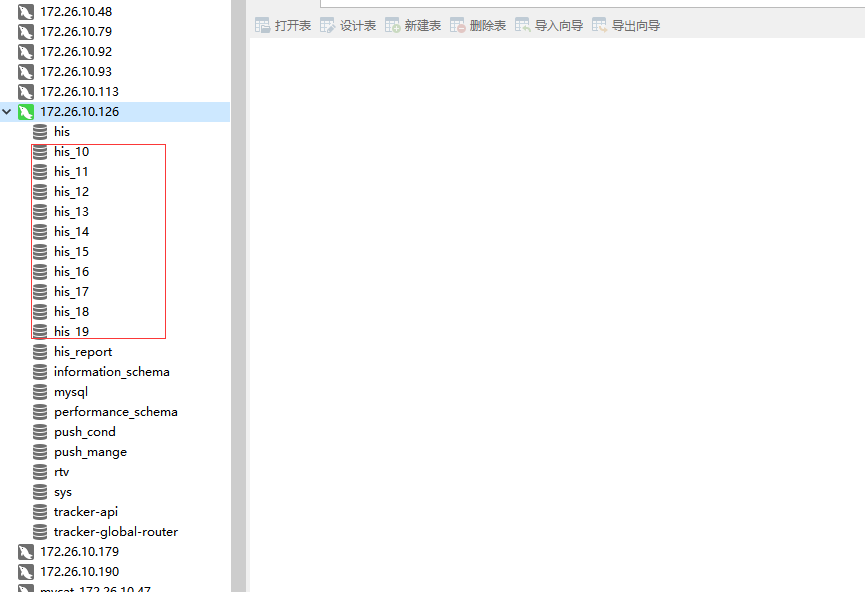
partition-range-mod.txt、auto-sharding-rang-mod.txt,这两个文件是因为node定义错误,并且定义了20个,这个值必须要小于schemal.xml database个数,定义 his_10 - his_19 10个库,这个节点也需要小于等于10个

0M-600M=3
600M-1200M=3
1200M-1800M=4
第六步、再次重启docker-compose
docker-compose -f docker-compose.yml stop
docker-compose -f docker-compose.yml up -d
第七步、在MySQL建立 his_10 - his_19库,导入schemal.xml定义的表


码道开发者社区,聚焦华为云码道 CodeArts 代码智能体,沉淀 Agent、Skill、鸿蒙开发实战内容,供开发者查阅资料、交流技术、分享工程实践
更多推荐



 19
19 0
0- 0


 已为社区贡献1条内容

所有评论(0)