基于亚马逊云科技Amazon Lambda,构建AI出海服务
2025年3月,Model Context Protocol(MCP)v2025.03.26协议发布,并且引入了Streamable HTTP Transport的支持,这一新的协议重构了大语言模型(LLM)与外部系统的交互范式。

MCP Server在之前版本提供了Stdio、Service Side Event(SSE)2种Transport,其中SSE也是通常用来作为访问远程MCP Server的重要协议。
下面先介绍Streamable HTTP和HTTP SSE协议的对比。
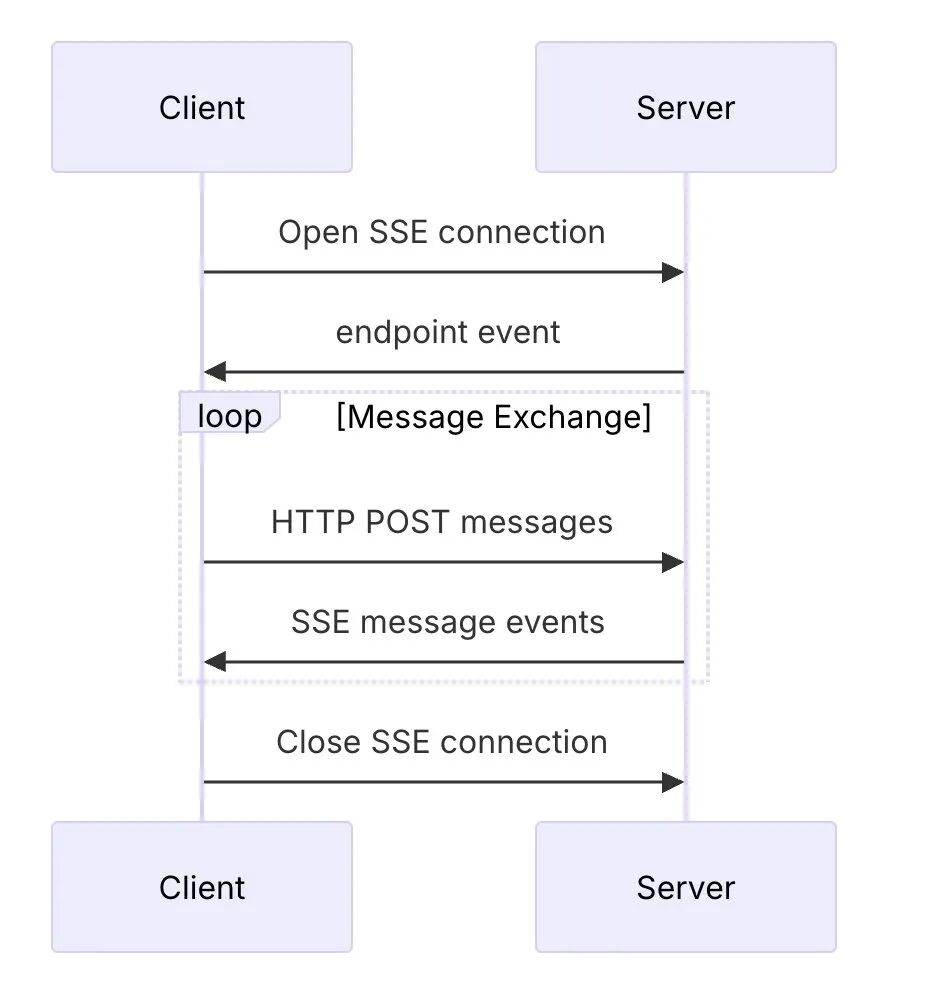
HTTP SSE
SSE Transport提供2个访问端点,分别是/sse、/message,/sse用来保持长链接。MCP Client需要发送POST /message来调用MCP Server的服务,通过/sse来接收MCP Server的返回。
整个调用期间,MCP Client需要一直和MCP Server保持/sse端点的长链接不能断开,否则会可能丢失某次调用的数据。
-
SSE要求服务器维护长链接,不适合复杂的网络环境。
-
服务器消息只能通过SSE传递,需要/sse和/message 2个不同方式的端点,开发较复杂。
Streamable HTTP
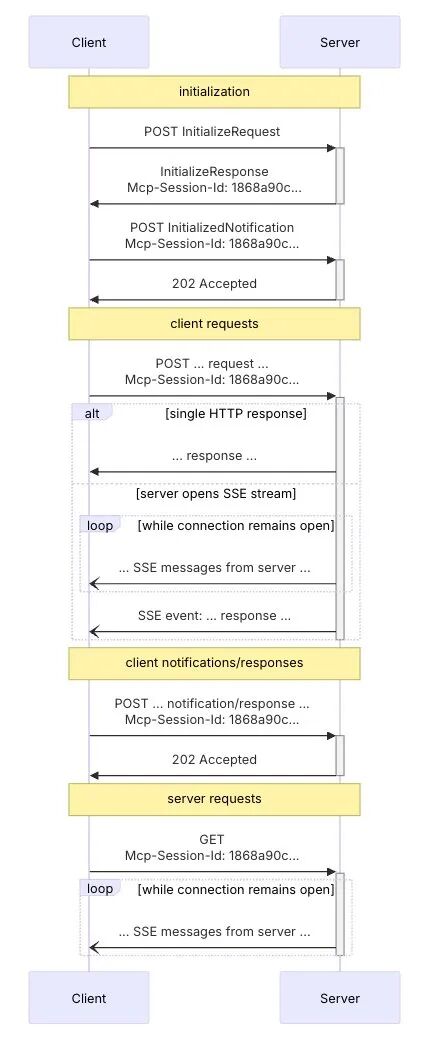
新版本Streamable HTTP Transport首先移除了MCP Server的/sse端点,只保留/message,并且不再强制要求使用SSE长链接(为了向下兼容SSE,MCP Client可以发起一个GET请求/message,要求在/message上创建SSE连接),除此之外其他请求都是标准的POST请求,并且在初始化阶段MCP Server可以返回Mcp-Session-Id作为整个通信阶段的会话ID。
-
移除了/sse端点,默认不需要提供Service Side Event端点;
-
所有客户端和服务器消息都可以通过/message(或者类似比如/mcp)端点发送和接收消息;
-
服务器可以选择创建会话ID来维持状态。
通过使用Streamable HTTP,可以:
-
支持无状态服务,不需要SSE长链接;
-
纯HTTP实现,类似于REST full API,兼容现有的CDN、Web firewall等基础设施;
-
向后兼容,允许客户段通过/message发送空请求来初始化SSE流。
在新的协议下,Streamable HTTP MCP Server可以用Amazon Lambda,实现MCP Server的远程部署,该部署方案的优势如下:
-
Amazon Lambda的弹性伸缩能力:天然适配MCP Server突发流量(如百名开发者同时触发代码查询)。
-
成本与性能平衡:Amazon Lambda按照调用次数收费,不会造成空闲资源浪费。
-
无缝集成多种服务:远程部署可以充分利用到云上的各类服务,包括Amazon S3、Amazon DynamoDB、Amazon Bedrock等。
-
使用Amazon API Gateway实现Steamable HTTP无状态协议。
下文将具体讲解如何将一个官方TypeScript开发的STDIO/SSE的MCP Server,改造成一个Streamable HTTP MCP Server,并且通过Amazon Lambda进行快速部署。
您可参阅GitHub代码库获取项目源代码。
GitHub代码库:
https://github.com/aws-samples/sample-serverless-mcp-server
*说明:此处没有做SSE的向下兼容,所有测试的MCP Client需要支持Streamable HTTP协议。
参考架构
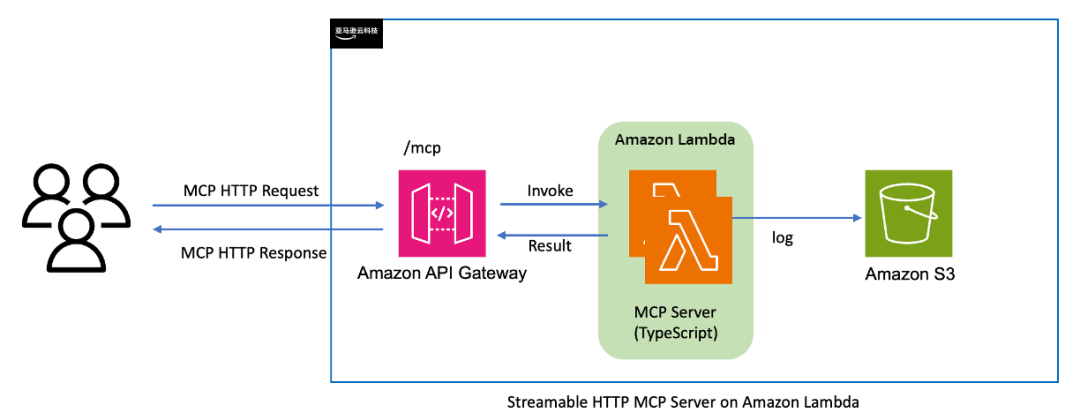
在项目中使用了开源Serverless中间件框架Middy、Middy-mcp、open serverless framework以及Amazon API Gateway、Amazon Lambda服务。
Middy是一个开源的Node.js库,它为Amazon Lambda函数引入了中间件的概念。如果您熟悉Express.js或Koa,那么Middy的设计理念会让您倍感亲切。
它支持将Amazon Lambda处理流程分解为前置处理、主函数执行和后置处理三个阶段,并在每个阶段插入可重用的中间件,而Middy-mcp是一个Middy框架的中间件,它提供了MCP协议的支持。
项目代码讲解
Streamable HTTP Github MCP Server的项目仓库,可参阅GitHub代码库获取。
接下来将讲解如何从现有的一个Type Script MCP Server,改造为Streamable HTTP on Amazon Lambda的版本。
GitHub代码库:
https://github.com/aws-samples/sample-serverless-mcp-server
01
克隆官方的github MCP Server(可选)
git clone https://github.com/modelcontextprotocol/serverscd servers/github
左右滑动查看完整示意
需要注意的是这个github MCP Server调用了github API,所以需要设personal acces token,在环境变量中设置即可。
先来看看官方项目的代码:
//在官方的index.ts里面我们可以看到它是用了StdioServerTransport,这里就是我们需要改造的部分import { Server } from "@modelcontextprotocol/sdk/server/index.js";import { StdioServerTransport } from "@modelcontextprotocol/sdk/server/stdio.js";
左右滑动查看完整示意
02
使用下面的package.json添加@middy/httpcore,middy-mcp等需要的依赖库
{"name": "@modelcontextprotocol/server-github","version": "0.6.2","description": "MCP server for using the GitHub API","license": "MIT","author": "Anthropic, PBC (https://anthropic.com)","homepage": "https://modelcontextprotocol.io","bugs": "https://github.com/modelcontextprotocol/servers/issues","type": "module","bin": {"mcp-server-github": "dist/index.js"},"files": ["dist"],"scripts": {"build": "tsc && shx chmod +x dist/*.js","prepare": "npm run build","watch": "tsc --watch"},"dependencies": {"@middy/core": "^6.1.6","@middy/http-cors": "^6.1.6","@middy/http-error-handler": "^6.1.6","@modelcontextprotocol/sdk": "^1.9.0","@types/node": "^22","@types/node-fetch": "^2.6.12","http-errors": "^2.0.0","middy-mcp": "file:../middy-mcp","node-fetch": "^3.3.2","osls": "^3.51.0","universal-user-agent": "^7.0.2","zod": "^3.24.2","zod-to-json-schema": "^3.23.5"},"devDependencies": {"@types/aws-lambda": "^8.10.148","@types/http-errors": "^2.0.4","serverless-offline": "^14.4.0","shx": "^0.3.4","typescript": "^5.6.2"}}
左右滑动查看完整示意
03
代码改写
首先需要修改原来的tools添加代码,更换成middy-mcp可以使用的方法,以search_code、search_user、search_issue为例:
//server.setRequestHandler(CallToolRequestSchema, async (request) => {try {if (!request.params.arguments) {thrownew Error("Arguments are required");}switch (request.params.name) {//.....case"search_code": {const args = search.SearchCodeSchema.parse(request.params.arguments);const results = await search.searchCode(args);return {content: [{ type: "text", text: JSON.stringify(results, null, 2) }],};}case"search_issues": {const args = search.SearchIssuesSchema.parse(request.params.arguments);const results = await search.searchIssues(args);return {content: [{ type: "text", text: JSON.stringify(results, null, 2) }],};}case"search_users": {const args = search.SearchUsersSchema.parse(request.params.arguments);const results = await search.searchUsers(args);return {content: [{ type: "text", text: JSON.stringify(results, null, 2) }],};}//....default:thrownew Error(`Unknown tool: ${request.params.name}`);}} catch (error) {if (error instanceof z.ZodError) {thrownew Error(`Invalid input: ${JSON.stringify(error.errors)}`);}if (isGitHubError(error)) {thrownew Error(formatGitHubError(error));}throw error;}});
左右滑动查看完整示意
不再使用Server和StdioServerTransport,直接导入McpServer,然后通过server.tools来添加tools。
import { McpServer } from "@modelcontextprotocol/sdk/server/mcp.js";const server = new McpServer({name: "Lambda hosted github-mcp-server",version: "1.0.0",});//添加server.toolsserver.tool("search_code",SearchCodeSchema.shape, async (args) => {const results = await search.searchCode(args);return { content: [{ type: "text", text: JSON.stringify(results, null, 2) }] };});server.tool("search_issues", SearchIssuesSchema.shape, async (args) => {const results = await search.searchIssues(args);return { content: [{ type: "text", text: JSON.stringify(results, null, 2) }] };});server.tool("search_users", SearchUsersSchema.shape, async (args) => {const results = await search.searchUsers(args);return { content: [{ type: "text", text: JSON.stringify(results, null, 2) }] };});
左右滑动查看完整示意
然后需要移除StdioServerTransport,以及runServer代码,需要通过Middy、middy-mcp来实现一个Amazon Lambda handler。
//移除runServer/*async function runServer() {const transport = new StdioServerTransport();await server.connect(transport);console.error("GitHub MCP Server running on stdio");}runServer().catch((error) => {console.error("Fatal error in main():", error);process.exit(1);})*///根据middy的文档说明,我们需要导出一个handler给Amazon Lambdaexportconst handler = middy().use(mcpMiddleware({ server })).use(cors()).use(httpErrorHandler())
左右滑动查看完整示意
04
Python版本Http MCP Client实现
在Python中实现Streamable Http MCP Client,是应用侧与Streamable MCP Server进行交互的有效方式。
目前,官方尚未发布Streamable Http MCP针对Python的SDK,您可以自行根据MCP的交互式协议进行封装,确保Python客户端能够正确构建和解析MCP Server端消息,包括初始化MCP Server、MCP服务端list tools请求、messages请求触发服务端tools call,以及需要的时候通知Server端转为普通SSE模型等。
以下是一个简单的Python示例代码,展示如何实现一个基本的Streamable Http MCP Client。
import httpximport jsonimport asyncioimport aiofilesimport asyncioimport osfrom typing import Optional, DictclassHttpMCPClient:def __init__(self, server_url: str, access_key_id='', secret_access_key='', region='us-east-1'):self.env = {'AWS_ACCESS_KEY_ID': access_key_id or os.environ.get('AWS_ACCESS_KEY_ID'),'AWS_SECRET_ACCESS_KEY': secret_access_key or os.environ.get('AWS_SECRET_ACCESS_KEY'),'AWS_REGION': region or os.environ.get('AWS_REGION'),}self.server_url = server_urlself.session_id = "default"self.headers = {"Content-Type": "application/json","Accept": "text/event-stream, application/json","jsonrpc":"2.0"}async def initialize(self):"""初始化会话。"""async with httpx.AsyncClient() as client:try:response = await client.post(f"{self.server_url}/message",headers=self.headers,json={"jsonrpc": "2.0","method": "initialize","params": {"protocolVersion": "2024-11-05","clientInfo": {"name": "MCP Client", "version": "1.0"},"capabilities": {},},},)response.raise_for_status()self.session_id = response.headers.get("Mcp-Session-Id")print(f"Session ID: {self.session_id}")return self.session_idexcept Exception as e:print(f"Failed to initialize session: {e}")return Noneasync def list_tools(self):"""发送请求"""async with httpx.AsyncClient() as client:try:payload = {"jsonrpc": "2.0","method": "list_tools","id": 1}response = await client.post(f"{self.server_url}/message",headers=self.headers,json=payload)response.raise_for_status()return response.json()except Exception as e:print(f"请求失败: {e}")if hasattr(e, 'response'):print(f"响应内容: {e.response.text}")return Noneasync def call_tool(self, method: str, params: dict = None):"""发送消息。"""ifnot self.session_id:await self.initialize()async with httpx.AsyncClient() as client:try:response = await client.post(f"{self.server_url}/message",headers={"Mcp-Session-Id": self.session_id, **self.headers},json={"jsonrpc": "2.0","id": 1,"method": "tools/call",{"method":method,"arguments": params}},)response.raise_for_status()return response.json()except Exception as e:print(f"Failed to send message: {e}")return Noneasync def listen_sse(self):ifnot self.session_id:await self.initialize()async with httpx.AsyncClient(timeout=None) as client:try:async with client.stream("GET",f"{self.server_url}/message",headers={"Mcp-Session-Id": self.session_id, **self.headers},) as response:async for line in response.aiter_lines():if line.strip():print(f"SSE Message: {line}")except Exception as e:print(f"Failed to listen SSE: {e}")await self.reconnect()async def reconnect(self):"""断线重连。"""print("Attempting to reconnect...")await asyncio.sleep(5) # 等待5秒后重试await self.initialize()await self.listen_sse()async def main():#client = HttpMCPClient("https://fux8ccy7cg.execute-api.us-east-1.amazonaws.com/dev/mcp"),#response = await client.call_tool("add", {"a": "5","b":"10"})client = HttpMCPClient("http://ec2-35-93-77-218.us-west-2.compute.amazonaws.com:8080")await client.initialize()response = await client.list_tools()print((str(response['result'])))response = await client.call_tool("search_codes", params={"search_term": "Swish","repo_url":"https://github.com/qingyuan18/ComfyUI-AnyText.git"})print(f"Response: {response}")await client.listen_sse()
左右滑动查看完整示意
在该示例中,创建了一个MCPClient类,这个类使用httpx库与Streamable Http MCP Server进行异步HTTP请求,并且支持转为Server-Sent Events(SSE)的监听,详细解释如下:
-
会话初始化:async def initialize(self),向MCP Server发送初始化请求报文(“method”: “initialize”),获取会话ID,并将其存储在session_id。
-
列出MCP Server工具:async def list_tools(self),通过MCP协议{self.server_url}/message请求以列出可用的工具,并返回服务端tools的JSON响应。
-
调用工具:async def call_tool(self, method: str, params: dict = None),用于调用特定的工具,需要提供方法名和参数。
-
监听SSE:async def listen_sse(self),同样通过{self.server_url}/message请求服务端转为SSE模式(注意此时是Http的GET请求),建立连接后监听服务器发送的SSE消息。如果会话ID不存在,则先初始化会话(SSE模式需要保持会话mcp-session-id)。
使用该HttpMCPClient示例,可以方便地与LLM侧交互,如通过Function Calling集成MCP server,从而实现Agent、ChatBot等复杂应用场景。
以下是在Amazon Bedrock Converse API中,使用HttpMCPClient客户端与MCP Server交互的示例代码片段。
if mcp_clients is not None:for mcp_server_id in mcp_server_ids:mcp_server_type = _get_mcp_server_type(mcp_server_id)### stdio mcp serverif mcp_server_type != "http":server_configs = mcp_clients[mcp_server_id]._get_stdio_mcp_server_config("./config.json")['mcpServers'][mcp_server_id]mcp_clients[mcp_server_id].connect_to_server(server_script_path=server_configs['scirpt_path'],command=config["command"],server_script_args=config.get("args", []),server_script_envs=config.get("env", {}))tool_config_response = await mcp_clients[mcp_server_id].get_tool_config(server_id=mcp_server_id)tool_config['tools'].extend(tool_config_response['tools'])### streamabel http serverelse:tool_config_response = await mcp_clients[mcp_server_id].list_tools()tool_config_response=tool_config_response['result']print("tool_config_response:",str(tool_config_response))tool_config['tools'].extend(tool_config_response['tools'])...省略if stop_reason == 'end_turn':# normal chat finishedyield output_messageelif stop_reason == 'tool_use'and mcp_clients is not None:mcp_client = mcp_clients.get(server_id)result = await mcp_client.call_tool(tool_name, tool_args)#print("http mcp client call result",result)return [{"toolUseId": tool['toolUseId'],"content": [{"text":str(result)}]}]...省略tool_result_message = {"role": "user","content": tool_results_content}messages.append(tool_result_message)# return tool use resultsyield tool_result_message# send the tool results to the model.response = bedrock_client.converse(**requestParams)stop_reason = response['stopReason']output_message = response['output']['message']messages.append(output_message)
左右滑动查看完整示意
测试
完成代码改写后,可以通过oss-serverless进行本地测试或者远程部署。
首先需要编写一个serverless.yml配置文件,请填写您的:
GITHUB_PERSONAL_ACCESS_TOKEN。
frameworkVersion: "3"provider:name: awsruntime: nodejs22.xtimeout: 30plugins:- serverless-offlinepackage:excludeDevDependencies: truefunctions:mcpServer:handler: dist/index.handlerenvironment:GITHUB_PERSONAL_ACCESS_TOKEN: <你的GITHUB PERSONAL ACCESS TOKEN>events:- http:path: mcpmethod: postcors: true
左右滑动查看完整示意
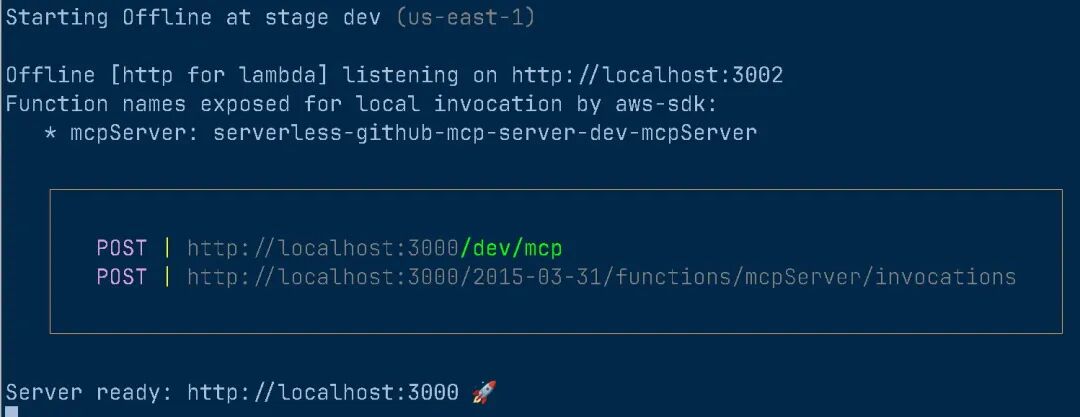
本地测试
启动oss-serverless,运行本地MCP Server。
npm sls offline
然后启动mcp-debug。
npx mcp-debug
左右滑动查看完整示意
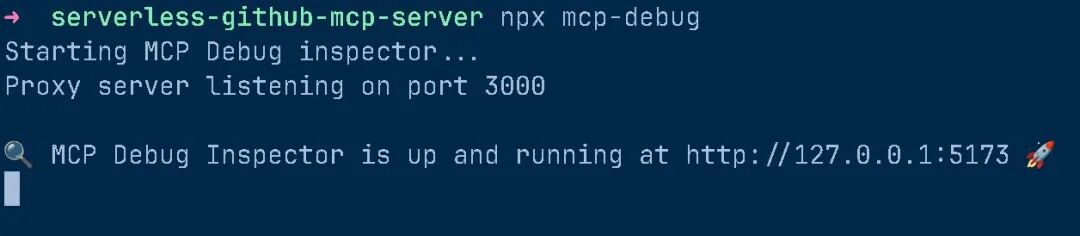
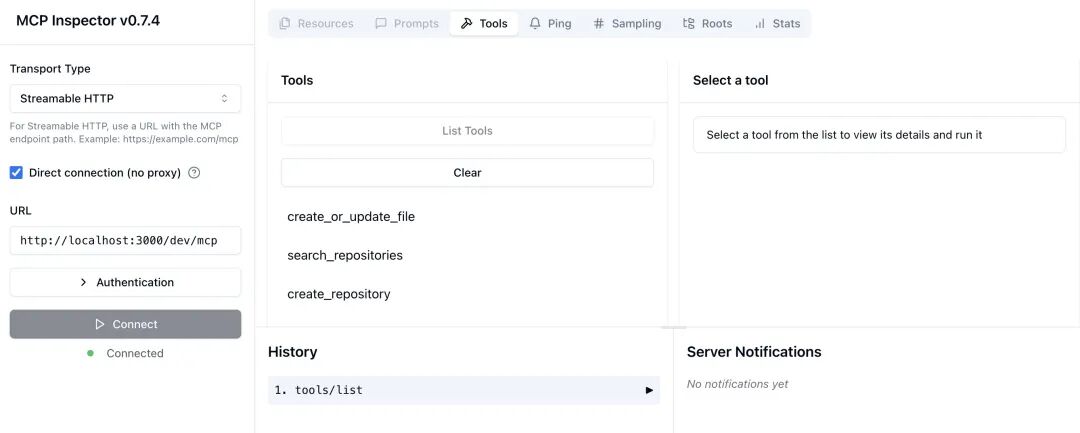
打开http://127.0.0.1:5173,选择Streamable HTTP,并且点击Direct connections(no proxy)。
在URL中输入http://localhost:3000/dev/mcp,点击connect,如果顺利则可以看到返回列表的返回。
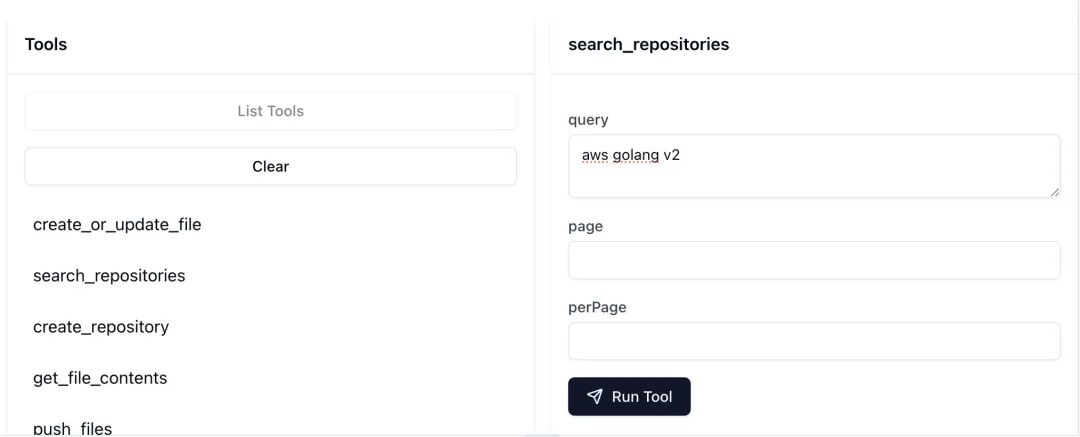
选择search_repositories,输入aws golang v2,点击Run Tools。
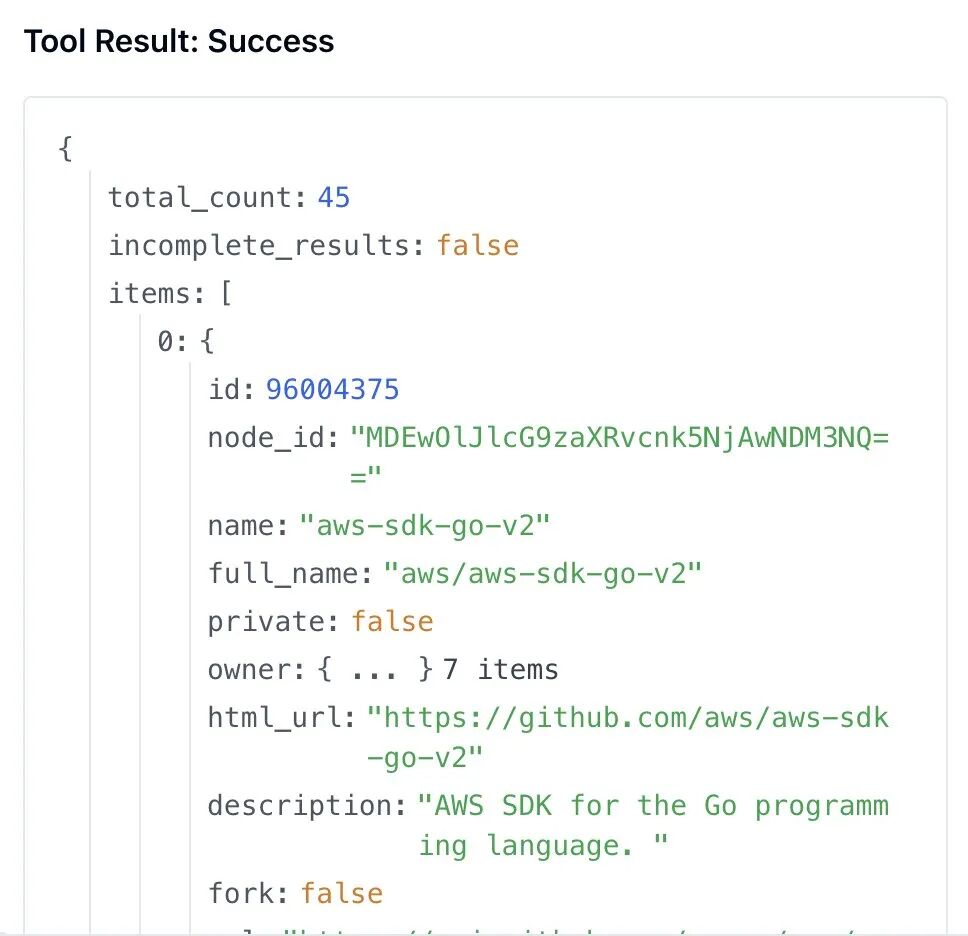
MCP Server通过查询github.com返回结果参考如下,可以看到tools正确搜索到:
https://github.com/aws/aws-sdk-go-v2。
部署到Amazon Lambda
通过本地测试调试好了程序,接下来就可以通过oss-serverlss部署到Amazon Lambda,部署过程非常简单。
#注意,环境需要提前正确配置了亚马逊云服务账号的权限npm sls deploy
左右滑动查看完整示意

部署完成后会产生一个API Gateway地址,在mcp-debug中填入这个新的地址访问即可。
总结
随着MCP最新协议v2025.03.26的发布,官方各种SDK纷纷开始更新支持Streamable HTTP。
您可以通过结合开源项目Middy、middy-mcp、Amazon Gateway、Amazon Lamba,快速实现Stdio、SSE的MCP Server改造,实现一个高效可扩展的Streamable HTTP MCP Server。
我们正处在Agentic AI爆发前夜。企业要从"成本优化"转向"创新驱动",通过完善的数据战略和AI云服务,把握全球化机遇。亚马逊将投入1000亿美元在AI算力、云基础设施等领域,通过领先的技术实力和帮助“中国企业出海“和”服务中国客户创新“的丰富经验,助力企业在AI时代突破。
附录
源代码:
https://github.com/aws-samples/sample-serverless-mcp-server
Github MCP Server:
https://github.com/modelcontextprotocol/servers
Middy:
https://github.com/middyjs/middy
middy-mcp:
https://github.com/fredericbarthelet/middy-mcp
oss-serverless:
https://github.com/oss-serverless/serverless

码道开发者社区,聚焦华为云码道 CodeArts 代码智能体,沉淀 Agent、Skill、鸿蒙开发实战内容,供开发者查阅资料、交流技术、分享工程实践
更多推荐



 0
0 0
0- 0


 已为社区贡献205条内容

所有评论(0)