每天半小时,轻松学Docker第二篇:Linux二八法则基础知识

一、上期回顾
每天半小时,轻松学Docker第一篇:Debian 12 无痛安装与初体验
二、常用Linux命令实践
1、Linux目录结构查看
- 查看Linux系统目录结构,了解根目录、及常用二级目录主要作用
Linux的目录是一个倒树结构,根目录为/。在根目录/下的二级目录多为系统在安装过程中建立的目录。Debian作为Linux发行版,其根目录/下的二级目录为:
root@debase:~# ll /
total 68
drwxr-xr-x  18 root root  4096 Sep 29 17:37 ./
drwxr-xr-x  18 root root  4096 Sep 29 17:37 ../
lrwxrwxrwx   1 root root     7 Sep 29 17:28 bin -> usr/bin/
drwxr-xr-x   3 root root  4096 Sep 29 17:44 boot/
drwxr-xr-x  17 root root  3360 Sep 30 09:05 dev/
drwxr-xr-x  67 root root  4096 Sep 30 09:05 etc/
drwxr-xr-x   3 root root  4096 Sep 29 17:43 home/
lrwxrwxrwx   1 root root    30 Sep 29 17:37 initrd.img -> boot/initrd.img-6.1.0-40-amd64
lrwxrwxrwx   1 root root    30 Sep 29 17:29 initrd.img.old -> boot/initrd.img-6.1.0-27-amd64
lrwxrwxrwx   1 root root     7 Sep 29 17:28 lib -> usr/lib/
lrwxrwxrwx   1 root root     9 Sep 29 17:28 lib64 -> usr/lib64/
drwx------   2 root root 16384 Sep 29 17:28 lost+found/
drwxr-xr-x   3 root root  4096 Sep 29 17:28 media/
drwxr-xr-x   2 root root  4096 Sep 29 17:28 mnt/
drwxr-xr-x   2 root root  4096 Sep 29 17:28 opt/
dr-xr-xr-x 274 root root     0 Sep 30 09:05 proc/
drwx------   3 root root  4096 Sep 30 09:06 root/
drwxr-xr-x  17 root root   520 Sep 30 09:06 run/
lrwxrwxrwx   1 root root     8 Sep 29 17:28 sbin -> usr/sbin/
drwxr-xr-x   2 root root  4096 Sep 29 17:28 srv/
dr-xr-xr-x  13 root root     0 Sep 30 09:05 sys/
drwxrwxrwt   9 root root  4096 Sep 30 09:05 tmp/
drwxr-xr-x  12 root root  4096 Sep 29 17:28 usr/
drwxr-xr-x  11 root root  4096 Sep 29 17:28 var/
lrwxrwxrwx   1 root root    27 Sep 29 17:37 vmlinuz -> boot/vmlinuz-6.1.0-40-amd64
lrwxrwxrwx   1 root root    27 Sep 29 17:29 vmlinuz.old -> boot/vmlinuz-6.1.0-27-amd64
root@debase:~# - 涉及到常用二级目录如下:
| 二级目录 | 主要作用 |
|---|---|
/bin | 常用系统命令 |
/etc | 系统配置目录 |
/home | 普通用户家目录 |
/mnt | 临时设备挂载点 |
/root | 超级用户 |
/sbin | 系统管理命令 |
2、绝对路径与相对路径使用
绝对路径是指从根目录开始的路径如:/home/rz,该路径从根目录开始指明了一个目录在磁盘的绝对地址。
而相对路径就是指相对于当前文件或目录,目录文件或目录的路径,为了定义相对路径,引入两个符号:.和..,分别表示当前工作路径和父目录(上一级路径)。
root@debase:~# cd /tmp/
root@debase:/tmp# pwd
/tmp
root@debase:/tmp# cd ..
root@debase:/# pwd
/
root@debase:/#
3、家目录切换
使用Linux,用户可以设置目录和文件的权限,以便允许或拒绝其他人对其进行访问。
家目录也是用户登录到系统之后默认的目录,/home是系统默认的用户家目录,新增用户账号时,用户的家目录都存放在此目录下,~表示当前用户的家目录。本教程中,用户为rz,则其家目录为/home/rz。因此,进入到家目录时可以发现其表示为~。
- 使用cd命令使用绝对路径切换至/home/rz:
root@debase:/home/rz# cd /home/rz/ root@debase:/home/rz# pwd /home/rz - 使用cd /etc/network进入/etc/network路径,并通过pwd显示当前目录的绝对路径:
root@debase:/home/rz# cd /etc/network/ root@debase:/etc/network# pwd /etc/network - 为了方便用户快速返回家目录,也可以单独使用cd命令,后面不跟任何参数,则默认切回为当前用户的家目录:
rz@debase:/root$ cd /etc/network/
rz@debase:/etc/network$ pwd
/etc/network
rz@debase:/etc/network$ cd
rz@debase:~$ pwd
/home/rz
rz@debase:~$
4、常用命令使用
使用常用命令进行查看当前目录下的文件列表、创建文件夹、创建文件、显示目录结构、拷贝文件与文件夹、移动文件或文件夹、删除文件或文件夹、查看IP地址信息、文件内容条件过滤、命令历史配置,以及命令续行使用。
- ls:列表命令,查看目标目录下文件列表,还可通过
ll='ls -l'、la='ls -A'、l='ls -CF'等别名简化操作root@debase:~# ls /etc/network if-down.d if-post-down.d if-pre-up.d if-up.d interfaces interfaces.d root@debase:~# ls -la total 44 drwx------ 3 root root 4096 Sep 30 09:06 . drwxr-xr-x 18 root root 4096 Sep 29 17:37 .. -rw------- 1 root root 810 Sep 29 21:43 .bash_history -rw-r--r-- 1 root root 749 Sep 29 21:29 .bashrc -rw------- 1 root root 20 Sep 29 21:19 .lesshst -rw-r--r-- 1 root root 161 Jul 9 2019 .profile drwx------ 2 root root 4096 Sep 29 17:28 .ssh -rw------- 1 root root 9551 Sep 29 21:29 .viminfo -rw------- 1 root root 101 Sep 30 09:06 .Xauthority - cd:Change Directory 的简写,切换目录命令;
cd -可快速切回之前目录,cd无参数时默认返回当前用户家目录,搭配pwd可查看当前所在目录路径root@debase:~# cd /etc/network root@debase:/etc/network# pwd /etc/network root@debase:/etc/network# cd root@debase:~# pwd /root - mkdir:创建文件夹命令;直接创建多级不存在的目录会失败,添加
-p参数可递归创建所有不存在的父目录(如mkdir -p test_dir/test1/test2)root@debase:/home/rz# mkdir test_dir root@debase:/home/rz# ll total 32 drwx------ 3 rz rz 4096 Sep 30 09:25 ./ drwxr-xr-x 3 root root 4096 Sep 29 17:43 ../ -rw------- 1 rz rz 96 Sep 29 21:43 .bash_history -rw-r--r-- 1 rz rz 220 Sep 29 17:43 .bash_logout -rw-r--r-- 1 rz rz 3526 Sep 29 17:43 .bashrc -rw-r--r-- 1 rz rz 807 Sep 29 17:43 .profile drwxr-xr-x 2 root root 4096 Sep 30 09:25 test_dir/ -rw------- 1 rz rz 49 Sep 29 21:11 .Xauthority root@debase:/home/rz# mkdir test_dir/test1/test2 mkdir: cannot create directory ‘test_dir/test1/test2’: No such file or directory root@debase:/home/rz# mkdir -p test_dir/test1/test2 root@debase:/home/rz# ll total 32 drwx------ 3 rz rz 4096 Sep 30 09:25 ./ drwxr-xr-x 3 root root 4096 Sep 29 17:43 ../ -rw------- 1 rz rz 96 Sep 29 21:43 .bash_history -rw-r--r-- 1 rz rz 220 Sep 29 17:43 .bash_logout -rw-r--r-- 1 rz rz 3526 Sep 29 17:43 .bashrc -rw-r--r-- 1 rz rz 807 Sep 29 17:43 .profile drwxr-xr-x 3 root root 4096 Sep 30 09:26 test_dir/ -rw------- 1 rz rz 49 Sep 29 21:11 .Xauthority root@debase:/home/rz# tree . └── test_dir └── test1 └── test2 4 directories, 0 files root@debase:/home/rz# - touch:用于创建空文件或更新文件时间戳;首次执行
touch 文件名创建空文件,再次执行同一命令则更新该文件的时间戳root@debase:/home/rz# touch test_dir/file1 root@debase:/home/rz# touch test_dir/file2 root@debase:/home/rz# ll test_dir/ total 12 drwxr-xr-x 3 root root 4096 Sep 30 09:27 ./ drwx------ 3 rz rz 4096 Sep 30 09:25 ../ -rw-r--r-- 1 root root 0 Sep 30 09:27 file1 -rw-r--r-- 1 root root 0 Sep 30 09:27 file2 drwxr-xr-x 3 root root 4096 Sep 30 09:26 test1/ root@debase:/home/rz# - tree:以树形结构显示目录结构;
-d参数仅显示目录,-h参数可显示便于阅读的文件大小(如[4.0K])root@debase:/home/rz# tree . └── test_dir ├── file1 ├── file2 └── test1 └── test2 4 directories, 2 files root@debase:/home/rz# tree -d . └── test_dir └── test1 └── test2 4 directories root@debase:/home/rz# tree -h [4.0K] . └── [4.0K] test_dir ├── [ 0] file1 ├── [ 0] file2 └── [4.0K] test1 └── [4.0K] test2 4 directories, 2 files root@debase:/home/rz# - cp:拷贝命令;拷贝文件直接使用
cp 源文件 目标路径,拷贝目录需添加-r参数递归拷贝(含目录下的子目录和文件,如cp -r 源目录 目标路径)root@debase:/home/rz# cp test_dir/file1 test_dir/test1/file1 root@debase:/home/rz# tree . └── test_dir ├── file1 ├── file2 └── test1 ├── file1 └── test2 4 directories, 3 files root@debase:/home/rz# cp -r test_dir/test1/ test_dir/ cp: 'test_dir/test1/' and 'test_dir/test1' are the same file root@debase:/home/rz# cp -r test_dir/test1/ test_dir/test1_copy root@debase:/home/rz# tree . └── test_dir ├── file1 ├── file2 ├── test1 │ ├── file1 │ ├── sub_test1 │ │ ├── file1 │ │ ├── test1 │ │ │ ├── file1 │ │ │ ├── sub_test1 │ │ │ │ ├── file1 │ │ │ │ └── test2 │ │ │ └── test2 │ │ └── test2 │ └── test2 └── test1_copy ├── file1 ├── sub_test1 │ ├── file1 │ ├── test1 │ │ ├── file1 │ │ ├── sub_test1 │ │ │ ├── file1 │ │ │ └── test2 │ │ └── test2 │ └── test2 └── test2 18 directories, 10 files - mv:用于对文件或目录进行重命名或移动;
mv 源文件 目标目录实现移动,mv 源文件 目标目录/新文件名实现移动并重命名root@debase:/home/rz# mv test_dir/test1_copy/ test_dir/test1 root@debase:/home/rz# tree . └── test_dir ├── file1 ├── file2 └── test1 ├── file1 ├── sub_test1 │ ├── file1 │ ├── test1 │ │ ├── file1 │ │ ├── sub_test1 │ │ │ ├── file1 │ │ │ └── test2 │ │ └── test2 │ └── test2 ├── test1_copy │ ├── file1 │ ├── sub_test1 │ │ ├── file1 │ │ ├── test1 │ │ │ ├── file1 │ │ │ ├── sub_test1 │ │ │ │ ├── file1 │ │ │ │ └── test2 │ │ │ └── test2 │ │ └── test2 │ └── test2 └── test2 18 directories, 10 files root@debase:/home/rz# mv test_dir/ test_dir_rename/ root@debase:/home/rz# tree . └── test_dir_rename ├── file1 ├── file2 └── test1 ├── file1 ├── sub_test1 │ ├── file1 │ ├── test1 │ │ ├── file1 │ │ ├── sub_test1 │ │ │ ├── file1 │ │ │ └── test2 │ │ └── test2 │ └── test2 ├── test1_copy │ ├── file1 │ ├── sub_test1 │ │ ├── file1 │ │ ├── test1 │ │ │ ├── file1 │ │ │ ├── sub_test1 │ │ │ │ ├── file1 │ │ │ │ └── test2 │ │ │ └── test2 │ │ └── test2 │ └── test2 └── test2 18 directories, 10 files - rm:删除命令;删除文件直接使用
rm 文件名,删除目录需添加-r参数递归删除(含目录下所有子目录和文件,如rm -r 目录名)root@debase:/home/rz# rm test_dir_rename/ rm: cannot remove 'test_dir_rename/': Is a directory root@debase:/home/rz# rm -r test_dir_rename/ root@debase:/home/rz# tree . 0 directories, 0 files root@debase:/home/rz# - ip addr:查看 IP 地址信息;可显示系统中所有网卡的 IP(如
lo网卡的 127.0.0.1 本地回环地址、ens33等实际网卡的局域网 / 公网地址)root@debase:/home/rz# ip addr 1: lo: <LOOPBACK,UP,LOWER_UP> mtu 65536 qdisc noqueue state UNKNOWN group default qlen 1000 link/loopback 00:00:00:00:00:00 brd 00:00:00:00:00:00 inet 127.0.0.1/8 scope host lo valid_lft forever preferred_lft forever inet6 ::1/128 scope host noprefixroute valid_lft forever preferred_lft forever 2: ens33: <BROADCAST,MULTICAST,UP,LOWER_UP> mtu 1500 qdisc fq_codel state UP group default qlen 1000 link/ether 00:0c:29:13:2f:f0 brd ff:ff:ff:ff:ff:ff altname enp2s1 inet 192.168.100.132/24 brd 192.168.100.255 scope global dynamic ens33 valid_lft 41451sec preferred_lft 41451sec inet6 240e:3a3:8822:3e12:20c:29ff:fe13:2ff0/64 scope global dynamic mngtmpaddr valid_lft 2459889sec preferred_lft 472689sec inet6 fe80::20c:29ff:fe13:2ff0/64 scope link valid_lft forever preferred_lft forever - grep:根据指定条件过滤信息,通常与管道符
|结合使用;管道符格式为 “命令 1 | 命令 2”,将命令 1 的输出作为命令 2 的输入root@debase:/home/rz# cat ~/.bashrc # ~/.bashrc: executed by bash(1) for non-login shells. # Note: PS1 and umask are already set in /etc/profile. You should not # need this unless you want different defaults for root. # PS1='${debian_chroot:+($debian_chroot)}\h:\w\$ ' # umask 022 # You may uncomment the following lines if you want `ls' to be colorized: alias ll='ls -alF' alias la='ls -A' alias l='ls -CF' if [ -n "$force_color_prompt" ]; then if [ -x /usr/bin/tput ] && tput setaf 1 >&/dev/null; then # We have color support; assume it's compliant with Ecma-48 # (ISO/IEC-6429). (Lack of such support is extremely rare, and such # a case would tend to support setf rather than setaf.) color_prompt=yes else color_prompt= fi fi root@debase:/home/rz# cat ~/.bashrc | grep alias alias ll='ls -alF' alias la='ls -A' alias l='ls -CF' root@debase:/home/rz# - history:显示用户在当前 shell 会话中执行过的命令历史记录;支持
!N(N 为命令序号)快速执行历史命令,可配置显示命令执行时间戳root@debase:/home/rz# history 1 apt update 2 apt install vim 3 vim /etc/ssh/sshd_config 4 vim /etc/ssh/sshd_config 5 systemctl daemon-reload 6 systemctl restart sshd 7 systemctl status sshd 8 exit 9 apt update 10 vim ~/.bashrc 11 vim ~/.bashrc 12 vim ~/.bashrc 13 ll 14 source ~/.bashrc 15 vim ~/.bashrc 16 cat ~/.bashrc 17 vim ~/.bashrc 18 source ~/.bashrc 19 ll 20 ll 21 ls -la 22 vim ~/.bashrc 23 source ~/.bashrc - 命令续行 \ 符:Linux 中用于将一条较长的命令分解为多行(每行末尾加
\),不改变命令功能,仅提升可读性root@debase:/home/rz# ping baidu.com PING baidu.com (39.156.70.37) 56(84) bytes of data. 64 bytes from 39.156.70.37 (39.156.70.37): icmp_seq=1 ttl=48 time=35.9 ms ^C --- baidu.com ping statistics --- 1 packets transmitted, 1 received, 0% packet loss, time 0ms rtt min/avg/max/mdev = 35.881/35.881/35.881/0.000 ms root@debase:/home/rz# ping \ > baidu.com PING baidu.com (220.181.7.203) 56(84) bytes of data. 64 bytes from 220.181.7.203 (220.181.7.203): icmp_seq=1 ttl=51 time=29.8 ms ^C --- baidu.com ping statistics --- 1 packets transmitted, 1 received, 0% packet loss, time 0ms rtt min/avg/max/mdev = 29.758/29.758/29.758/0.000 ms root@debase:/home/rz# Linux常用命令速览表:
| 命令 | 作用 |
|---|---|
ls | 列出目录下的文件与子目录,参数 |
cd | 切换目录 |
mkdir | 创建文件夹,参数 |
touch | 创建空文件或更新文件时间戳 |
tree | 以树形结构结构直接显示目录结构,参数 |
cp | 拷贝,参数 |
mv | 对文件或目录进行重命名或移动 |
rm | 删除,参数 |
ip addr | 查看 |
grep | 根据指定的条件进行过滤,从而显示信息,通常和管道符使用 |
history | 显示用户在当前 |
5、系统信息查看
- uname -a:查看系统内核和操作系统详细信息,包含内核版本、主机名、系统架构等(不直接显示发行版本号,但可通过内核版本大致判断发行版)
root@debase:/home/rz# uname -a Linux debase 6.1.0-40-amd64 #1 SMP PREEMPT_DYNAMIC Debian 6.1.153-1 (2025-09-20) x86_64 GNU/Linux root@debase:/home/rz# - cat /etc/os-release:读取包含操作系统发行版信息的文本文件,显示版本号、发行号、名称、ID 等关键信息
root@debase:/home/rz# cat /etc/os-release PRETTY_NAME="Debian GNU/Linux 12 (bookworm)" NAME="Debian GNU/Linux" VERSION_ID="12" VERSION="12 (bookworm)" VERSION_CODENAME=bookworm ID=debian HOME_URL="https://www.debian.org/" SUPPORT_URL="https://www.debian.org/support" BUG_REPORT_URL="https://bugs.debian.org/" root@debase:/home/rz# - cat /etc/issue:查看当前系统发行版本信息,通常包含登录欢迎信息
root@debase:/home/rz# cat /etc/issue Debian GNU/Linux 12 \n \l root@debase:/home/rz# - lsb_release -a:显示 Linux 发行版本详细信息,包括发行版本号、发行代号、发行说明等
root@debase:/home/rz# lsb_release -a
No LSB modules are available.
Distributor ID:	Debian
Description:	Debian GNU/Linux 12 (bookworm)
Release:	12
Codename:	bookworm
root@debase:/home/rz#
6、磁盘占用情况查看
使用df -h查看磁盘占用情况,特别是了解/dev/sda1主系统盘的磁盘占用情况。
root@debase:/home/rz# df -h
Filesystem      Size  Used Avail Use% Mounted on
udev            941M     0  941M   0% /dev
tmpfs           194M  732K  193M   1% /run
/dev/sda1        35G  1.8G   31G   6% /
tmpfs           966M     0  966M   0% /dev/shm
tmpfs           5.0M     0  5.0M   0% /run/lock
tmpfs           194M     0  194M   0% /run/user/1000
tmpfs           194M     0  194M   0% /run/user/0
root@debase:/home/rz#
7、系统关机与重启
# 关机
root@debase:/home/rz# poweroff

# 重启
root@debase:/home/rz# reboot
8、Vim编辑器基本使用
Vim避免了使用鼠标,以提高输入效率,甚至避免使用上下左右键从而避免过多的手指移动。这样的设计哲学使得Vim成为了一个能跟上创作者或使用者思维速度的编辑器。Vim的设计以用户大多数时间都花在阅读、浏览和进行少量编辑改动为前提,因此它具有多种操作模式:
| Vim 模式 | 核心功能 | 进入方式(从正常模式) | 退出方式 |
|---|---|---|---|
| 正常模式 | 移动光标,执行复制、删除、修改等基础操作,不直接输入文本 | Vim 启动默认进入 | 按 i/a/o 等进入其他模式 |
| 插入模式 | 插入文本,可在光标前后或新行中输入内容 | 按 i(光标前)、a(光标后)、o(新行)等 | 按 Esc 键返回正常模式 |
| 替换模式 | 替换文本,输入的字符直接覆盖光标所在位置的现有字符 | 按 R 键 | 按 Esc 键返回正常模式 |
| 可视化模式(一般) | 按字符选中文本块,选后可执行复制、删除、替换等操作 | 按 v 键 | 按 Esc 键返回正常模式 |
| 可视化模式(行) | 按行选中文本块,整行选中,适合批量处理多行内容 | 按 V(大写)键 | 按 Esc 键返回正常模式 |
| 可视化模式(块) | 按矩形块选中文本(如选中多列数据),支持列级操作(插入、删除、替换) | 按 Ctrl+v 组合键 | 按 Esc 键返回正常模式 |
| 命令模式 | 执行命令(如保存、退出、查找、替换、设置格式等) | 按 :(冒号)键 | 按 Enter 执行命令 /Esc 取消,返回正常模式 |
由于
正常模式、插入模式、命令模式已经可以满足日常绝大部分场景,因此相对复杂的替换模式与可视化模式根据28原则,将不作介绍,以简化、缩减读者的内容消化。
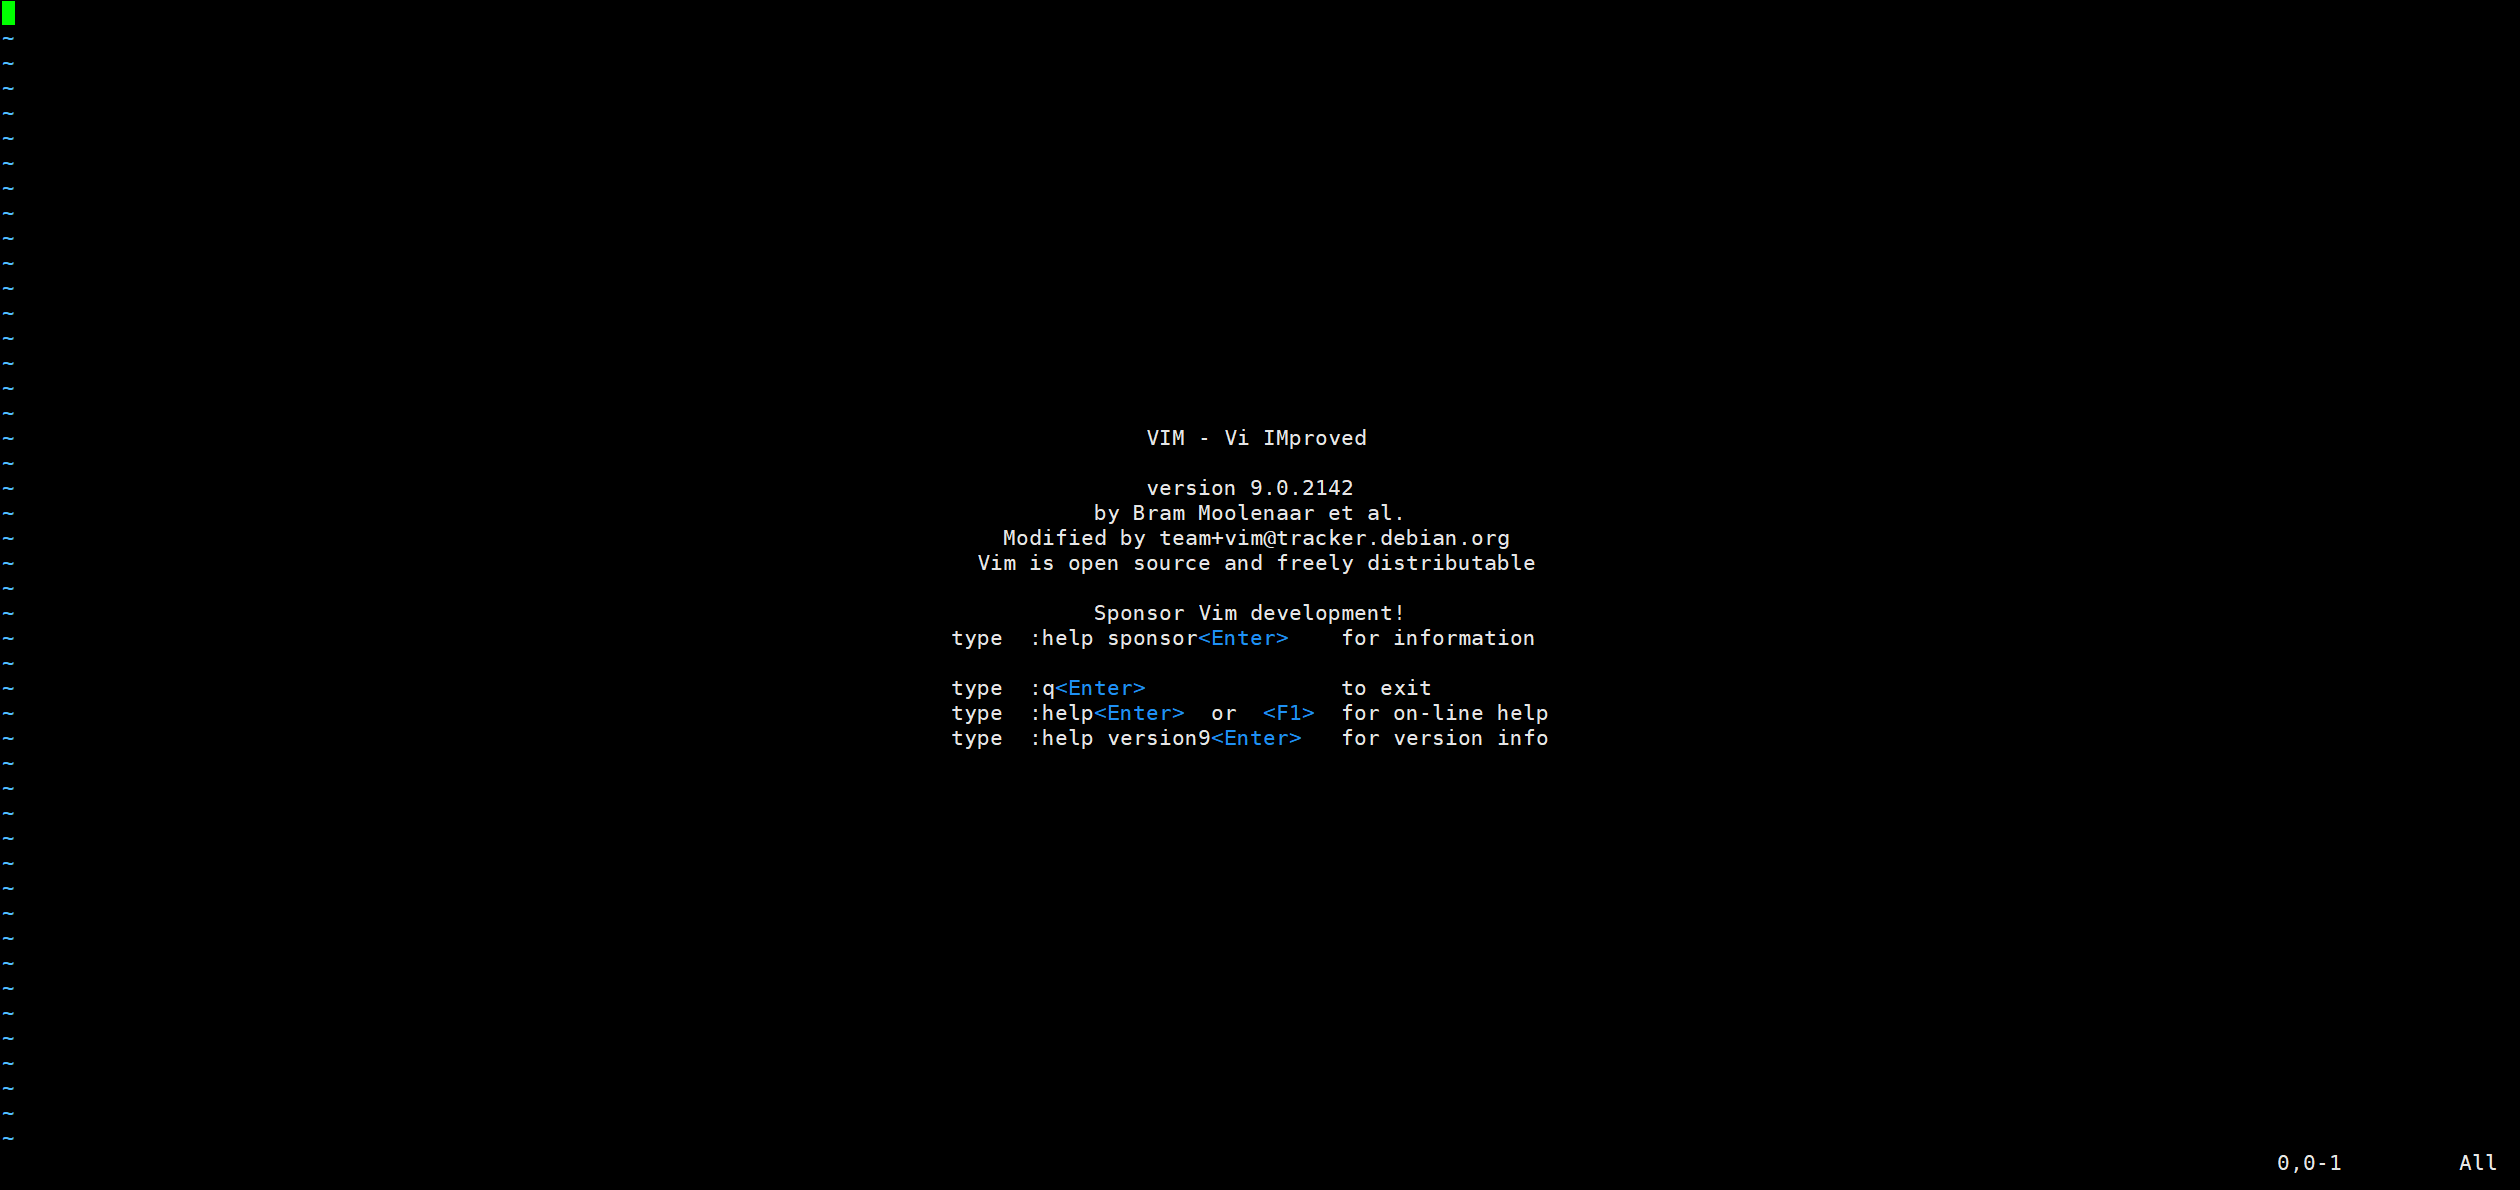
- Vim在各模式下均可以通过ESC 键切换回正常模式。单独使用vim命令不进行任何文件编辑时,其界面如下:
- 在正常模式下键入英文冒号:进入命令模式。在键入冒号:后,光标会立即跳到屏幕下方的命令行。这个模式下常用功能包括打开,保存,关闭文件,以及退出Vim。
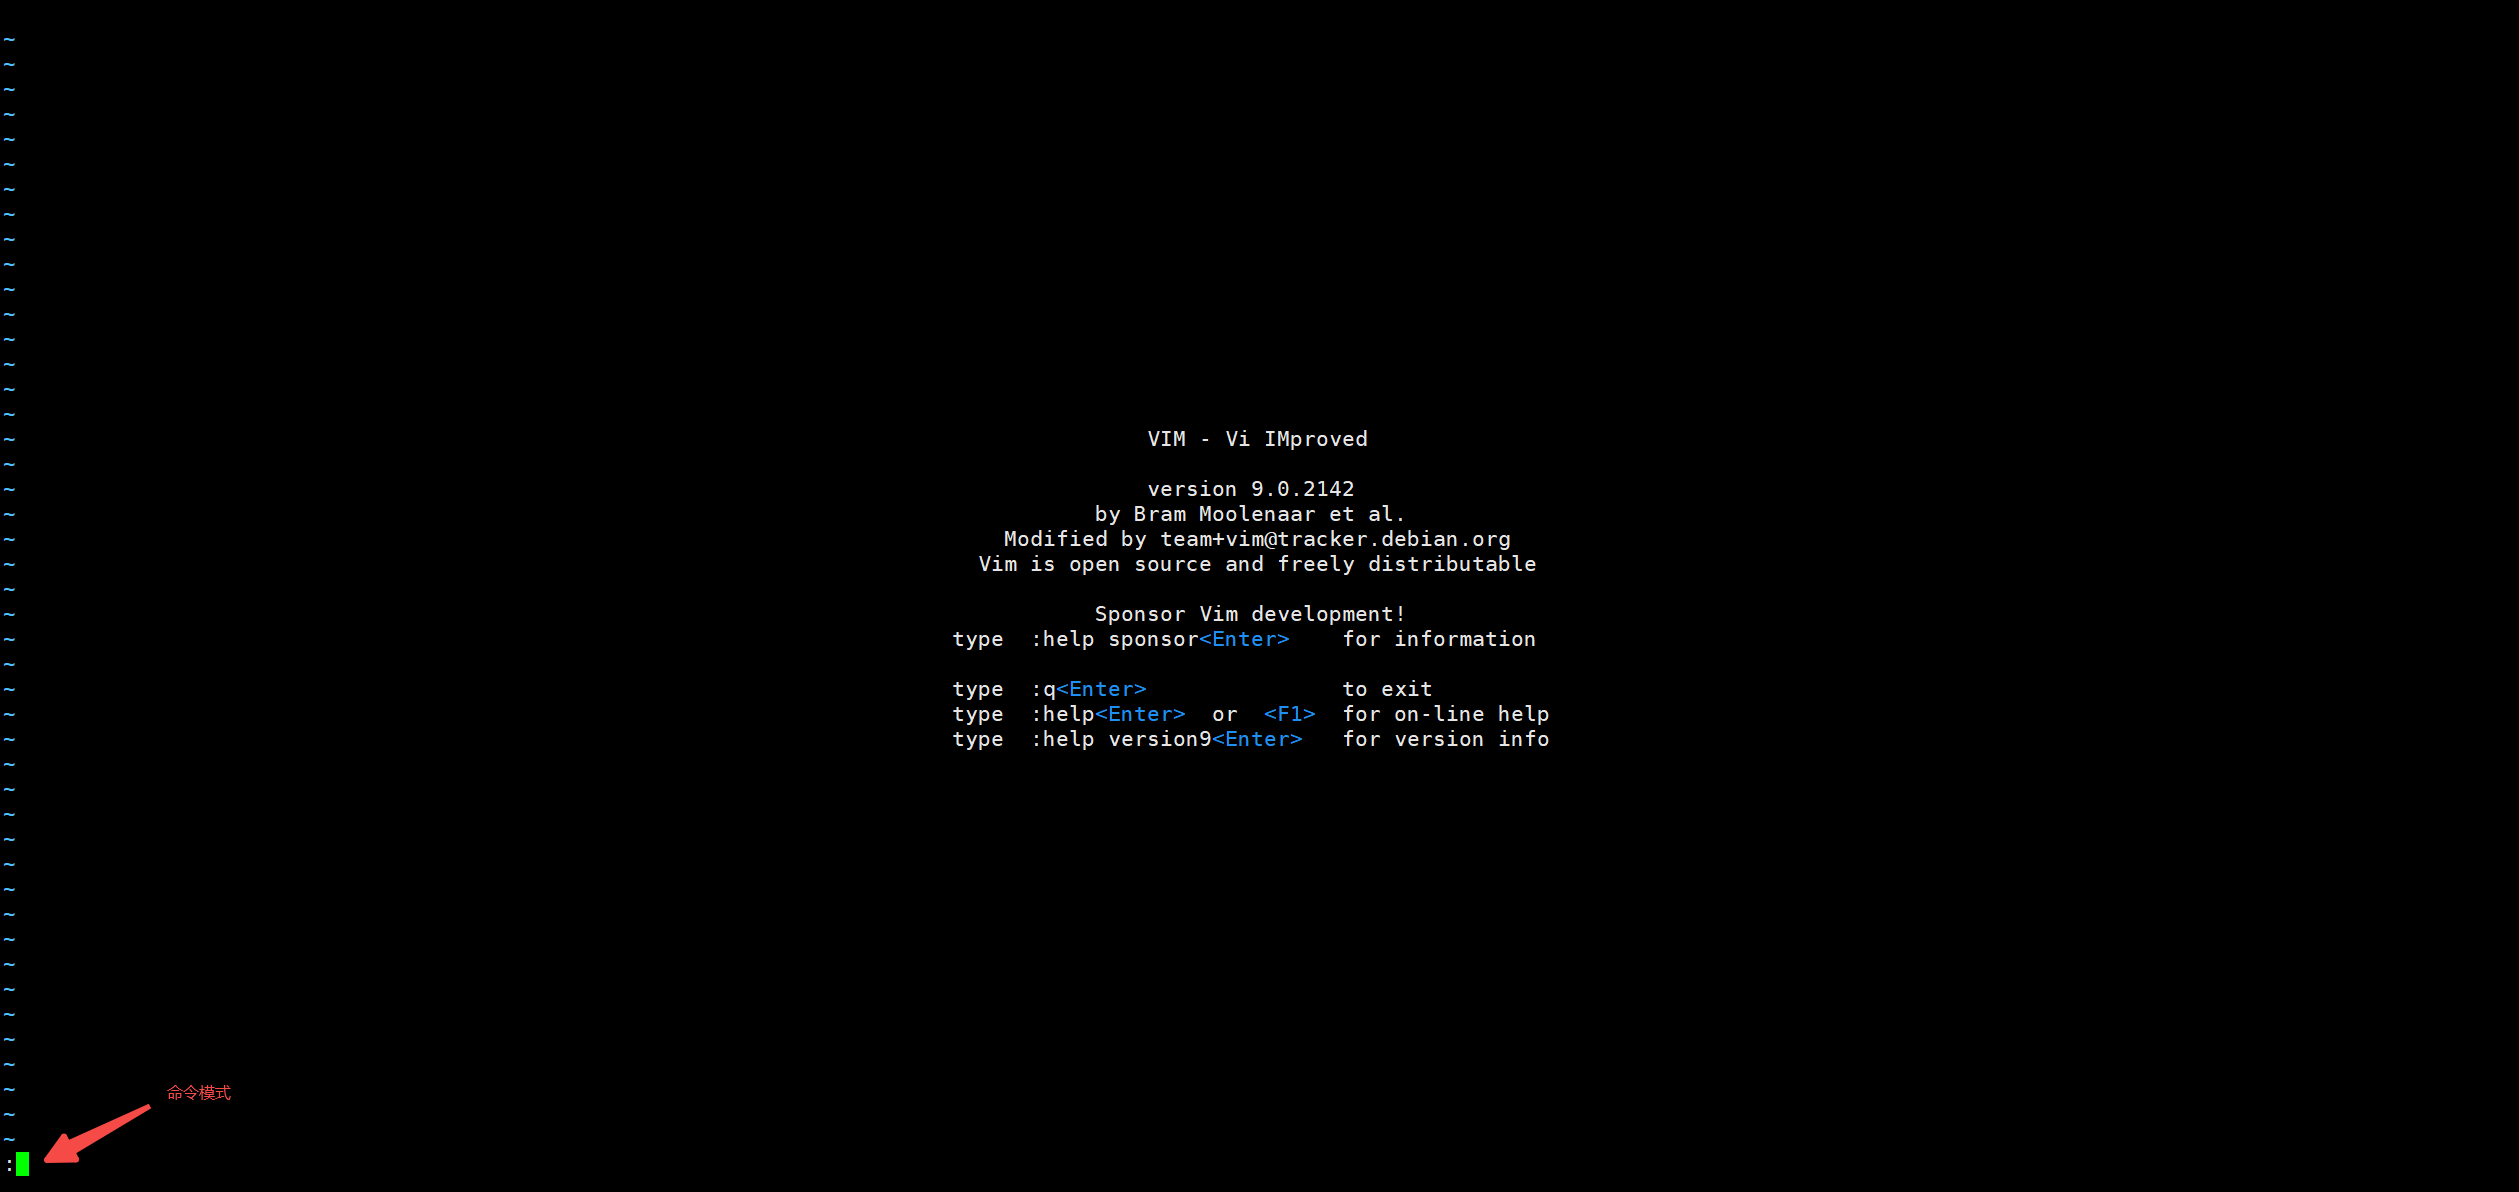
:q:退出(关闭窗口),若Vim编辑的文件内容发生变化,在未保存的情况下,强制退出需要使用:q!;
:w:保存(写);
:wq:保存并退出;
- 在正常模式下可以通过快捷按键高效移动光标
移动类型 操作命令 功能说明 基本移动 h光标向左移动 1 个字符 基本移动 j光标向下移动 1 行 基本移动 k光标向上移动 1 行 基本移动 l光标向右移动 1 个字符 按词移动 w光标向后移动 1 个完整的词(以空格 / 标点分隔) 按词移动 b光标向前移动至当前词或前一个词的开头(beginning) 按词移动 e光标向后移动至当前词或后一个词的结尾(ending) 行内移动 0(数字零)光标直接跳转至当前行的行首(包括空格) 行内移动 ^( caret 符号)光标跳转至当前行第一个非空格字符的位置 行内移动 $光标直接跳转至当前行的行尾 翻页移动 Ctrl+u向上翻一页(约半屏内容,具体取决于终端高度) 翻页移动 Ctrl+d向下翻一页(约半屏内容,具体取决于终端高度) 文件全局移动 gg光标直接跳转至整个文件的头部(第一行开头) 文件全局移动 G(大写)光标直接跳转至整个文件的尾部(最后一行开头) 指定行跳转 :{行号}<CR>(如:10<CR>)输入行号后按回车,光标跳转至指定行的开头(<CR> 代表回车键) 指定行跳转 :{行号}G(如10G)输入行号后按 G,光标跳转至指定行的开头(无需按回车,更简洁)内容搜索 :/{字符串}<CR>(如:/test<CR>)从当前位置向后搜索指定字符串,找到后光标跳转至第一个匹配结果处 搜索结果切换 n(小写)在搜索结果中,向前(顺着搜索方向)切换到下一个匹配项 搜索结果切换 N(大写)在搜索结果中,向后(逆着搜索方向)切换到上一个匹配项 - 在正常模式下可以通过快捷按键高效编辑文件内容
操作类型 操作命令 功能说明 进入插入模式 i(小写字母)从 Vim 正常模式进入插入模式,光标位置不变,后续输入的内容插入在光标前 插入新行 o(小写字母)在当前光标所在行的下方新建一行,并自动进入插入模式 插入新行 O(大写字母)在当前光标所在行的上方新建一行,并自动进入插入模式 按范围删除 d{移动命令}结合移动命令删除指定范围的内容, {移动命令}定义删除的长度 / 范围按范围删除 dw删除 “光标所在位置到当前单词词尾” 的内容(包含单词内的字符,不包含后续空格) 按范围删除 d$删除 “光标所在位置到当前行末尾” 的所有内容(包含光标处字符及行尾所有字符) 按范围删除 d0(数字零)删除 “光标所在位置到当前行开头” 的所有内容(包含光标处字符及行首所有字符) 单个字符删除 x(小写字母)直接删除光标当前所选中的单个字符 撤销与重做 u(小写字母)撤销上一步操作(可多次执行,恢复之前的编辑状态) 撤销与重做 Ctrl+r(组合键)重做被撤销的操作(恢复 “撤销前” 的状态,即取消上一次的撤销操作) Vim官方教程,可以在控制台中使用vimtutorroot@debase:/home/rz# vimtutor
三、实战:安装mariadb
1、认识apt
APT 全称为 Advanced Package Tool(高级包管理工具),是 Debian、Ubuntu 及其衍生系统(如 Linux Mint、Elementary OS)中默认的软件包管理工具。它的核心作用是帮助用户自动化处理软件的安装、升级、卸载,并解决软件之间的依赖关系,避免手动下载安装包时出现的 “缺依赖” 问题。
2、apt的核心优势
- 自动解决依赖:安装软件时,apt会自动识别并下载该软件所需的其他依赖包(比如安装 MariaDB 时需要的系统库)。
- 统一软件源:APT 通过 “软件源列表”(
/etc/apt/sources.list)从官方或第三方仓库获取软件,确保软件的安全性和兼容性。 - 简化操作:一条命令即可完成 “更新源、升级软件、安装软件” 等复杂流程,无需手动处理底层细节。
- apt与dpkg的关系:
- dpkg:是 Linux 底层的包管理工具,负责直接安装
.deb格式的软件包,但不处理依赖。 - apt:是基于 dpkg 的上层工具,通过调用 dpkg 实现软件管理,并额外解决了依赖问题。日常使用中,优先用 apt即可。
- dpkg:是 Linux 底层的包管理工具,负责直接安装
3、apt的常用命令(必学)
所有 APT 命令都需要 管理员权限(通过 sudo 前缀实现),以下是最常用的 5 类操作,直接复制命令到终端即可执行。
| 操作目的 | 命令格式 | 说明 |
|---|---|---|
| 更新软件源列表 | sudo apt update | 同步软件源仓库的最新信息(比如哪些软件有新版本),安装 / 升级前必执行。 |
| 升级已安装的软件 | sudo apt upgrade -y | 按照更新后的源列表,升级系统中所有可更新的软件;-y 表示自动确认升级。 |
| 安装指定软件 | sudo apt install -y [软件名] | 安装指定软件(如 sudo apt install -y mariadb-server 安装 MariaDB)。 |
| 卸载指定软件 | sudo apt remove -y [软件名] | 卸载软件,但保留配置文件;若需彻底删除配置,用 purge 代替 remove。 |
| 清理缓存的安装包 | sudo apt clean 或 sudo apt autoclean | 清理系统中缓存的 .deb 安装包,释放磁盘空间(前者清理全部,后者保留近期)。 |
4、查看mariadb版本号
# 更新apt
root@debase:/home/rz# apt update
Hit:1 http://mirrors.tuna.tsinghua.edu.cn/debian bookworm InRelease
Hit:2 http://mirrors.tuna.tsinghua.edu.cn/debian bookworm-updates InRelease
Hit:3 http://security.debian.org/debian-security bookworm-security InRelease
Reading package lists... Done
Building dependency tree... Done
Reading state information... Done
All packages are up to date.

# 查看软件版本
root@debase:/home/rz# apt-cache madison mariadb-server
mariadb-server | 1:10.11.14-0+deb12u2 | http://mirrors.tuna.tsinghua.edu.cn/debian bookworm/main amd64 Packages
   mariadb | 1:10.11.14-0+deb12u2 | http://mirrors.tuna.tsinghua.edu.cn/debian bookworm/main Sources
5、安装mariadb
安装mariadb-server,将自动安装mariadb-client,Debian 12中包含的MariaDB仅包含一版,因此安装时也可以不指定版本号,直接使用apt install mariadb-server即可。
apt install mariadb-server -y6、查看服务状态
oot@debase:/home/rz# systemctl status mariadb
● mariadb.service - MariaDB 10.11.14 database server
     Loaded: loaded (/lib/systemd/system/mariadb.service; enabled; preset: enabled)
     Active: active (running) since Tue 2025-09-30 10:07:01 CST; 24s ago
       Docs: man:mariadbd(8)
             https://mariadb.com/kb/en/library/systemd/
   Main PID: 2793 (mariadbd)
     Status: "Taking your SQL requests now..."
      Tasks: 13 (limit: 14902)
     Memory: 112.2M
        CPU: 414ms
     CGroup: /system.slice/mariadb.service
             └─2793 /usr/sbin/mariadbd

Sep 30 10:07:01 debase mariadbd[2793]: 2025-09-30 10:07:01 0 [Note] Plugin 'FEEDBACK' is disabled.
Sep 30 10:07:01 debase mariadbd[2793]: 2025-09-30 10:07:01 0 [Warning] You need to use --log-bin to make --expire-logs-days or --binlog-expire-logs-seconds work.
Sep 30 10:07:01 debase mariadbd[2793]: 2025-09-30 10:07:01 0 [Note] Server socket created on IP: '127.0.0.1', port: '3306'.
Sep 30 10:07:01 debase mariadbd[2793]: 2025-09-30 10:07:01 0 [Note] InnoDB: Buffer pool(s) load completed at 250930 10:07:01
Sep 30 10:07:01 debase mariadbd[2793]: 2025-09-30 10:07:01 0 [Note] /usr/sbin/mariadbd: ready for connections.
Sep 30 10:07:01 debase mariadbd[2793]: Version: '10.11.14-MariaDB-0+deb12u2'  socket: '/run/mysqld/mysqld.sock'  port: 3306  Debian 12
Sep 30 10:07:01 debase systemd[1]: Started mariadb.service - MariaDB 10.11.14 database server.
Sep 30 10:07:01 debase /etc/mysql/debian-start[2809]: Upgrading MySQL tables if necessary.
Sep 30 10:07:01 debase /etc/mysql/debian-start[2820]: Checking for insecure root accounts.
Sep 30 10:07:01 debase /etc/mysql/debian-start[2824]: Triggering myisam-recover for all MyISAM tables and aria-recover for all Aria tables
root@debase:/home/rz# 若希望禁止MariaDB服务开机启动,则可以使用systemctl disable命令禁止开机服务启动,反之使用systemctl enable
7、如何使用mariadb
在使用之前,需要对MariaDB数据库进行初始化相关操作,MariaDB提供了mariadb-secure-installation命令,实现安全配置,除了设置密码,其余全部默认即可完成配置
root@debase:/home/rz# mariadb-secure-installation

NOTE: RUNNING ALL PARTS OF THIS SCRIPT IS RECOMMENDED FOR ALL MariaDB
      SERVERS IN PRODUCTION USE!  PLEASE READ EACH STEP CAREFULLY!

In order to log into MariaDB to secure it, we'll need the current
password for the root user. If you've just installed MariaDB, and
haven't set the root password yet, you should just press enter here.

Enter current password for root (enter for none):
OK, successfully used password, moving on...

Setting the root password or using the unix_socket ensures that nobody
can log into the MariaDB root user without the proper authorisation.

You already have your root account protected, so you can safely answer 'n'.

Switch to unix_socket authentication [Y/n]
Enabled successfully!
Reloading privilege tables..
 ... Success!


You already have your root account protected, so you can safely answer 'n'.

Change the root password? [Y/n]
New password:
Re-enter new password:
Password updated successfully!
Reloading privilege tables..
 ... Success!


By default, a MariaDB installation has an anonymous user, allowing anyone
to log into MariaDB without having to have a user account created for
them.  This is intended only for testing, and to make the installation
go a bit smoother.  You should remove them before moving into a
production environment.

Remove anonymous users? [Y/n]
 ... Success!

Normally, root should only be allowed to connect from 'localhost'.  This
ensures that someone cannot guess at the root password from the network.

Disallow root login remotely? [Y/n]
 ... Success!

By default, MariaDB comes with a database named 'test' that anyone can
access.  This is also intended only for testing, and should be removed
before moving into a production environment.

Remove test database and access to it? [Y/n]
 - Dropping test database...
 ... Success!
 - Removing privileges on test database...
 ... Success!

Reloading the privilege tables will ensure that all changes made so far
will take effect immediately.

Reload privilege tables now? [Y/n]
 ... Success!

Cleaning up...

All done!  If you've completed all of the above steps, your MariaDB
installation should now be secure.

Thanks for using MariaDB!
root@debase:/home/rz# mariadb -h 127.0.0.1 -uroot -p
Enter password:
Welcome to the MariaDB monitor.  Commands end with ; or \g.
Your MariaDB connection id is 51
Server version: 10.11.14-MariaDB-0+deb12u2 Debian 12

Copyright (c) 2000, 2018, Oracle, MariaDB Corporation Ab and others.

Type 'help;' or '\h' for help. Type '\c' to clear the current input statement.

MariaDB [(none)]> show databases;
+--------------------+
| Database           |
+--------------------+
| information_schema |
| mysql              |
| performance_schema |
| sys                |
+--------------------+
4 rows in set (0.001 sec)

MariaDB [(none)]>
四、总结与预告
1、下节课程预告
每天半小时,轻松学Docker第三篇:Docker 27.4.1部署与配置

码道开发者社区,聚焦华为云码道 CodeArts 代码智能体,沉淀 Agent、Skill、鸿蒙开发实战内容,供开发者查阅资料、交流技术、分享工程实践
更多推荐


 23
23 0
0- 0


 已为社区贡献23条内容

所有评论(0)